Introducing the Embedding Function: How Milvus 2.6 Streamlines Vectorization and Semantic Search
If you’ve ever built a vector search application, you already know the workflow a little too well. Before any data can be stored, it must first be transformed into vectors using an embedding model, cleaned and formatted, and then finally ingested into your vector database. Every query goes through the same process as well: embed the input, run a similarity search, then map the resulting IDs back to your original documents or records. It works — but it creates a distributed tangle of preprocessing scripts, embedding pipelines, and glue code that you have to maintain.
Milvus, a high-performance open-source vector database, now takes a major step toward simplifying all of that. Milvus 2.6 introduces the Data-in, Data-out feature (also known as the Embedding Function), a built-in embedding capability that connects directly to major model providers such as OpenAI, AWS Bedrock, Google Vertex AI, and Hugging Face. Instead of managing your own embedding infrastructure, Milvus can now call these models for you. You can also insert and query using raw text — and soon other data types — while Milvus automatically handles vectorization at write and query time.
In the rest of this post, we’ll take a closer look at how Data-in, Data-out works under the hood, how to configure providers and embedding functions, and how you can use it to streamline your vector search workflows end-to-end.
What is Data-in, Data-out?
Data-in, Data-out in Milvus 2.6 is built on the new Function module — a framework that enables Milvus to handle data transformation and embedding generation internally, without any external preprocessing services. (You can follow the design proposal in GitHub issue #35856.) With this module, Milvus can take raw input data, call an embedding provider directly, and automatically write the resulting vectors into your collection.
At a high level, the Function module turns embedding generation into a native database capability. Instead of running separate embedding pipelines, background workers, or reranker services, Milvus now sends requests to your configured provider, retrieves embeddings, and stores them alongside your data — all inside the ingestion path. This removes the operational overhead of managing your own embedding infrastructure.
Data-in, Data-out introduces three major improvements to the Milvus workflow:
Insert raw data directly – You can now insert unprocessed text, images, or other data types directly into Milvus. No need to convert them into vectors in advance.
Configure one embedding function – Once you configure an embedding model in Milvus, it automatically manages the entire embedding process. Milvus integrates seamlessly with a range of model providers, including OpenAI, AWS Bedrock, Google Vertex AI, Cohere, and Hugging Face.
Query with raw inputs – You can now perform semantic search using raw text or other content-based queries. Milvus uses the same configured model to generate embeddings on the fly, perform similarity search, and return relevant results.
In short, Milvus now automatically embeds — and optionally reranks — your data. Vectorization becomes a built-in database function, eliminating the need for external embedding services or custom preprocessing logic.
How Data-in, Data-out Works
The diagram below illustrates how Data-in, Data-out operates inside Milvus.
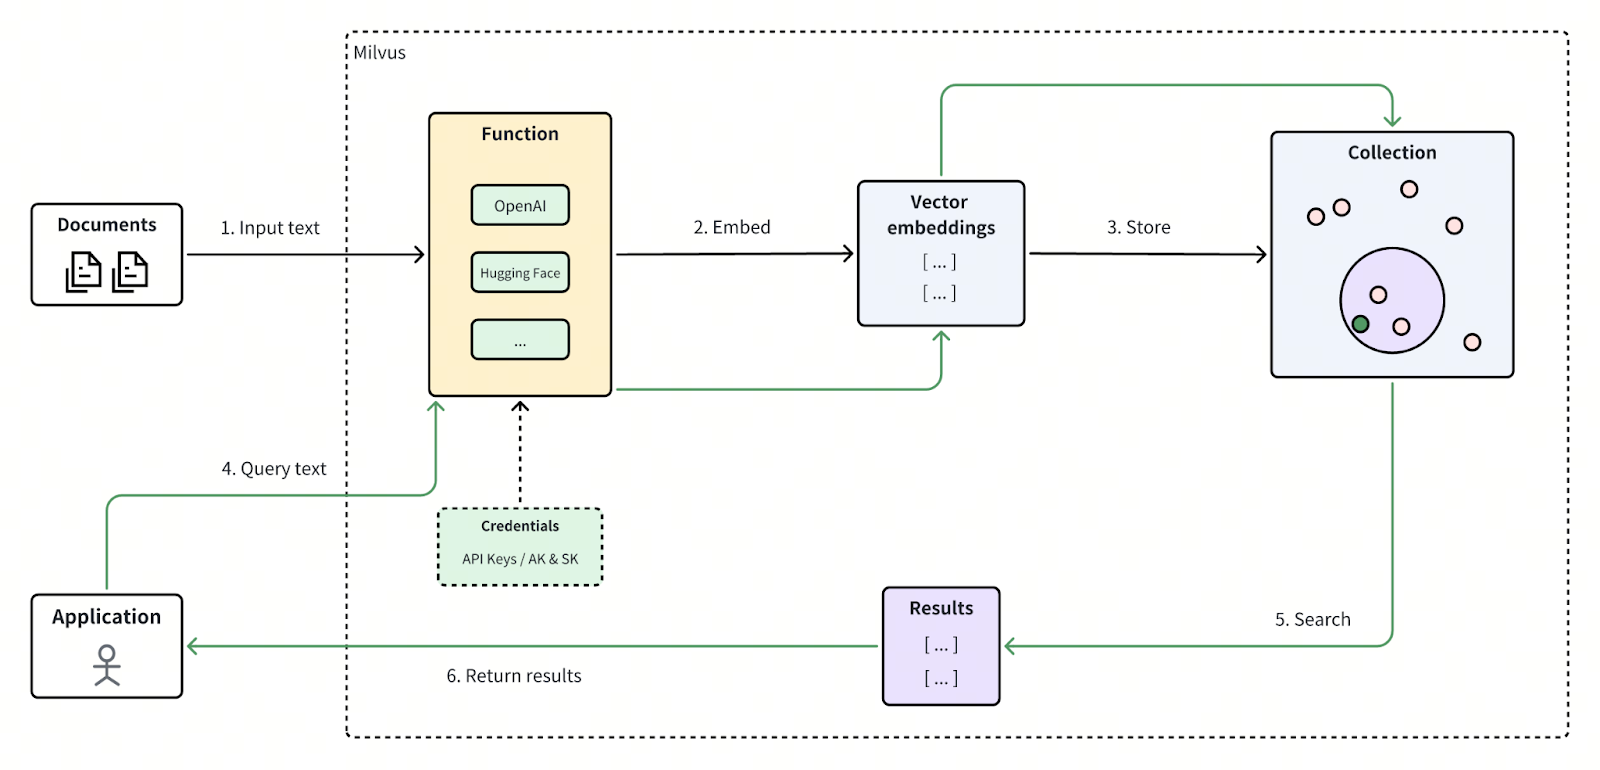
The Data-in, Data-out workflow can be broken down into six main steps:
Input Data – The user inserts raw data — such as text, images, or other content types — directly into Milvus without performing any external preprocessing.
Generate Embeddings – The Function module automatically invokes the configured embedding model through its third-party API, converting the raw input into vector embeddings in real time.
Store Embeddings – Milvus writes the generated embeddings into the designated vector field within your collection, where they become available for similarity search operations.
Submit a Query – The user issues a raw-text or content-based query to Milvus, just as with the input stage.
Semantic Search – Milvus embeds the query using the same configured model, runs a similarity search over the stored vectors, and determines the closest semantic matches.
Return Results – Milvus returns the top-k most similar results — mapped back to their original data — directly to the application.
How to Configure Data-in, Data-out
Prerequisites
Install the latest version of Milvus 2.6.
Prepare your embedding API key from a supported provider (e.g., OpenAI, AWS Bedrock, or Cohere). In this example, we’ll use Cohere as the embedding provider.
Modify the milvus.yaml Configuration
If you are running Milvus with Docker Compose, you’ll need to modify the milvus.yaml file to enable the Function module. You can refer to the official documentation for guidance: Configure Milvus with Docker Compose (Instructions for other deployment methods can also be found here).
In the configuration file, locate the sections credential and function.
Then, update the fields apikey1.apikey and providers.cohere.
...
credential:
  aksk1:
    access_key_id:  # Your access_key_id
    secret_access_key:  # Your secret_access_key
  apikey1:
    apikey: "***********************" # Edit this section
  gcp1:
    credential_json:  # base64 based gcp credential data
# Any configuration related to functions
function:
  textEmbedding:
    providers:
                        ...
      cohere: # Edit the section below
        credential:  apikey1 # The name in the crendential configuration item
        enable: true # Whether to enable cohere model service
        url:  "https://api.cohere.com/v2/embed" # Your cohere embedding url, Default is the official embedding url
      ...
...
Once you’ve made these changes, restart Milvus to apply the updated configuration.
How to Use the Data-in, Data-out Feature
1. Define the Schema for the Collection
To enable the embedding feature, your collection schema must include at least three fields:
Primary key field (
id) – Uniquely identifies each entity in the collection.Scalar field (
document) – Stores the original raw data.Vector field (
dense) – Stores the generated vector embeddings.
from pymilvus import MilvusClient, DataType, Function, FunctionType
# Initialize Milvus client
client = MilvusClient(
    uri="http://localhost:19530",
)
# Create a new schema for the collection
schema = client.create_schema()
# Add primary field "id"
schema.add_field("id", DataType.INT64, is_primary=True, auto_id=False)
# Add scalar field "document" for storing textual data
schema.add_field("document", DataType.VARCHAR, max_length=9000)
# Add vector field "dense" for storing embeddings.
# IMPORTANT: Set `dim` to match the exact output dimension of the embedding model.
# For instance, OpenAI's text-embedding-3-small model outputs 1536-dimensional vectors.
# For dense vector, data type can be FLOAT_VECTOR or INT8_VECTOR
schema.add_field("dense", DataType.FLOAT_VECTOR, dim=1536) # Set dim according to the embedding model you use.
2. Define the Embedding Function
Next, define the embedding function in the schema.
name– A unique identifier for the function.function_type– Set toFunctionType.TEXTEMBEDDINGfor text embeddings. Milvus also supports other function types such asFunctionType.BM25andFunctionType.RERANK. See Full Text Search and Decay Ranker Overview for more details.input_field_names– Defines the input field for raw data (document).output_field_names– Defines the output field where the vector embeddings will be stored (dense).params– Contains configuration parameters for the embedding function. The values forproviderandmodel_namemust match the corresponding entries in yourmilvus.yamlconfiguration file.
Note: Each function must have a unique name and output_field_names to distinguish different transformation logics and prevent conflicts.
# Define embedding function (example: OpenAI provider)
text_embedding_function = Function(
    name="cohere_embedding",                  # Unique identifier for this embedding function
    function_type=FunctionType.TEXTEMBEDDING, # Type of embedding function
    input_field_names=["document"],           # Scalar field to embed
    output_field_names=["dense"],             # Vector field to store embeddings
    params={                                  # Provider-specific configuration (highest priority)
        "provider": "cohere",                 # Embedding model provider
        "model_name": "embed-v4.0",     # Embedding model
        # "credential": "apikey1",            # Optional: Credential label
        # Optional parameters:
        # "dim": "1536",       # Optionally shorten the vector dimension
        # "user": "user123"    # Optional: identifier for API tracking
    }
)
# Add the embedding function to your schema
schema.add_function(text_embedding_function)
3. Configure the Index
Once the fields and functions are defined, create an index for the collection. For simplicity, we use the AUTOINDEX type here as an example.
# Prepare index parameters
index_params = client.prepare_index_params()
# Add AUTOINDEX to automatically select optimal indexing method
index_params.add_index(
    field_name="dense",
    index_type="AUTOINDEX",
    metric_type="COSINE"
)
4. Create the Collection
Use the defined schema and index to create a new collection. In this example, we’ll create a collection named Demo.
# Create collection named "demo"
client.create_collection(
    collection_name='demo',
    schema=schema,
    index_params=index_params
)
5. Insert Data
Now you can insert raw data directly into Milvus — there’s no need to generate embeddings manually.
# Insert sample documents
client.insert('demo', [
    {'id': 1, 'document': 'Milvus simplifies semantic search through embeddings.'},
    {'id': 2, 'document': 'Vector embeddings convert text into searchable numeric data.'},
    {'id': 3, 'document': 'Semantic search helps users find relevant information quickly.'},
])
6. Perform Vector Search
After inserting data, you can perform searches directly using raw text queries. Milvus automatically converts your query into an embedding, perform similarity search against stored vectors, and return the top matches.
# Perform semantic search
results = client.search(
    collection_name='demo',
    data=['How does Milvus handle semantic search?'], # Use text query rather than query vector
    anns_field='dense',   # Use the vector field that stores embeddings
    limit=1,
    output_fields=['document'],
)
print(results)
# Example output:
# data: ["[{'id': 1, 'distance': 0.8821347951889038, 'entity': {'document': 'Milvus simplifies semantic search through embeddings.'}}]"]
For more details on vector search, see: Basic Vector Search and Query API.
Get Started with Milvus 2.6
With Data-in, Data-out, Milvus 2.6 takes vector search simplicity to the next level. By integrating embedding and reranking functions directly within Milvus, you no longer need to manage external preprocessing or maintain separate embedding services.
Ready to try it out? Install Milvus 2.6 today and experience the power of Data-in, Data-out for yourself.
Have questions or want a deep dive on any feature? Join our Discord channel or file issues on GitHub. You can also book a 20-minute one-on-one session to get insights, guidance, and answers to your questions through Milvus Office Hours.
Learn More about Milvus 2.6 Features
Introducing Milvus 2.6: Affordable Vector Search at Billion Scale
JSON Shredding in Milvus: 88.9x Faster JSON Filtering with Flexibility
Unlocking True Entity-Level Retrieval: New Array-of-Structs and MAX_SIM Capabilities in Milvus
MinHash LSH in Milvus: The Secret Weapon for Fighting Duplicates in LLM Training Data
Bring Vector Compression to the Extreme: How Milvus Serves 3× More Queries with RaBitQ
Vector Search in the Real World: How to Filter Efficiently Without Killing Recall
- What is Data-in, Data-out?
- How Data-in, Data-out Works
- How to Configure Data-in, Data-out
- Prerequisites
- Modify the milvus.yaml Configuration
- How to Use the Data-in, Data-out Feature
- 1. Define the Schema for the Collection
- 2. Define the Embedding Function
- 3. Configure the Index
- 4. Create the Collection
- 5. Insert Data
- 6. Perform Vector Search
- Get Started with Milvus 2.6
- Learn More about Milvus 2.6 Features
On This Page
Try Managed Milvus for Free
Zilliz Cloud is hassle-free, powered by Milvus and 10x faster.
Get StartedLike the article? Spread the word