Using Full-Text Search with LangChain and Milvus
![]()
Full-text search is a traditional method for retrieving documents by matching specific keywords or phrases in the text. It ranks results based on relevance scores calculated from factors like term frequency. While semantic search is better at understanding meaning and context, full-text search excels at precise keyword matching, making it a useful complement to semantic search. The BM25 algorithm is widely used for ranking in full-text search and plays a key role in Retrieval-Augmented Generation (RAG).
Milvus 2.5 introduces native full-text search capabilities using BM25. This approach converts text into sparse vectors that represent BM25 scores. You can simply input raw text and Milvus will automatically generate and store the sparse vectors, with no manual sparse embedding generation required.
LangChain’s integration with Milvus has also introduced this feature, simplifying the process of incorporating full-text search into RAG applications. By combining full-text search with semantic search with dense vectors, you can achieve a hybrid approach that leverages both semantic context from dense embeddings and precise keyword relevance from word matching. This integration enhances the accuracy, relevance, and user experience of search systems.
This tutorial will show how to use LangChain and Milvus to implement full-text search in your application.
- Full-text search is currently available in Milvus Standalone, Milvus Distributed, and Zilliz Cloud, though not yet supported in Milvus Lite (which has this feature planned for future implementation). Reach out support@zilliz.com for more information.
- Before proceeding with this tutorial, ensure you have a basic understanding of full-text search and the basic usage of LangChain Milvus integration.
Prerequisites
Before running this notebook, make sure you have the following dependencies installed:
$ pip install --upgrade --quiet langchain langchain-core langchain-community langchain-text-splitters langchain-milvus langchain-openai bs4 #langchain-voyageai
If you are using Google Colab, to enable dependencies just installed, you may need to restart the runtime (click on the “Runtime” menu at the top of the screen, and select “Restart session” from the dropdown menu).
We will use the models from OpenAI. You should prepare the environment variables OPENAI_API_KEY from OpenAI.
import os

os.environ["OPENAI_API_KEY"] = "sk-***********"
Specify your Milvus server URI (and optionally the TOKEN). For how to install and start the Milvus server following this guide.
URI = "http://localhost:19530"
# TOKEN = ...
Prepare some examples documents:
from langchain_core.documents import Document

docs = [
    Document(page_content="I like this apple", metadata={"category": "fruit"}),
    Document(page_content="I like swimming", metadata={"category": "sport"}),
    Document(page_content="I like dogs", metadata={"category": "pets"}),
]
Initialization with BM25 Function
Hybrid Search
For full-text search Milvus VectorStore accepts a builtin_function parameter. Through this parameter, you can pass in an instance of the BM25BuiltInFunction. This is different than semantic search which usually passes dense embeddings to the VectorStore,
Here is a simple example of hybrid search in Milvus with OpenAI dense embedding for semantic search and BM25 for full-text search:
from langchain_milvus import Milvus, BM25BuiltInFunction
from langchain_openai import OpenAIEmbeddings


vectorstore = Milvus.from_documents(
    documents=docs,
    embedding=OpenAIEmbeddings(),
    builtin_function=BM25BuiltInFunction(),
    # `dense` is for OpenAI embeddings, `sparse` is the output field of BM25 function
    vector_field=["dense", "sparse"],
    connection_args={
        "uri": URI,
    },
    drop_old=False,
)
In the code above, we define an instance of BM25BuiltInFunction and pass it to the Milvus object. BM25BuiltInFunction is a lightweight wrapper class for Function in Milvus.
You can specify the input and output fields for this function in the parameters of the BM25BuiltInFunction:
input_field_names(str): The name of the input field, default istext. It indicates which field this function reads as input.output_field_names(str): The name of the output field, default issparse. It indicates which field this function outputs the computed result to.
Note that in the Milvus initialization parameters mentioned above, we also specify vector_field=["dense", "sparse"]. Since the sparse field is taken as the output field defined by the BM25BuiltInFunction, the other dense field will be automatically assigned to the output field of OpenAIEmbeddings.
In practice, especially when combining multiple embeddings or functions, we recommend explicitly specifying the input and output fields for each function to avoid ambiguity.
In the following example, we specify the input and output fields of BM25BuiltInFunction explicitly, making it clear which field the built-in function is for.
# from langchain_voyageai import VoyageAIEmbeddings

embedding1 = OpenAIEmbeddings(model="text-embedding-ada-002")
embedding2 = OpenAIEmbeddings(model="text-embedding-3-large")
# embedding2 = VoyageAIEmbeddings(model="voyage-3")  # You can also use embedding from other embedding model providers, e.g VoyageAIEmbeddings


vectorstore = Milvus.from_documents(
    documents=docs,
    embedding=[embedding1, embedding2],
    builtin_function=BM25BuiltInFunction(
        input_field_names="text", output_field_names="sparse"
    ),
    text_field="text",  # `text` is the input field name of BM25BuiltInFunction
    # `sparse` is the output field name of BM25BuiltInFunction, and `dense1` and `dense2` are the output field names of embedding1 and embedding2
    vector_field=["dense1", "dense2", "sparse"],
    connection_args={
        "uri": URI,
    },
    drop_old=False,
)

vectorstore.vector_fields
['dense1', 'dense2', 'sparse']
In this example, we have three vector fields. Among them, sparse is used as the output field for BM25BuiltInFunction, while the other two, dense1 and dense2, are automatically assigned as the output fields for the two OpenAIEmbeddings models (based on the order).
In this way, you can define multiple vector fields and assign different combinations of embeddings or functions to them, to implement hybrid search.
When performing hybrid search, we just need to pass in the query text and optionally set the topK and reranker parameters. The vectorstore instance will automatically handle the vector embeddings and built-in functions and finally use a reranker to refine the results. The underlying implementation details of the searching process are hidden from the user.
vectorstore.similarity_search(
    "Do I like apples?", k=1
)  # , ranker_type="weighted", ranker_params={"weights":[0.3, 0.3, 0.4]})
[Document(metadata={'category': 'fruit', 'pk': 454646931479251897}, page_content='I like this apple')]
For more information about hybrid search, you can refer to the Hybrid Search introduction and this LangChain Milvus hybrid search tutorial .
BM25 search without embedding
If you want to perform only full-text search with BM25 function without using any embedding-based semantic search, you can set the embedding parameter to None and keep only the builtin_function specified as the BM25 function instance. The vector field only has “sparse” field. For example:
vectorstore = Milvus.from_documents(
    documents=docs,
    embedding=None,
    builtin_function=BM25BuiltInFunction(
        output_field_names="sparse",
    ),
    vector_field="sparse",
    connection_args={
        "uri": URI,
    },
    drop_old=False,
)

vectorstore.vector_fields
['sparse']
Customize analyzer
Analyzers are essential in full-text search by breaking the sentence into tokens and performing lexical analysis like stemming and stop word removal. Analyzers are usually language-specific. You can refer to this guide to learn more about analyzers in Milvus.
Milvus supports two types of analyzers: Built-in Analyzers and Custom Analyzers. By default, the BM25BuiltInFunction will use the standard built-in analyzer, which is the most basic analyzer that tokenizes the text with punctuation.
If you want to use a different analyzer or customize the analyzer, you can pass in the analyzer_params parameter in the BM25BuiltInFunction initialization.
analyzer_params_custom = {
    "tokenizer": "standard",
    "filter": [
        "lowercase",  # Built-in filter
        {"type": "length", "max": 40},  # Custom filter
        {"type": "stop", "stop_words": ["of", "to"]},  # Custom filter
    ],
}


vectorstore = Milvus.from_documents(
    documents=docs,
    embedding=OpenAIEmbeddings(),
    builtin_function=BM25BuiltInFunction(
        output_field_names="sparse",
        enable_match=True,
        analyzer_params=analyzer_params_custom,
    ),
    vector_field=["dense", "sparse"],
    connection_args={
        "uri": URI,
    },
    drop_old=False,
)
We can take a look at the schema of the Milvus collection and make sure the customized analyzer is set up correctly.
vectorstore.col.schema
{'auto_id': True, 'description': '', 'fields': [{'name': 'text', 'description': '', 'type': <DataType.VARCHAR: 21>, 'params': {'max_length': 65535, 'enable_match': True, 'enable_analyzer': True, 'analyzer_params': {'tokenizer': 'standard', 'filter': ['lowercase', {'type': 'length', 'max': 40}, {'type': 'stop', 'stop_words': ['of', 'to']}]}}}, {'name': 'pk', 'description': '', 'type': <DataType.INT64: 5>, 'is_primary': True, 'auto_id': True}, {'name': 'dense', 'description': '', 'type': <DataType.FLOAT_VECTOR: 101>, 'params': {'dim': 1536}}, {'name': 'sparse', 'description': '', 'type': <DataType.SPARSE_FLOAT_VECTOR: 104>, 'is_function_output': True}, {'name': 'category', 'description': '', 'type': <DataType.VARCHAR: 21>, 'params': {'max_length': 65535}}], 'enable_dynamic_field': False, 'functions': [{'name': 'bm25_function_de368e79', 'description': '', 'type': <FunctionType.BM25: 1>, 'input_field_names': ['text'], 'output_field_names': ['sparse'], 'params': {}}]}
For more concept details, e.g., analyzer, tokenizer, filter, enable_match, analyzer_params, please refer to the analyzer documentation.
Using Hybrid Search and Reranking in RAG
We have learned how to use the basic BM25 build-in function in LangChain and Milvus. Let’s introduce an optimized RAG implementation with hybrid search and reranking.
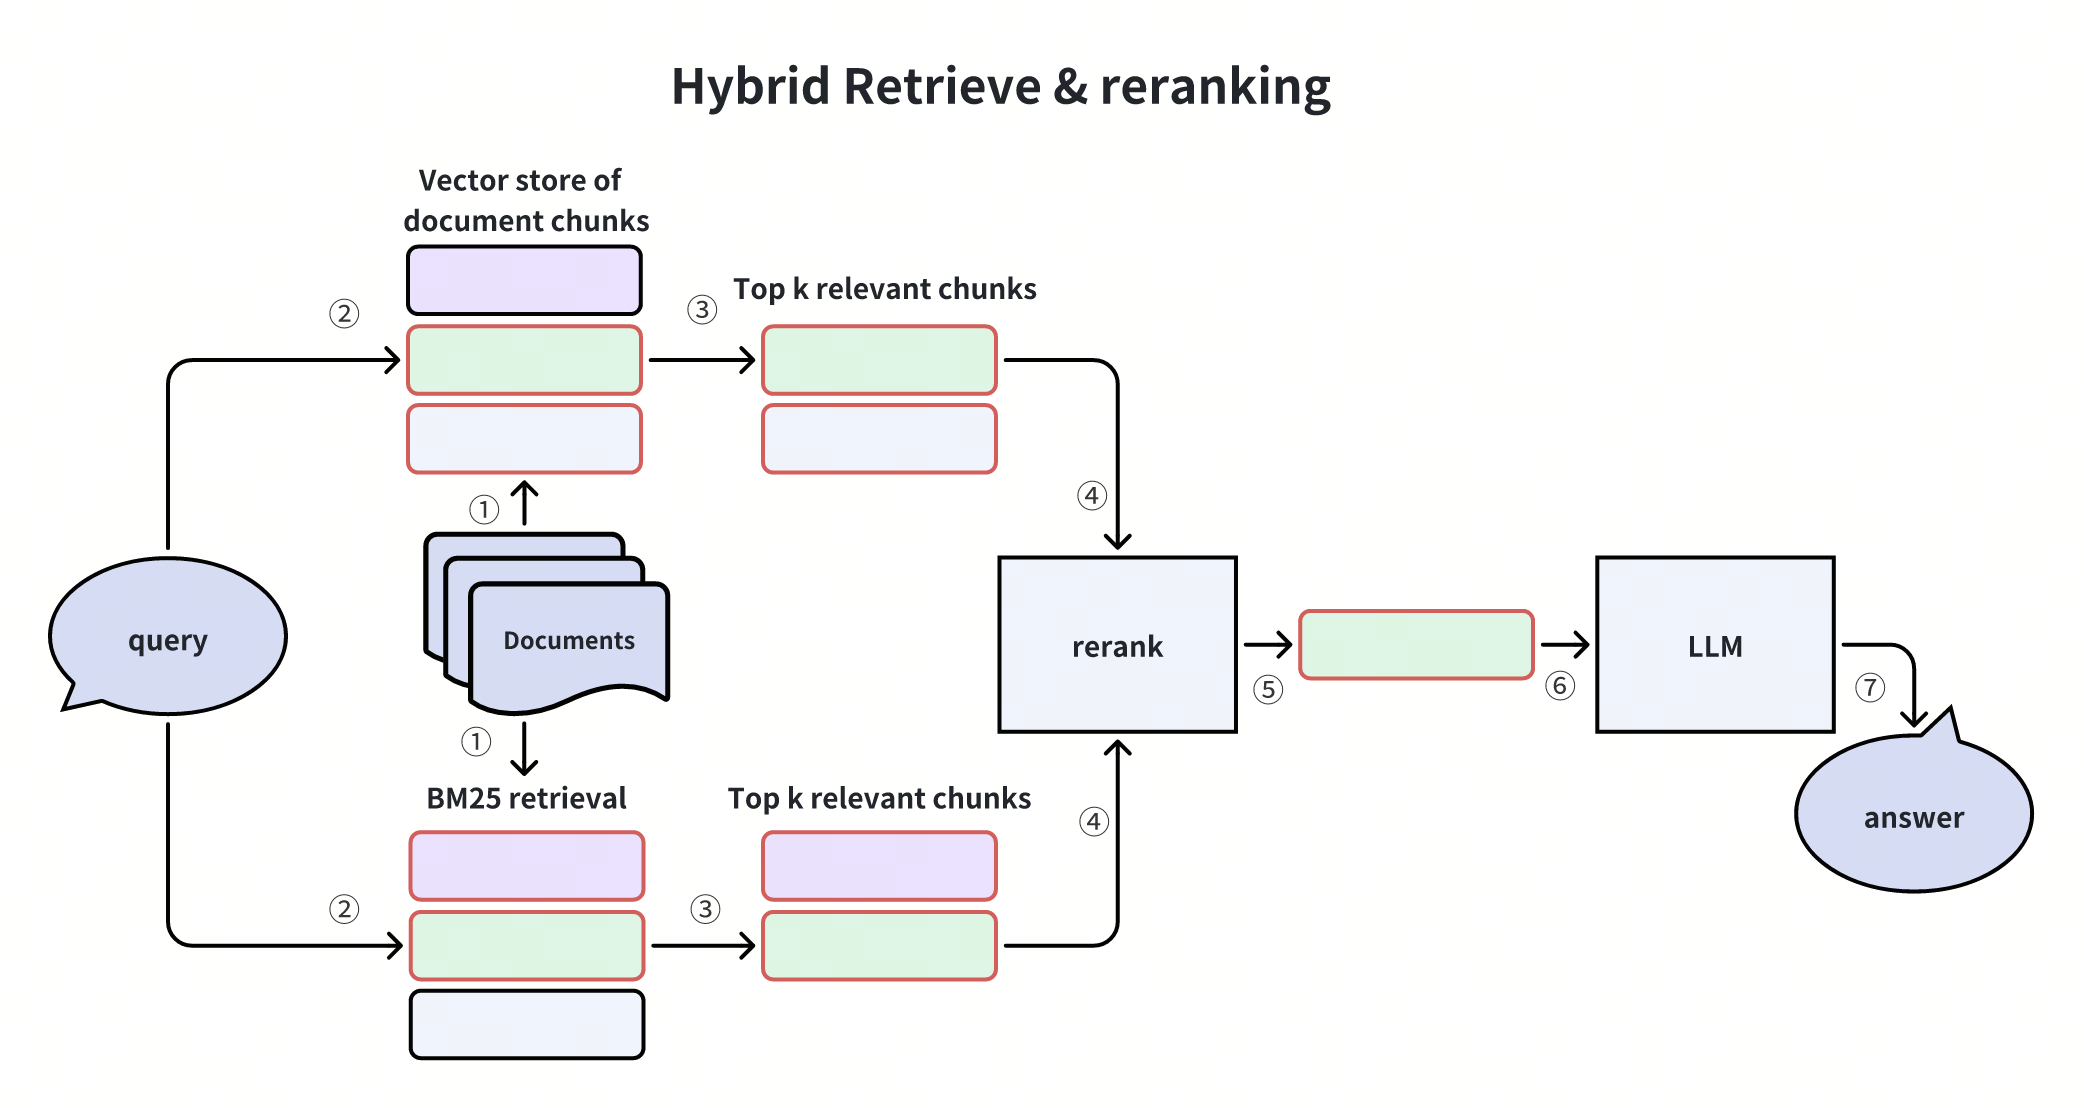
This diagram shows the Hybrid Retrieve & Reranking process, combining BM25 for keyword matching and vector search for semantic retrieval. Results from both methods are merged, reranked, and passed to an LLM to generate the final answer.
Hybrid search balances precision and semantic understanding, improving accuracy and robustness for diverse queries. It retrieves candidates with BM25 full-text search and vector search, ensuring both semantic, context-aware, and accurate retrieval.
Let’s get started with an example.
Prepare the data
We use the Langchain WebBaseLoader to load documents from web sources and split them into chunks using the RecursiveCharacterTextSplitter.
import bs4
from langchain_community.document_loaders import WebBaseLoader
from langchain_text_splitters import RecursiveCharacterTextSplitter

# Create a WebBaseLoader instance to load documents from web sources
loader = WebBaseLoader(
    web_paths=(
        "https://lilianweng.github.io/posts/2023-06-23-agent/",
        "https://lilianweng.github.io/posts/2023-03-15-prompt-engineering/",
    ),
    bs_kwargs=dict(
        parse_only=bs4.SoupStrainer(
            class_=("post-content", "post-title", "post-header")
        )
    ),
)
# Load documents from web sources using the loader
documents = loader.load()
# Initialize a RecursiveCharacterTextSplitter for splitting text into chunks
text_splitter = RecursiveCharacterTextSplitter(chunk_size=2000, chunk_overlap=200)

# Split the documents into chunks using the text_splitter
docs = text_splitter.split_documents(documents)

# Let's take a look at the first document
docs[1]
Document(metadata={'source': 'https://lilianweng.github.io/posts/2023-06-23-agent/'}, page_content='Fig. 1. Overview of a LLM-powered autonomous agent system.\nComponent One: Planning#\nA complicated task usually involves many steps. An agent needs to know what they are and plan ahead.\nTask Decomposition#\nChain of thought (CoT; Wei et al. 2022) has become a standard prompting technique for enhancing model performance on complex tasks. The model is instructed to “think step by step” to utilize more test-time computation to decompose hard tasks into smaller and simpler steps. CoT transforms big tasks into multiple manageable tasks and shed lights into an interpretation of the model’s thinking process.\nTree of Thoughts (Yao et al. 2023) extends CoT by exploring multiple reasoning possibilities at each step. It first decomposes the problem into multiple thought steps and generates multiple thoughts per step, creating a tree structure. The search process can be BFS (breadth-first search) or DFS (depth-first search) with each state evaluated by a classifier (via a prompt) or majority vote.\nTask decomposition can be done (1) by LLM with simple prompting like "Steps for XYZ.\\n1.", "What are the subgoals for achieving XYZ?", (2) by using task-specific instructions; e.g. "Write a story outline." for writing a novel, or (3) with human inputs.\nAnother quite distinct approach, LLM+P (Liu et al. 2023), involves relying on an external classical planner to do long-horizon planning. This approach utilizes the Planning Domain Definition Language (PDDL) as an intermediate interface to describe the planning problem. In this process, LLM (1) translates the problem into “Problem PDDL”, then (2) requests a classical planner to generate a PDDL plan based on an existing “Domain PDDL”, and finally (3) translates the PDDL plan back into natural language. Essentially, the planning step is outsourced to an external tool, assuming the availability of domain-specific PDDL and a suitable planner which is common in certain robotic setups but not in many other domains.\nSelf-Reflection#')
Load the document into Milvus vector store
As the introduction above, we initialize and load the prepared documents into Milvus vector store, which contains two vector fields: dense is for the OpenAI embedding and sparse is for the BM25 function.
vectorstore = Milvus.from_documents(
    documents=docs,
    embedding=OpenAIEmbeddings(),
    builtin_function=BM25BuiltInFunction(),
    vector_field=["dense", "sparse"],
    connection_args={
        "uri": URI,
    },
    drop_old=False,
)
Build RAG chain
We prepare the LLM instance and prompt, then conbine them into a RAG pipeline using the LangChain Expression Language.
from langchain_core.runnables import RunnablePassthrough
from langchain_core.prompts import PromptTemplate
from langchain_core.output_parsers import StrOutputParser
from langchain_openai import ChatOpenAI

# Initialize the OpenAI language model for response generation
llm = ChatOpenAI(model_name="gpt-4o", temperature=0)

# Define the prompt template for generating AI responses
PROMPT_TEMPLATE = """
Human: You are an AI assistant, and provides answers to questions by using fact based and statistical information when possible.
Use the following pieces of information to provide a concise answer to the question enclosed in <question> tags.
If you don't know the answer, just say that you don't know, don't try to make up an answer.
<context>
{context}
</context>

<question>
{question}
</question>

The response should be specific and use statistics or numbers when possible.

Assistant:"""

# Create a PromptTemplate instance with the defined template and input variables
prompt = PromptTemplate(
    template=PROMPT_TEMPLATE, input_variables=["context", "question"]
)
# Convert the vector store to a retriever
retriever = vectorstore.as_retriever()


# Define a function to format the retrieved documents
def format_docs(docs):
    return "\n\n".join(doc.page_content for doc in docs)
Use the LCEL(LangChain Expression Language) to build a RAG chain.
# Define the RAG (Retrieval-Augmented Generation) chain for AI response generation
rag_chain = (
    {"context": retriever | format_docs, "question": RunnablePassthrough()}
    | prompt
    | llm
    | StrOutputParser()
)

# rag_chain.get_graph().print_ascii()
Invoke the RAG chain with a specific question and retrieve the response
query = "What is PAL and PoT?"
res = rag_chain.invoke(query)
res
'PAL (Program-aided Language models) and PoT (Program of Thoughts prompting) are approaches that involve using language models to generate programming language statements to solve natural language reasoning problems. This method offloads the solution step to a runtime, such as a Python interpreter, allowing for complex computation and reasoning to be handled externally. PAL and PoT rely on language models with strong coding skills to effectively generate and execute these programming statements.'
Congratulations! You have built a hybrid(dense vector + sparse bm25 function) search RAG chain powered by Milvus and LangChain.