From PDFs to Answers: Building a RAG Knowledge Base with PaddleOCR, Milvus, and ERNIE
Large language models are far more capable than they were in 2023, but they still hallucinate with confidence and often fall back on outdated information. RAG (Retrieval-Augmented Generation) addresses both problems by retrieving relevant context from a vector database such as Milvus before the model generates a response. That extra context grounds the answer in real sources and makes it more current.
One of the most common RAG use cases is a company knowledge base. A user uploads PDFs, Word files, or other internal documents, asks a natural-language question, and receives an answer based on those materials rather than solely on the model’s pretraining.
But using the same LLM and the same vector database does not guarantee the same outcome. Two teams can build on the same foundation and still end up with very different system quality. The difference usually comes from everything upstream: how documents are parsed, chunked, and embedded; how data is indexed; how retrieval results are ranked; and how the final answer is assembled.
In this article, we’ll use Paddle-ERNIE-RAG as an example and explain how to build an RAG-based knowledge base with PaddleOCR, Milvus, and ERNIE-4.5-Turbo.
Paddle-ERNIE-RAG System Architecture
The Paddle-ERNIE-RAG architecture consists of four core layers:
- Data extraction layer. PP-StructureV3, the document parsing pipeline in PaddleOCR, reads PDFs and images with layout-aware OCR. It preserves document structure — headings, tables, reading order — and outputs clean Markdown, split into overlapping chunks.
- Vector storage layer. Each chunk is embedded into a 384-dimensional vector and stored in Milvus alongside metadata (file name, page number, chunk ID). A parallel inverted index supports keyword search.
- Retrieval and answering layer. Each query runs against both the vector index and the keyword index. Results are merged via RRF (Reciprocal Rank Fusion), reranked, and passed to the ERNIE model for answer generation.
- Application layer. A Gradio interface lets you upload documents, ask questions, and view answers with source citations and confidence scores.
The sections below walk through each stage in order, starting with how raw documents become searchable text.
How to Build RAG Pipeline Step by Step
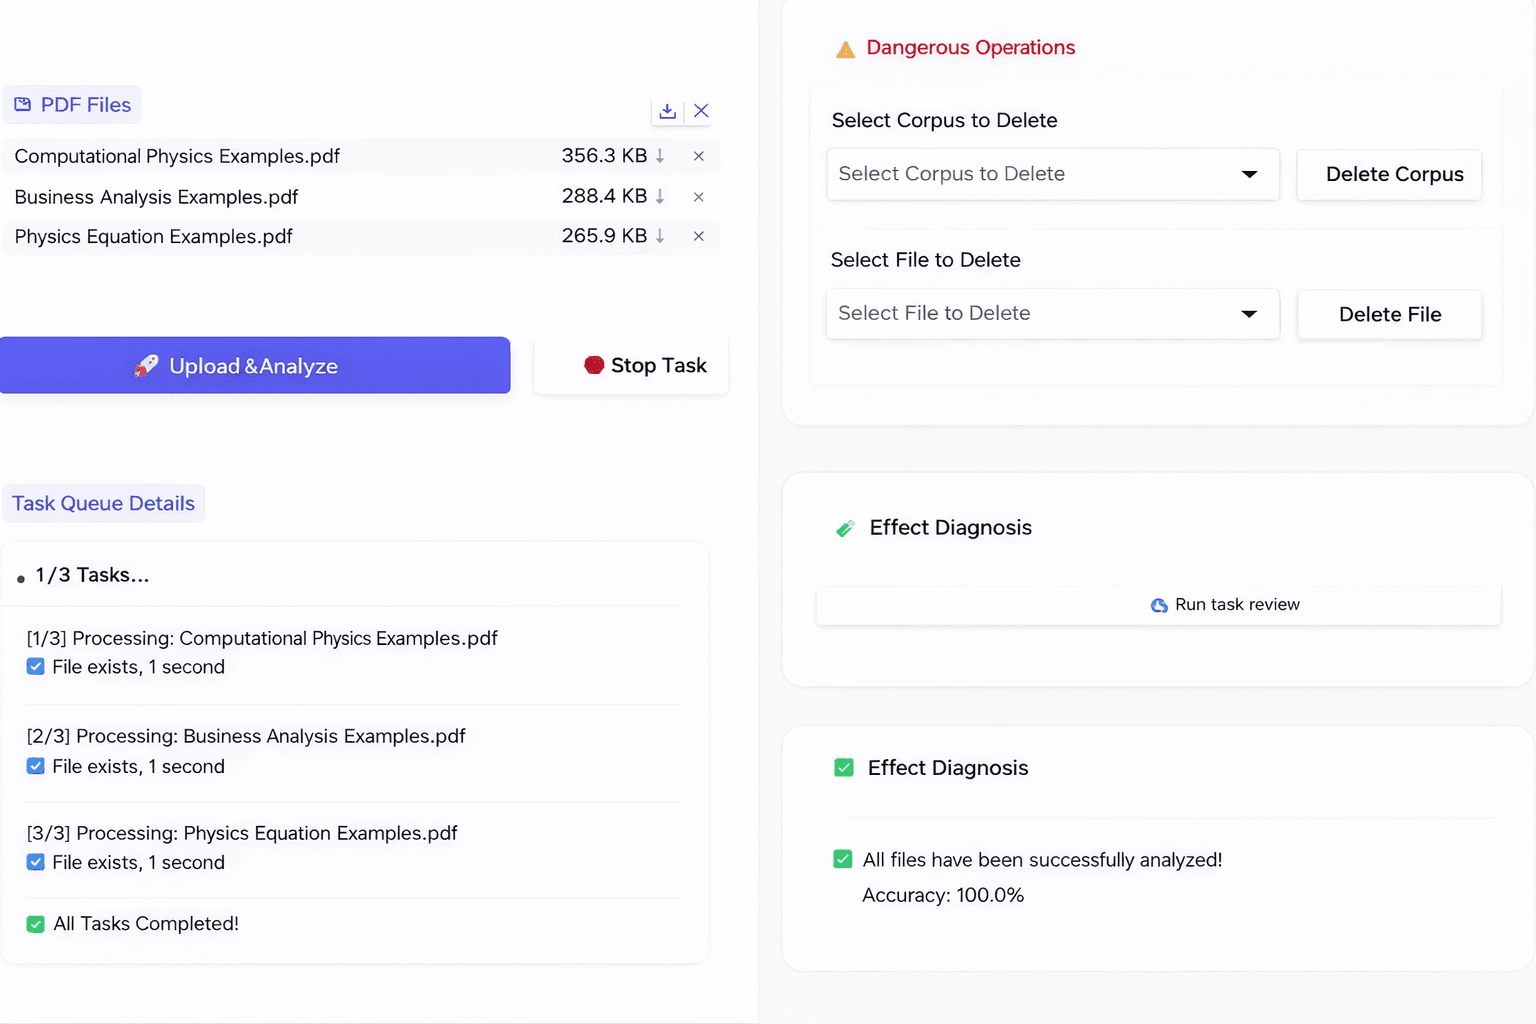
Step 1: Parse Documents with PP-StructureV3
Raw documents are where most accuracy problems begin. Research papers and technical reports mix two-column layouts, formulas, tables, and images. Extracting text with a basic library like PyPDF2 usually garbles the output: paragraphs appear out of order, tables collapse, and formulas vanish.
To avoid these problems, the project creates an OnlinePDFParser class in backend.py. This class calls the PP-StructureV3 online API to do layout parsing. Instead of extracting raw text, it identifies the structure of the document, then turns it into Markdown format.
This method has three clear benefits:
- Clean Markdown output
The output is formatted as Markdown with proper headings and paragraphs. This makes the content easier for the model to understand.
- Separate Image extraction
The system extracts and saves images during parsing. This prevents important visual information from being lost.
- Better context handling
The text is split using a sliding window with overlap. This avoids cutting sentences or formulas in the middle, which helps keep the meaning clear and improves search accuracy.
Basic Parsing Flow
In backend.py, parsing follows three simple steps:
- Send the PDF file to the PP-StructureV3 API.
- Read the returned layoutParsingResults.
- Extract the cleaned Markdown text and any images.
# backend.py (Core logic summary of the OnlinePDFParser class)
def predict(self, file_path):
    # 1. Convert file to Base64
    with open(file_path, "rb") as file:
        file_data = base64.b64encode(file.read()).decode("ascii")
    # 2. Build request payload
    payload = {
        "file": file_data,
        "fileType": 1, # PDF type
        "useChartRecognition": False, # Configure based on requirements
        "useDocOrientationClassify": False
    }
    # 3. Send request to get Layout Parsing results
    response = requests.post(self.api_url, json=payload, headers=headers)
    res_json = response.json()
    # 4. Extract Markdown text and images
    parsing_results = res_json.get("result", {}).get("layoutParsingResults", [])
    mock_outputs = []
    for item in parsing_results:
        md_text = item.get("markdown", {}).get("text", "")
        images = item.get("markdown", {}).get("images", {})
        # ... (subsequent image downloading and text cleaning logic)
        mock_outputs.append(MockResult(md_text, images))
    return mock_outputs, "Success"
Step 2: Chunk Text with Sliding Window Overlap
After parsing, the Markdown text must be divided into smaller pieces (chunks) for search. If text is cut at fixed lengths, sentences or formulas may be split in half.
To prevent this, the system uses sliding window chunking with overlap. Each chunk shares a tail portion with the next, so boundary content appears in both windows. This keeps meaning intact at chunk edges and improves retrieval recall.
# backend.py
def split_text_into_chunks(text: str, chunk_size: int = 300, overlap: int = 120) -> list:
    """Sliding window-based text chunking that preserves overlap-length contextual overlap"""
    if not text: return []
    lines = [line.strip() for line in text.split("\n") if line.strip()]
    chunks = []
    current_chunk = []
    current_length = 0
    for line in lines:
        while len(line) > chunk_size:
            # Handle overly long single line
            part = line[:chunk_size]
            line = line[chunk_size:]
            current_chunk.append(part)
            # ... (chunking logic) ...
        current_chunk.append(line)
        current_length += len(line)
        # When accumulated length exceeds the threshold, generate a chunk
        if current_length > chunk_size:
            chunks.append("\n".join(current_chunk))
            # Roll back: keep the last overlap-length text as the start of the next chunk
            overlap_text = current_chunk[-1][-overlap:] if current_chunk else ""
            current_chunk = [overlap_text] if overlap_text else []
            current_length = len(overlap_text)
    if current_chunk:
        chunks.append("\n".join(current_chunk).strip())
    return chunks
Step 3: Store Vectors and Metadata in Milvus
With clean chunks ready, the next step is storing them in a way that supports fast, accurate retrieval.
Vector Storage and Metadata
Milvus enforces strict rules for collection names — only ASCII letters, numbers, and underscores. If a knowledge base name contains non-ASCII characters, the backend hex-encodes it with a kb_ prefix before creating the collection and decodes it for display. A small detail, but one that prevents cryptic errors.
import binascii
import re

def encode_name(ui_name):
    """Convert a foreign name into a Milvus-valid hexadecimal string"""
    if not ui_name: return ""
    # If it only contains English letters, numbers, or underscores, return it directly
    if re.match(r'^[a-zA-Z_][a-zA-Z0-9_]*$', ui_name):
        return ui_name
    # Encode to Hex and add the kb_ prefix
    hex_str = binascii.hexlify(ui_name.encode('utf-8')).decode('utf-8')
    return f"kb_{hex_str}"
def decode_name(real_name):
    """Convert a hexadecimal string back to original language"""
    if real_name.startswith("kb_"):
        try:
            hex_str = real_name[3:]
            return binascii.unhexlify(hex_str).decode('utf-8')
        except:
            return real_name
    return real_name
Beyond naming, each chunk goes through two steps before insertion: generating an embedding and attaching metadata.
- What is stored:
Each chunk is converted into a 384-dimensional dense vector. At the same time, the Milvus schema stores extra fields such as file name, page number, and chunk ID.
- Why this is important:
This makes it possible to trace an answer back to the exact page it came from. It also prepares the system for future multimodal Q&A use cases.
- Performance optimization:
In vector_store.py, the insert_documents method uses batch embedding. This reduces the number of network requests and makes the process more efficient.
# vector_store.py
def insert_documents(self, documents):
    """Batch vectorization and insertion into Milvus"""
    if not documents: return
    # 1. Extract plain text list and request the embedding model in batch
    texts = [doc['content'] for doc in documents]
    embeddings = self.get_embeddings(texts)
    # 2. Data cleaning: filter out invalid data where embedding failed
    valid_docs, valid_vectors = [], []
    for i, emb in enumerate(embeddings):
        if emb and len(emb) == 384: # Ensure the vector dimension is correct
            valid_docs.append(documents[i])
            valid_vectors.append(emb)
    # 3. Assemble columnar data (Columnar Format)
    # Milvus insert API requires each field to be passed in list format
    data = [
        [doc['filename'] for doc in valid_docs],  # Scalar: file name
        [doc['page'] for doc in valid_docs],      # Scalar: page number (for traceability)
        [doc['chunk_id'] for doc in valid_docs],  # Scalar: chunk ID
        [doc['content'] for doc in valid_docs],   # Scalar: original content (for keyword search)
        valid_vectors                             # Vector: semantic vector
    ]
    # 4. Execute insertion and persistence
    self.collection.insert(data)
    self.collection.flush()
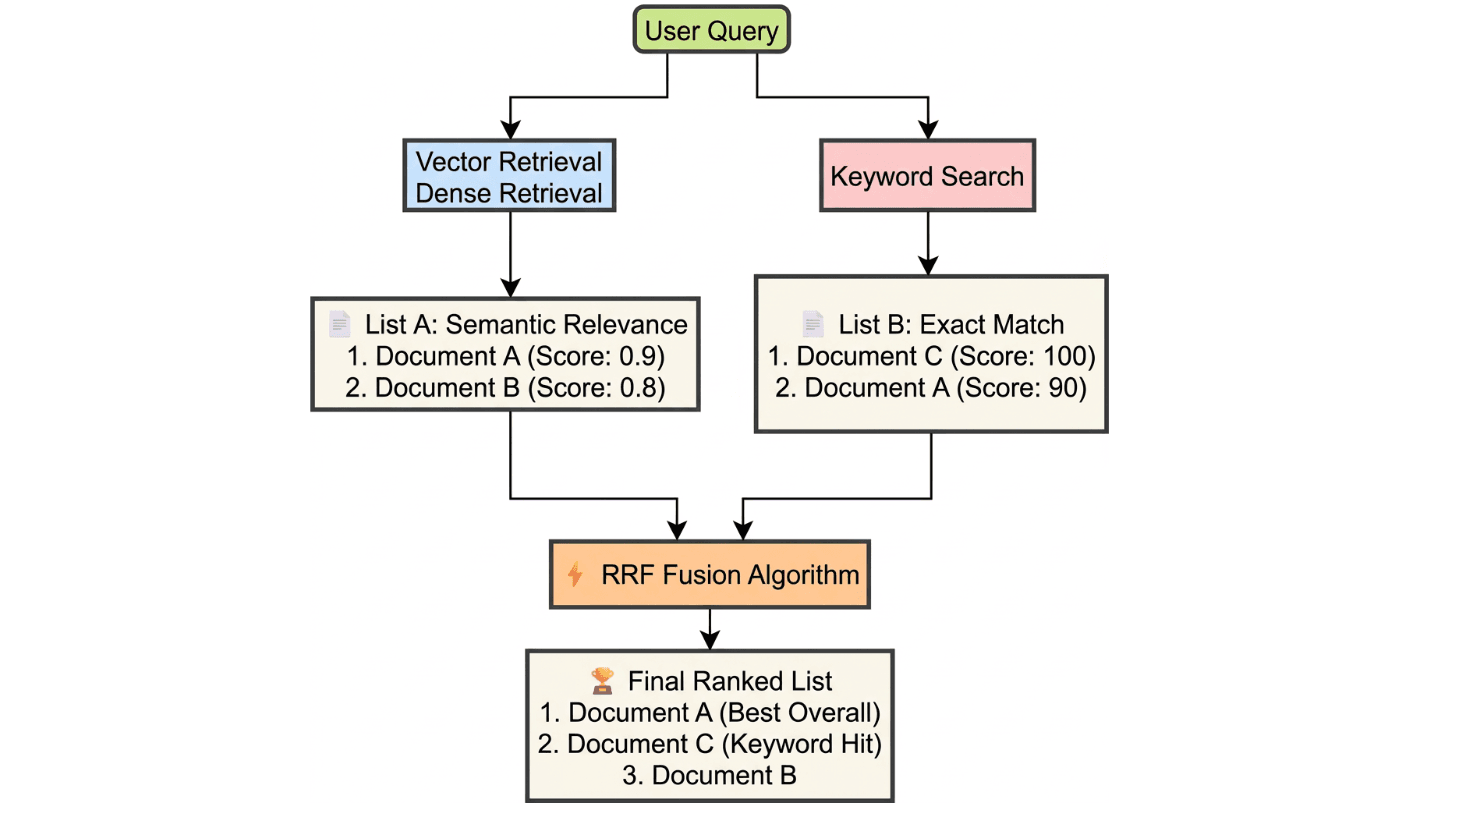
Step 4: Retrieve with Hybrid Search and RRF Fusion
A single search method is rarely enough. Vector search finds semantically similar content but can miss exact terms; keyword search nails specific terms but misses paraphrases. Running both in parallel and merging the output produces better results than either alone.
When the query language differs from the document language, the system first translates the query using an LLM so both search paths can operate in the document’s language. Then two searches run in parallel:
- Vector search (dense): Finds content with similar meaning, even across languages, but may surface related passages that don’t directly answer the question.
- Keyword search (sparse): Finds exact matches for technical terms, numbers, or formula variables — the kind of tokens that vector embeddings often smooth over.
The system merges both result lists using RRF (Reciprocal Rank Fusion). Each candidate receives a score based on its rank in each list, so a chunk that appears near the top of both lists scores highest. Vector search contributes semantic coverage; keyword search contributes term precision.
# Summary of retrieval logic in vector_store.py
def search(self, query: str, top_k: int = 10, **kwargs):
    '''Vector search (Dense + Keyword) + RRF fusion'''
    # 1. Vector search (Dense)
    dense_results = []
    query_vector = self.embedding_client.get_embedding(query)  # ... (Milvus search code) ...
    # 2. Keyword search
    # Perform jieba tokenization and build like "%keyword%" queries
    keyword_results = self._keyword_search(query, top_k=top_k * 5, expr=expr)
    # 3. RRF fusion
    rank_dict = {}
    def apply_rrf(results_list, k=60, weight=1.0):
        for rank, item in enumerate(results_list):
            doc_id = item.get('id') or item.get('chunk_id')
            if doc_id not in rank_dict:
                rank_dict[doc_id] = {"data": item, "score": 0.0}
            # Core RRF formula
            rank_dict[doc_id]["score"] += weight * (1.0 / (k + rank))
    apply_rrf(dense_results, weight=4.0)
    apply_rrf(keyword_results, weight=1.0)
    # 4. Sort and return results
    sorted_docs = sorted(rank_dict.values(), key=lambda x: x['score'], reverse=True)
    return [item['data'] for item in sorted_docs[:top_k * 2]]
Step 5: Rerank Results Before Answer Generation
The chunks returned by the search step are not equally relevant. So before generating the final answer, a reranking step rescores them.
In reranker_v2.py, a combined scoring method evaluates each chunk, which is scored from five aspects:
- Fuzzy matching
Using fuzzywuzzy, we check how similar the wording of the chunk is to the query. This measures direct text overlap.
- Keyword coverage
We check how many important words from the query appear in the chunk. More keyword matches mean a higher score.
- Semantic similarity
We reuse the vector similarity score returned by Milvus. This reflects how close the meanings are.
- Length and original rank
Very short chunks are penalized because they often lack context. Chunks that ranked higher in the original Milvus results get a small bonus.
- Named entity detection
The system detects capitalized terms like “Milvus” or “RAG” as likely proper nouns, and identifies multi-word technical terms as possible key phrases.
Each factor has a weight in the final score (shown in the figure below).
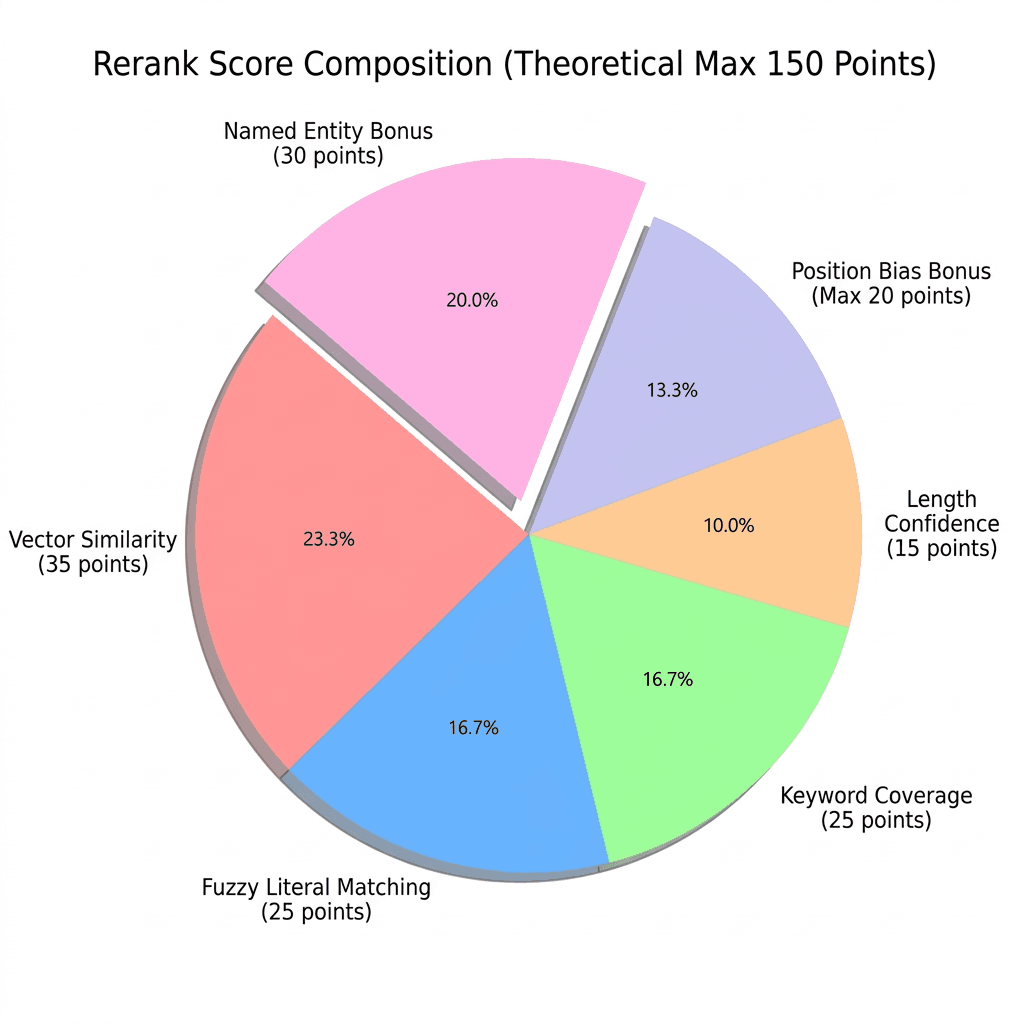
It requires no training data, and each factor’s contribution is visible. If a chunk ranks unexpectedly high or low, the scores explain why. A fully black-box reranker doesn’t offer that.
# reranker_v2.py
def _calculate_composite_score(self, query: str, chunk: Dict[str, Any]) -> float:
    content = chunk.get('content', '')
    # 1. Surface text similarity (FuzzyWuzzy)
    fuzzy_score = fuzz.partial_ratio(query, content)
    # 2. Keyword coverage
    query_keywords = self._extract_keywords(query)
    content_keywords = self._extract_keywords(content)
    keyword_coverage = (len(query_keywords & content_keywords) / len(query_keywords)) * 100 if query_keywords else 0
    # 3. Vector semantic score (normalized)
    milvus_distance = chunk.get('semantic_score', 0)
    milvus_similarity = 100 / (1 + milvus_distance * 0.1)
    # 4. Length penalty (prefer paragraphs between 200–600 characters)
    content_len = len(content)
    if 200 <= content_len <= 600:
        length_score = 100
    else:
        # ... (penalty logic)
        length_score = 100 - min(50, abs(content_len - 400) / 20)
    # Weighted sum
    base_score = (
        fuzzy_score * 0.25 +
        keyword_coverage * 0.25 +
        milvus_similarity * 0.35 +
        length_score * 0.15
    )
    # Position weight
    position_bonus = 0
    if 'milvus_rank' in chunk:
        rank = chunk['milvus_rank']
        position_bonus = max(0, 20 - rank)
    # Extra bonus for proper noun detection
    proper_noun_bonus = 30 if self._check_proper_nouns(query, content) else 0
    return base_score + proper_noun_bonus
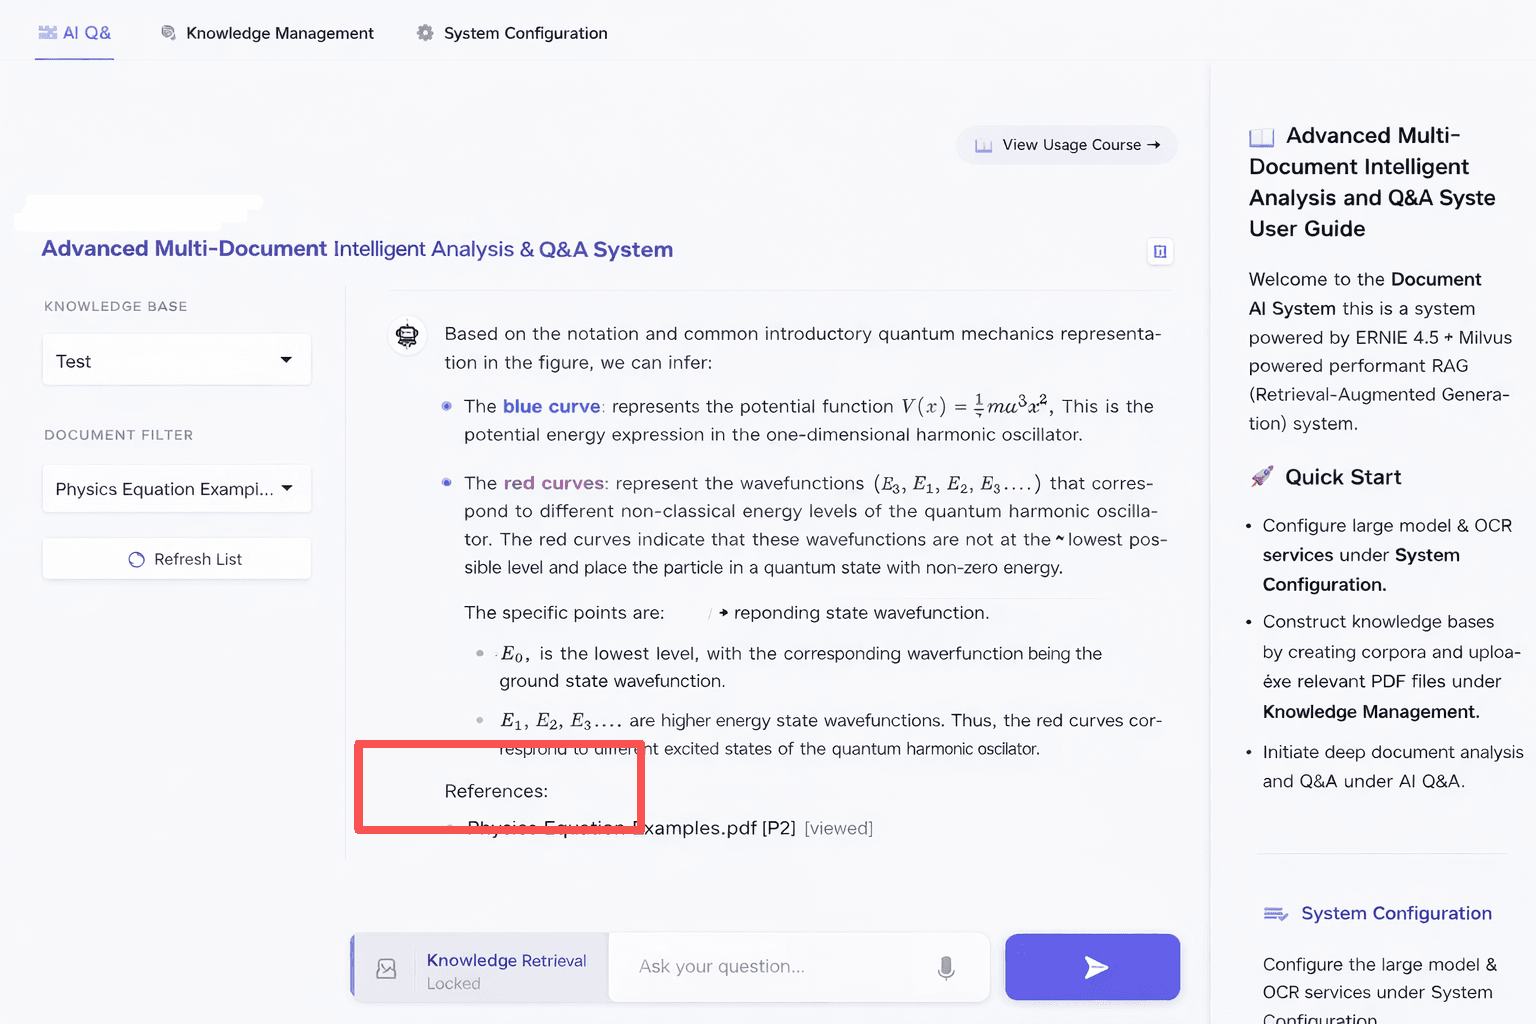
Step 6: Add Multimodal Q&A for Charts and Diagrams
Research papers often contain important charts and diagrams that carry information the text does not. A text-only RAG pipeline would miss those signals entirely. To handle this, we added a simple image-based Q&A feature with three parts:
1. Add more context to the prompt
When sending an image to the model, the system also gets the OCR text from the same page.
The prompt includes: the image, the page text, and the user’s question.
This helps the model understand the full context and reduces mistakes when reading the image.
# backend.py - Core logic for multimodal Q&A
# 1. Retrieve OCR text from the current page as background context
# The system pulls the full page text where the image appears from Milvus,
# based on the document name and page number.
# page_num is parsed from the image file name sent by the frontend (e.g., "p3_figure.jpg" -> Page 3)
page_text_context = milvus_store.get_page_content(doc_name, page_num)[:800]
# 2. Dynamically build a context-enhanced prompt
# Key idea: explicitly align visual information with textual background
# to prevent hallucinations caused by answering from the image alone
final_prompt = f"""
[Task] Answer the question using both the image and the background information.
[Image Metadata] Source: {doc_name} (P{page_num})
[Background Text] {page_text_context} ... (long text omitted here)
[User Question] {user_question}
"""
# 3. Send multimodal request (Vision API)
# The underlying layer converts the image to Base64 and sends it
# together with final_prompt to the ERNIE-VL model
answer = ernie_client.chat_with_image(query=final_prompt, image_path=img_path)
2. Vision API support
The client (ernie_client.py) supports the OpenAI vision format. Images are converted to Base64 and sent in the image_url format, which lets the model process both image and text together.
# ernie_client.py
def chat_with_image(self, query: str, image_path: str):
   base64_image = self._encode_image(image_path)
   # Build Vision message format
   messages = [
      {
            "role": "user",
            "content": [
               {"type": "text", "text": query},
               {
                  "type": "image_url",
                  "image_url": {
                        "url": f"data:image/jpeg;base64,{base64_image}"
                  }
               }
            ]
      }
   ]
   return self.chat(messages)
3. Fallback plan
If the image API fails (for example, because of network issues or model limits), the system switches back to normal text-based RAG.
It uses the OCR text to answer the question, so the system keeps working without interruption.
# Fallback logic in backend.py
try:
   answer = ernie.chat_with_image(final_prompt, img_path)
   # ...
except Exception as e:
   print(f"⚠️ Model does not support images. Switching to text mode.")
   # Fallback: use the extracted text as context to continue answering
   answer, metric = ask_question_logic(final_prompt, collection_name)
Key UI Features and Implementation for Pipeline
How to Handle API Rate Limiting and Protection
When calling LLM or embedding APIs, the system may sometimes receive a 429 Too Many Requests error. This usually happens when too many requests are sent in a short time.
To handle this, the project adds an adaptive slowdown mechanism in ernie_client.py. If a rate limit error occurs, the system automatically reduces the request speed and retries instead of stopping.
# Logic for handling rate limiting
if is_rate_limit:
    self._adaptive_slow_down()  # Permanently increase the request interval
    wait_time = (2 ** attempt) + random.uniform(1.0, 3.0)  # Exponential backoff
    time.sleep(wait_time)
def _adaptive_slow_down(self):
    """Trigger adaptive downgrade: when rate limiting occurs, permanently increase the global request interval"""
    self.current_delay = min(self.current_delay * 2.0, 15.0)
    logger.warning(f"📉 Rate limit triggered (429), system automatically slowing down: new interval {self.current_delay:.2f}s")
This helps keep the system stable, especially when processing and embedding large numbers of documents.
Custom Styling
The frontend uses Gradio (main.py). We added custom CSS (modern_css) to make the interface cleaner and easier to use.
- Input box
Changed from the default gray style to a white, rounded design. It looks simpler and more modern.
- Send button
Added a gradient color and hover effect so it stands out more.
/* main.py - modern_css snippet */
/* Force the input box to use a white background with rounded corners, simulating a modern chat app */
.custom-textbox textarea {
    background-color:
#ffffff
 !important;
    border: 1px solid
#e5e7eb
 !important;
    border-radius: 12px !important;
    box-shadow: 0 4px 12px rgba(0,0,0,0.05) !important;
    padding: 14px !important;
}
/* Gradient send button */
.send-btn {
    background: linear-gradient(135deg,
#6366f1
 0%,
#4f46e5
 100%) !important;
    color: white !important;
    box-shadow: 0 4px 10px rgba(99, 102, 241, 0.3) !important;
}
LaTeX Formula Rendering
Many research documents contain math formulas, so correct rendering is important. We added full LaTeX support for both inline and block formulas.
- Where it applies The configuration works in both the chat window (Chatbot) and the summary area (Markdown).
- Practical result Whether formulas appear in the model’s answer or in document summaries, they are rendered correctly on the page.
# Configure LaTeX rules in main.py
latex_config = [
    {"left": "$$", "right": "$$", "display": True},    # Recognize block equations
    {"left": "$", "right": "$", "display": False},     # Recognize inline equations
    {"left": "\(", "right": "\)", "display": False}, # Standard LaTeX inline
    {"left": "\[", "right": "\]", "display": True}   # Standard LaTeX block
]
# Then inject this configuration when initializing components:
# Enable LaTeX in Chatbot
chatbot = gr.Chatbot(
    label="Conversation",
    # ... other parameters ...
    latex_delimiters=latex_config  # Key configuration: enable formula rendering
)
# Enable LaTeX in the document summary area
doc_summary = gr.Markdown(
    value="*No summary available*",
    latex_delimiters=latex_config
)
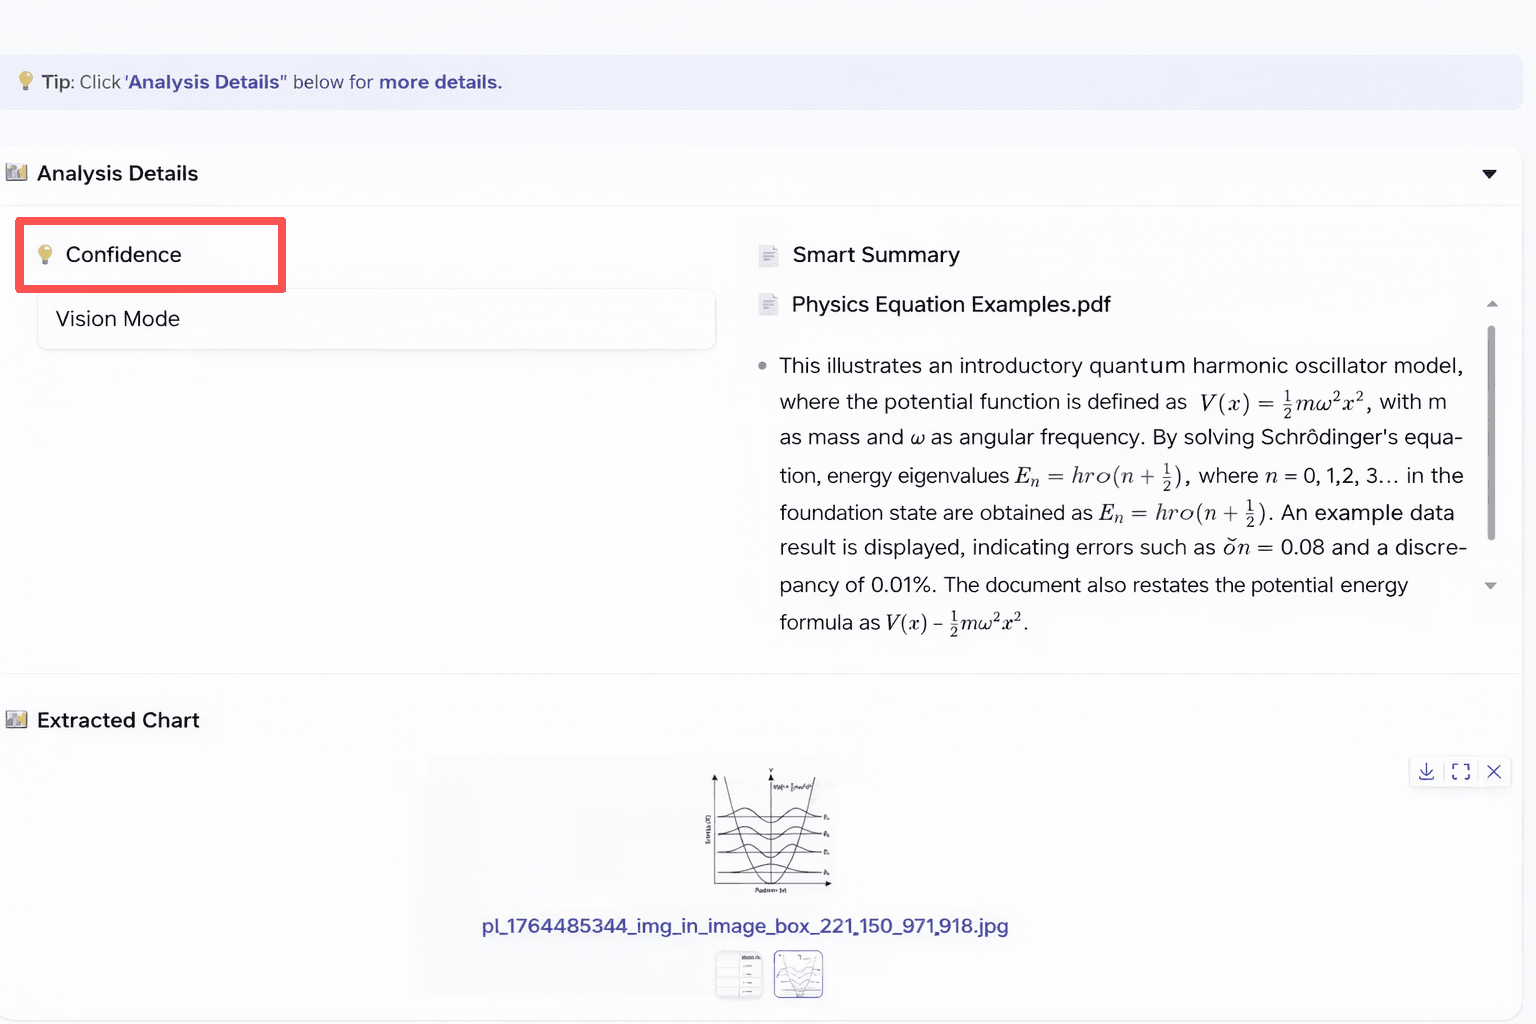
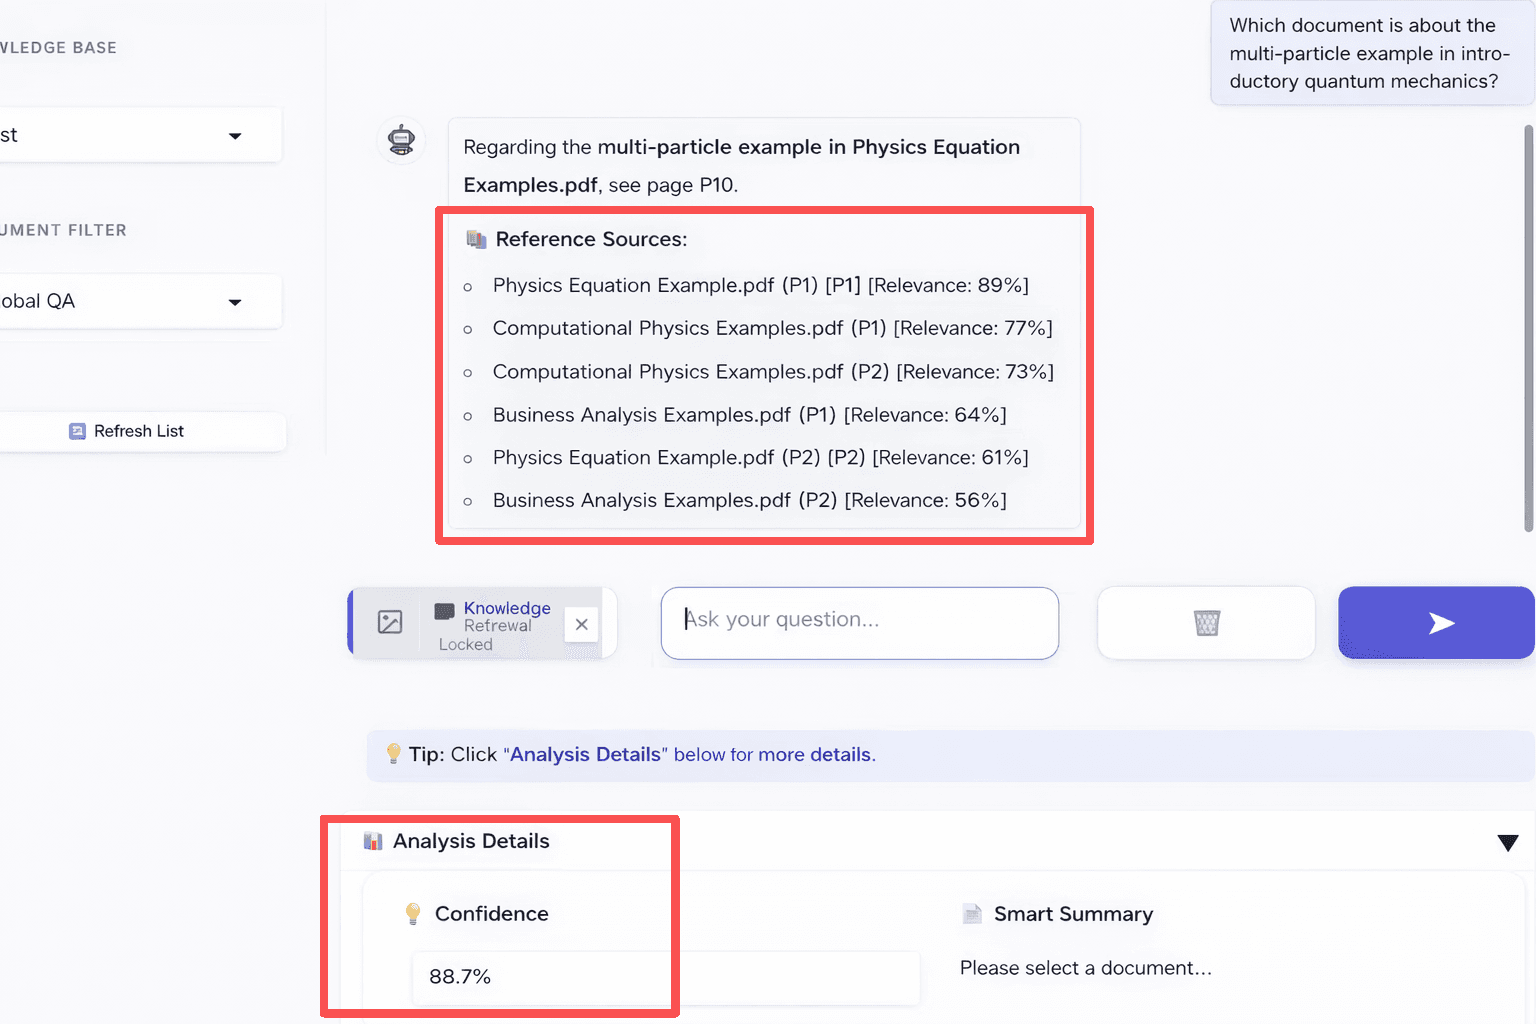
Explainability: Relevance Scores and Confidence
To avoid a “black box” experience, the system shows two simple indicators:
Relevance
Shown under each answer in the “References” section.
Displays the reranker score for each cited chunk.
Helps users see why a specific page or passage was used.
# backend.py - Build reference source list
sources = "\n\n📚 **References:**\n"
for c in final:
    # ... (deduplication logic) ...
    # Directly pass through the per-chunk score calculated by the Reranker
    sources += f"- {key} [Relevance:{c.get('composite_score',0):.0f}%]\n"
Confidence
Shown in the “Analysis Details” panel.
Based on the top chunk’s score (scaled to 100%).
Shows how confident the system is about the answer.
If below 60%, the answer may be less reliable.
# backend.py - Calculate overall confidence
# 1. Get the top-ranked chunk after reranking
final = processed[:22]
top_score = final[0].get('composite_score', 0) if final else 0
# 2. Normalize the score (capped at 100%) as the overall "confidence" for this Q&A
metric = f"{min(100, top_score):.1f}%"
The UI is shown below. In the interface, each answer shows the page number of the source and its relevance score.
Conclusion
RAG accuracy is dependent on the engineering between an LLM and a vector database. This article walked through a Paddle-ERNIE-RAG build with Milvus that covers each stage of that engineering:
- Document parsing. PP-StructureV3 (via PaddleOCR) converts PDFs into clean Markdown with layout-aware OCR, preserving headings, tables, and images that basic extractors lose.
- Chunking. Sliding window splits with overlap keep context intact at chunk boundaries, preventing the broken fragments that hurt retrieval recall.
- Storing Vectors in Milvus. Store vectors in a way that supports fast, accurate retrieval.
- Hybrid search. Running vector search and keyword search in parallel, then merging results with RRF (Reciprocal Rank Fusion), catches both semantic matches and exact-term hits that either method alone would miss.
- Reranking. A transparent, rule-based reranker scores each chunk on fuzzy match, keyword coverage, semantic similarity, length, and proper noun detection — no training data required, and every score is debuggable.
- Multimodal Q&A. Pairing images with OCR page text in the prompt gives the vision model enough context to answer questions about charts and diagrams, with a text-only fallback if the image API fails.
If you’re building a RAG system for document Q&A and want better accuracy, we’d love to hear how you’re approaching it.
Have questions about Milvus, hybrid search, or knowledge base design? Join our Slack channel or book a 20-minute Milvus Office Hours session to discuss your use case.
- Paddle-ERNIE-RAG System Architecture
- How to Build RAG Pipeline Step by Step
- Step 1: Parse Documents with PP-StructureV3
- Step 2: Chunk Text with Sliding Window Overlap
- Step 3: Store Vectors and Metadata in Milvus
- Step 4: Retrieve with Hybrid Search and RRF Fusion
- Step 5: Rerank Results Before Answer Generation
- Step 6: Add Multimodal Q&A for Charts and Diagrams
- Key UI Features and Implementation for Pipeline
- How to Handle API Rate Limiting and Protection
- Custom Styling
- LaTeX Formula Rendering
- Explainability: Relevance Scores and Confidence
- Conclusion
On This Page
Try Managed Milvus for Free
Zilliz Cloud is hassle-free, powered by Milvus and 10x faster.
Get StartedLike the article? Spread the word