

分析器概述
在文字處理中,分析器是將原始文字轉換為結構化且可搜尋格式的關鍵元件。每個分析器通常由兩個核心元件組成:分詞器與過濾器。兩者共同將輸入文字轉換為詞元、對這些詞元進行精煉,並為高效的索引與檢索做好準備。
在 Milvus 中,分析器是在建立集合時進行配置的,具體是在集合架構中新增「VARCHAR 」欄位時設定。分析器產生的詞元可用於建立關鍵字比對索引,或轉換為稀疏嵌入向量以進行全文檢索。如需更多資訊,請參閱《全文檢索》、《短語比對》或《文字比對》。
使用分析器的做法可能會影響效能:
全文搜尋:進行全文搜尋時,DataNode和QueryNode通道的資料處理速度會變慢,因為它們必須等待分詞完成。因此,新導入的資料需要更長的時間才能供搜尋使用。
關鍵字匹配:對於關鍵字匹配,索引建立速度也會較慢,因為必須待分詞完成後才能建立索引。
分析器的結構
Milvus 中的分析器由一個分詞器及零個或多個篩選器組成。
分詞器:分詞器將輸入文字分割成稱為「詞元」的離散單位。這些詞元可能是單字或短語,具體取決於分詞器的類型。
篩選器:可對分詞結果套用篩選器以進一步精細化處理,例如將其轉為小寫或移除常見詞彙。
分詞器目前僅支援 UTF-8 格式。未來版本將新增對其他格式的支援。
以下工作流程圖展示了解析器如何處理文字。
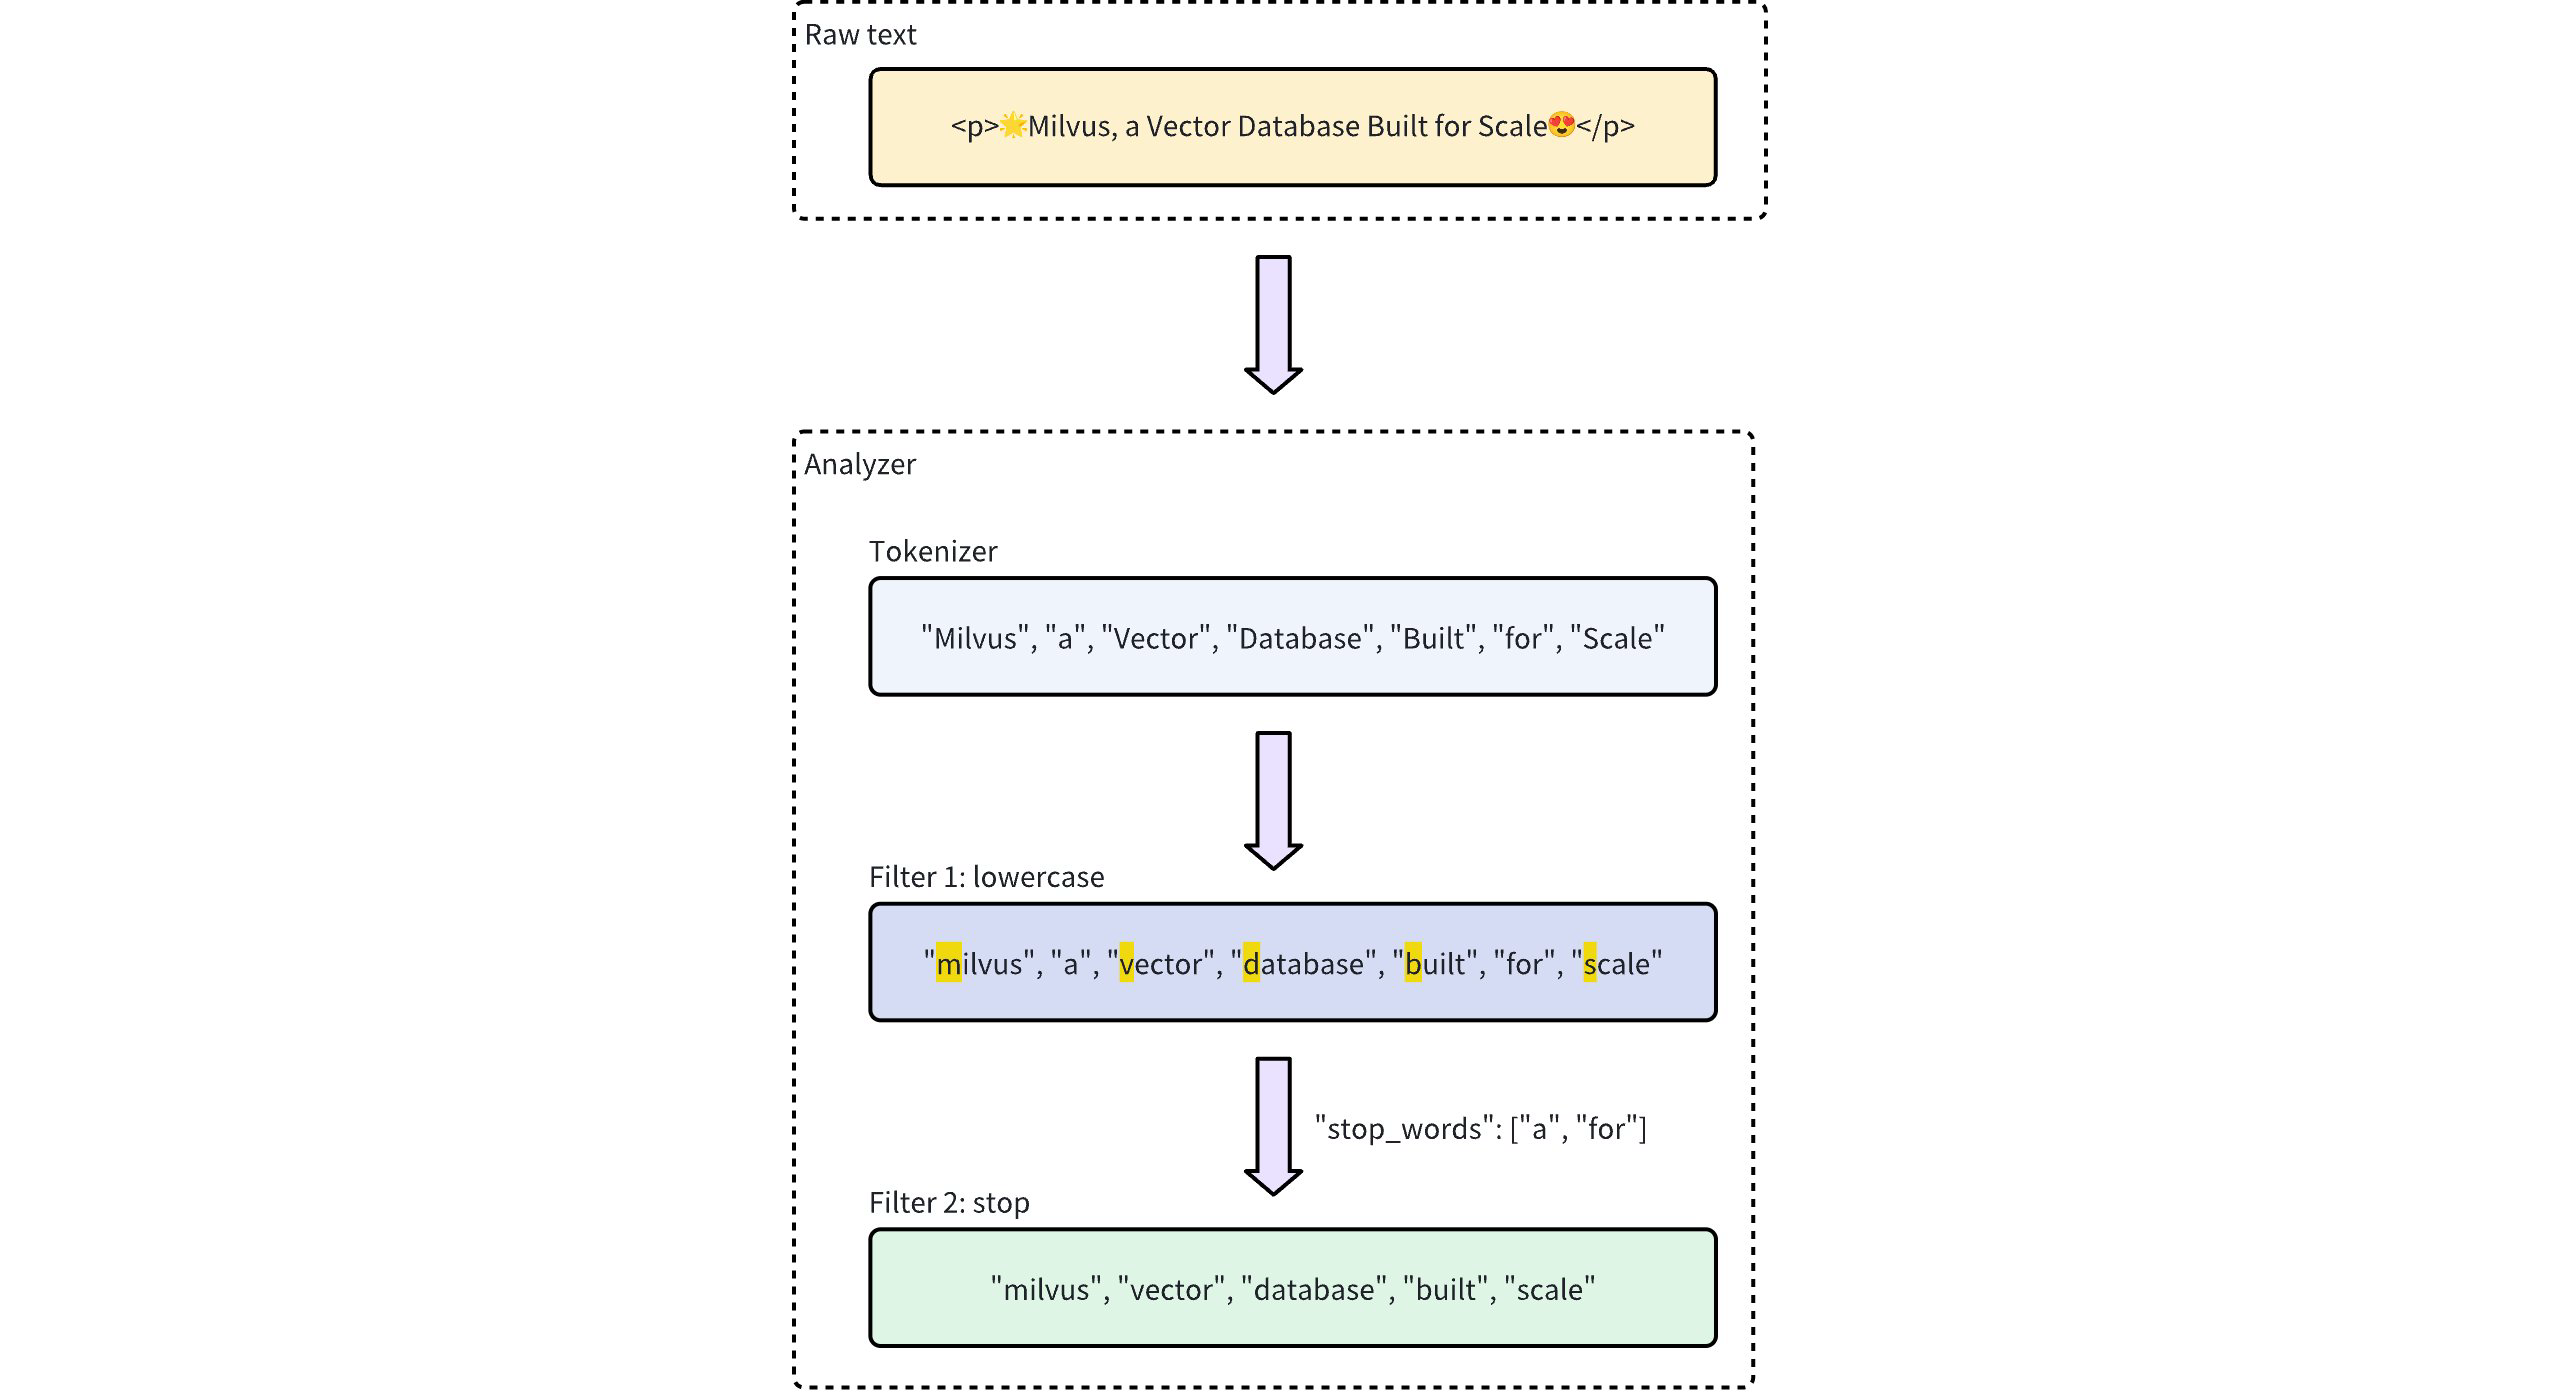 分析器處理工作流程
分析器類型
Milvus 提供兩種類型的分析器,以滿足不同的文字處理需求:
內建分析器:這些是預先定義的配置,只需最少的設定即可處理常見的文字處理任務。由於無需複雜的設定,內建分析器非常適合用於一般用途的搜尋。
自訂分析器:針對更進階的需求,自訂分析器允許您透過指定分詞器以及零個或多個篩選器,來定義自己的配置。此程度的自訂功能對於需要精確控制文字處理的特殊使用情境特別有用。
內建分析器
Milvus 中的內建分析器已預先配置了特定的分詞器和過濾器,讓您無需自行定義這些元件即可立即使用。每個內建分析器皆作為一個範本,包含預設的分詞器和過濾器,並提供可自訂的選項參數。
例如,若要使用內建分析器「standard 」,只需將其名稱standard 指定為type ,並可選擇性地加入此分析器類型的特定額外設定,例如stop_words :
analyzer_params = {
    "type": "standard", # Uses the standard built-in analyzer
    "stop_words": ["a", "an", "for"] # Defines a list of common words (stop words) to exclude from tokenization
}
Map<String, Object> analyzerParams = new HashMap<>();
analyzerParams.put("type", "standard");
analyzerParams.put("stop_words", Arrays.asList("a", "an", "for"));
const analyzer_params = {
    "type": "standard", // Uses the standard built-in analyzer
    "stop_words": ["a", "an", "for"] // Defines a list of common words (stop words) to exclude from tokenization
};
analyzerParams := map[string]any{"type": "standard", "stop_words": []string{"a", "an", "for"}}
export analyzerParams='{
       "type": "standard",
       "stop_words": ["a", "an", "for"]
    }'
若要檢查分析器的執行結果,請使用run_analyzer 方法:
# Sample text to analyze
text = "An efficient system relies on a robust analyzer to correctly process text for various applications."

# Run analyzer
result = client.run_analyzer(
    text,
    analyzer_params
)
import io.milvus.v2.service.vector.request.RunAnalyzerReq;
import io.milvus.v2.service.vector.response.RunAnalyzerResp;

List<String> texts = new ArrayList<>();
texts.add("An efficient system relies on a robust analyzer to correctly process text for various applications.");

RunAnalyzerResp resp = client.runAnalyzer(RunAnalyzerReq.builder()
        .texts(texts)
        .analyzerParams(analyzerParams)
        .build());
List<RunAnalyzerResp.AnalyzerResult> results = resp.getResults();
// javascrip# Sample text to analyze
const text = "An efficient system relies on a robust analyzer to correctly process text for various applications."

// Run analyzer
const result = await client.run_analyzer({
    text,
    analyzer_params
});
import (
    "context"
    "encoding/json"
    "fmt"

    "github.com/milvus-io/milvus/client/v2/milvusclient"
)

bs, _ := json.Marshal(analyzerParams)
texts := []string{"An efficient system relies on a robust analyzer to correctly process text for various applications."}
option := milvusclient.NewRunAnalyzerOption(texts).
    WithAnalyzerParams(string(bs))

result, err := client.RunAnalyzer(ctx, option)
if err != nil {
    fmt.Println(err.Error())
    // handle error
}
# restful
輸出結果將為:
['efficient', 'system', 'relies', 'on', 'robust', 'analyzer', 'to', 'correctly', 'process', 'text', 'various', 'applications']
這顯示該分析器已正確地將輸入文字進行分詞,篩除了停用詞"a" 、"an" 以及"for" ,同時回傳剩餘的有意義詞元。
上述standard 內建分析器的設定,相當於使用以下參數設定自訂分析器,其中tokenizer 和filter 選項是為了實現類似功能而明確定義的:
analyzer_params = {
    "tokenizer": "standard",
    "filter": [
        "lowercase",
        {
            "type": "stop",
            "stop_words": ["a", "an", "for"]
        }
    ]
}
Map<String, Object> analyzerParams = new HashMap<>();
analyzerParams.put("tokenizer", "standard");
analyzerParams.put("filter",
        Arrays.asList("lowercase",
                new HashMap<String, Object>() {{
                    put("type", "stop");
                    put("stop_words", Arrays.asList("a", "an", "for"));
                }}));
const analyzer_params = {
    "tokenizer": "standard",
    "filter": [
        "lowercase",
        {
            "type": "stop",
            "stop_words": ["a", "an", "for"]
        }
    ]
};
analyzerParams = map[string]any{"tokenizer": "standard",
    "filter": []any{"lowercase", map[string]any{
        "type":       "stop",
        "stop_words": []string{"a", "an", "for"},
    }}}
export analyzerParams='{
       "type": "standard",
       "filter":  [
       "lowercase",
       {
            "type": "stop",
            "stop_words": ["a", "an", "for"]
       }
   ]
}'
Milvus 提供以下內建分析器,每個分析器皆針對特定的文字處理需求而設計:
standard: 適用於通用文字處理,會套用標準的詞元分割與小寫過濾。english: 針對英文文本進行優化,支援英文停用詞。chinese: 專為處理中文文本而設計,包含針對中文語言結構進行調整的詞元化處理。arabic: 專為阿拉伯語文本設計,具備阿拉伯語正規化、小數位數正規化、阿拉伯語詞幹提取及阿拉伯語停用詞移除功能。thai: 專為泰文處理設計,具備泰文詞語分割、小數位數正規化及泰文停用詞移除功能。
自訂分析器
若需進行更進階的文本處理,Milvus 中的自訂分析器可讓您透過指定分詞器與篩選器,建立量身打造的文本處理管線。此設定非常適合需要精確控制的特殊應用情境。
分詞器
分詞器是 自訂分析器的必備組件,它會將輸入文字拆解為獨立單位(即詞元),從而啟動分析器處理流程。分詞過程遵循特定規則,例如依據空格或標點符號進行分割,具體取決於分詞器的類型。此流程可讓每個單字或短語獲得更精確且獨立的處理。
例如,分詞器會將文字「"Vector Database Built for Scale" 」轉換為獨立的詞元:
["Vector", "Database", "Built", "for", "Scale"]
指定分詞器的範例:
analyzer_params = {
    "tokenizer": "whitespace",
}
Map<String, Object> analyzerParams = new HashMap<>();
analyzerParams.put("tokenizer", "whitespace");
const analyzer_params = {
    "tokenizer": "whitespace",
};
analyzerParams = map[string]any{"tokenizer": "whitespace"}
export analyzerParams='{
       "type": "whitespace"
    }'
篩選器
篩選器是可選的組件,用於處理分詞器產生的詞元,並根據需要對其進行轉換或精煉。例如,在對已分詞的詞元["Vector", "Database", "Built", "for", "Scale"] 套用lowercase 篩選器後,結果可能如下:
["vector", "database", "built", "for", "scale"]
自訂分析器中的篩選器可為內建或自訂類型,視配置需求而定。
內建篩選器:由 Milvus 預先設定,僅需最少的設定即可使用。您只需指定其名稱,即可直接使用這些篩選器。以下篩選器為內建功能,可直接使用:
lowercase: 將文字轉換為小寫,確保不區分大小寫的比對。詳情請參閱「小寫轉換」。asciifolding: 將非 ASCII 字元轉換為 ASCII 等效字元,簡化多語言文字的處理。詳情請參閱「ASCII 摺疊」。alphanumonly:移除非字母數字字元,僅保留字母數字字元。詳情請參閱「Alphanumonly」。cnalphanumonly: 移除包含中文字元、英文字母或數字以外任何字元的詞元。詳情請參閱Cnalphanumonly。cncharonly: 移除包含任何非中文字元的詞元。詳情請參閱Cncharonly。pinyin: 為中文詞元新增拼音詞元形式,使中文文字能進行基於拼音的比對。詳情請參閱「拼音」。
使用內建篩選器的範例:
analyzer_params = {
    "tokenizer": "standard", # Mandatory: Specifies tokenizer
    "filter": ["lowercase"], # Optional: Built-in filter that converts text to lowercase
}
Map<String, Object> analyzerParams = new HashMap<>(); analyzerParams.put("tokenizer", "standard"); analyzerParams.put("filter", Collections.singletonList("lowercase"));const analyzer_params = { "tokenizer": "standard", // Mandatory: Specifies tokenizer "filter": ["lowercase"], // Optional: Built-in filter that converts text to lowercase }analyzerParams = map[string]any{"tokenizer": "standard", "filter": []any{"lowercase"}}export analyzerParams='{ "type": "standard", "filter": ["lowercase"] }'自訂篩選器:自訂篩選器可進行特殊設定。您可以透過選擇有效的篩選器類型(
filter.type)並為每種篩選器類型新增特定設定,來定義自訂篩選器。支援自訂的篩選器類型範例:stop:透過設定停用詞清單(例如"stop_words": ["of", "to"])來移除指定的常見詞彙。詳情請參閱「停用詞」。length:根據長度標準排除詞元,例如設定詞元最大長度。詳情請參閱「Length」。stemmer: 將單詞還原為詞幹形式,以實現更靈活的匹配。詳情請參閱「詞幹化 (Stemmer)」。
自訂篩選器的設定範例:
analyzer_params = {
    "tokenizer": "standard", # Mandatory: Specifies tokenizer
    "filter": [
        {
            "type": "stop", # Specifies 'stop' as the filter type
            "stop_words": ["of", "to"], # Customizes stop words for this filter type
        }
    ]
}
Map<String, Object> analyzerParams = new HashMap<>(); analyzerParams.put("tokenizer", "standard"); analyzerParams.put("filter", Collections.singletonList(new HashMap<String, Object>() {{ put("type", "stop"); put("stop_words", Arrays.asList("a", "an", "for")); }}));const analyzer_params = { "tokenizer": "standard", // Mandatory: Specifies tokenizer "filter": [ { "type": "stop", // Specifies 'stop' as the filter type "stop_words": ["of", "to"], // Customizes stop words for this filter type } ] };analyzerParams = map[string]any{"tokenizer": "standard", "filter": []any{map[string]any{ "type": "stop", "stop_words": []string{"of", "to"}, }}}export analyzerParams='{ "type": "standard", "filter": [ { "type": "stop", "stop_words": ["a", "an", "for"] } ] }'
使用範例
在此範例中,您將建立一個包含以下內容的集合架構:
一個用於嵌入向量的向量欄位。
兩個用於文字處理的
VARCHAR欄位:其中一個欄位使用內建分析器。
另一個則使用自訂分析器。
在將這些設定整合至您的集合之前,您將使用 `run_analyzer ` 方法驗證每個分析器。
步驟 1:初始化 MilvusClient 並建立資料結構
首先設定 Milvus 客戶端並建立新的資料結構。
from pymilvus import MilvusClient, DataType

# Set up a Milvus client
client = MilvusClient(uri="http://localhost:19530")

# Create a new schema
schema = client.create_schema(auto_id=True, enable_dynamic_field=False)
import io.milvus.v2.client.ConnectConfig;
import io.milvus.v2.client.MilvusClientV2;
import io.milvus.v2.common.DataType;
import io.milvus.v2.common.IndexParam;
import io.milvus.v2.service.collection.request.AddFieldReq;
import io.milvus.v2.service.collection.request.CreateCollectionReq;

// Set up a Milvus client
ConnectConfig config = ConnectConfig.builder()
        .uri("http://localhost:19530")
        .build();
MilvusClientV2 client = new MilvusClientV2(config);

// Create schema
CreateCollectionReq.CollectionSchema schema = CreateCollectionReq.CollectionSchema.builder()
        .enableDynamicField(false)
        .build();
import { MilvusClient, DataType } from "@zilliz/milvus2-sdk-node";

// Set up a Milvus client
const client = new MilvusClient("http://localhost:19530");
import (
    "context"
    "fmt"

    "github.com/milvus-io/milvus/client/v2/column"
    "github.com/milvus-io/milvus/client/v2/entity"
    "github.com/milvus-io/milvus/client/v2/index"
    "github.com/milvus-io/milvus/client/v2/milvusclient"
)

ctx, cancel := context.WithCancel(context.Background())
defer cancel()

cli, err := milvusclient.New(ctx, &milvusclient.ClientConfig{
    Address: "localhost:19530",
})
if err != nil {
    fmt.Println(err.Error())
    // handle err
}
defer client.Close(ctx)

schema := entity.NewSchema().WithAutoID(true).WithDynamicFieldEnabled(false)
# restful
步驟 2:定義並驗證分析器設定
設定並驗證內建分析器(
english):設定:定義內建英文分析器的參數。
驗證:使用
run_analyzer確認該設定能否產生預期的分詞結果。
# Built-in analyzer configuration for English text processing
analyzer_params_built_in = {
    "type": "english"
}

# Verify built-in analyzer configuration
sample_text = "Milvus simplifies text analysis for search."
result = client.run_analyzer(sample_text, analyzer_params_built_in)
print("Built-in analyzer output:", result)

# Expected output:
# Built-in analyzer output: ['milvus', 'simplifi', 'text', 'analysi', 'search']
Map<String, Object> analyzerParamsBuiltin = new HashMap<>(); analyzerParamsBuiltin.put("type", "english"); List<String> texts = new ArrayList<>(); texts.add("Milvus simplifies text ana lysis for search."); RunAnalyzerResp resp = client.runAnalyzer(RunAnalyzerReq.builder() .texts(texts) .analyzerParams(analyzerParams) .build()); List<RunAnalyzerResp.AnalyzerResult> results = resp.getResults();// Use a built-in analyzer for VARCHAR field `title_en` const analyzerParamsBuiltIn = { type: "english", }; const sample_text = "Milvus simplifies text analysis for search."; const result = await client.run_analyzer({ text: sample_text, analyzer_params: analyzer_params_built_in });analyzerParams := map[string]any{"type": "english"} bs, _ := json.Marshal(analyzerParams) texts := []string{"Milvus simplifies text analysis for search."} option := milvusclient.NewRunAnalyzerOption(texts). WithAnalyzerParams(string(bs)) result, err := client.RunAnalyzer(ctx, option) if err != nil { fmt.Println(err.Error()) // handle error }# restful設定並驗證自訂分析器:
設定:定義一個自訂分析器,該分析器使用標準分詞器,並搭配內建的小寫轉換濾波器,以及針對詞元長度和停用詞的自訂濾波器。
驗證:使用
run_analyzer確保自訂設定能如預期般處理文字。
# Custom analyzer configuration with a standard tokenizer and custom filters
analyzer_params_custom = {
    "tokenizer": "standard",
    "filter": [
        "lowercase",  # Built-in filter: convert tokens to lowercase
        {
            "type": "length",  # Custom filter: restrict token length
            "max": 40
        },
        {
            "type": "stop",  # Custom filter: remove specified stop words
            "stop_words": ["of", "for"]
        }
    ]
}

# Verify custom analyzer configuration
sample_text = "Milvus provides flexible, customizable analyzers for robust text processing."
result = client.run_analyzer(sample_text, analyzer_params_custom)
print("Custom analyzer output:", result)

# Expected output:
# Custom analyzer output: ['milvus', 'provides', 'flexible', 'customizable', 'analyzers', 'robust', 'text', 'processing']
// Configure a custom analyzer Map<String, Object> analyzerParams = new HashMap<>(); analyzerParams.put("tokenizer", "standard"); analyzerParams.put("filter", Arrays.asList("lowercase", new HashMap<String, Object>() {{ put("type", "length"); put("max", 40); }}, new HashMap<String, Object>() {{ put("type", "stop"); put("stop_words", Arrays.asList("of", "for")); }} ) ); List<String> texts = new ArrayList<>(); texts.add("Milvus provides flexible, customizable analyzers for robust text processing."); RunAnalyzerResp resp = client.runAnalyzer(RunAnalyzerReq.builder() .texts(texts) .analyzerParams(analyzerParams) .build()); List<RunAnalyzerResp.AnalyzerResult> results = resp.getResults();// Configure a custom analyzer for VARCHAR field `title` const analyzerParamsCustom = { tokenizer: "standard", filter: [ "lowercase", { type: "length", max: 40, }, { type: "stop", stop_words: ["of", "to"], }, ], }; const sample_text = "Milvus provides flexible, customizable analyzers for robust text processing."; const result = await client.run_analyzer({ text: sample_text, analyzer_params: analyzer_params_built_in });analyzerParams = map[string]any{"tokenizer": "standard", "filter": []any{"lowercase", map[string]any{ "type": "length", "max": 40, map[string]any{ "type": "stop", "stop_words": []string{"of", "to"}, }}} bs, _ := json.Marshal(analyzerParams) texts := []string{"Milvus provides flexible, customizable analyzers for robust text processing."} option := milvusclient.NewRunAnalyzerOption(texts). WithAnalyzerParams(string(bs)) result, err := client.RunAnalyzer(ctx, option) if err != nil { fmt.Println(err.Error()) // handle error }# curl
步驟 3:將欄位新增至模式
既然您已驗證分析器的設定,請將其新增至模式欄位中:
# Add VARCHAR field 'title_en' using the built-in analyzer configuration
schema.add_field(
    field_name='title_en',
    datatype=DataType.VARCHAR,
    max_length=1000,
    enable_analyzer=True,
    analyzer_params=analyzer_params_built_in,
    enable_match=True,
)

# Add VARCHAR field 'title' using the custom analyzer configuration
schema.add_field(
    field_name='title',
    datatype=DataType.VARCHAR,
    max_length=1000,
    enable_analyzer=True,
    analyzer_params=analyzer_params_custom,
    enable_match=True,
)

# Add a vector field for embeddings
schema.add_field(field_name="embedding", datatype=DataType.FLOAT_VECTOR, dim=3)

# Add a primary key field
schema.add_field(field_name="id", datatype=DataType.INT64, is_primary=True)
schema.addField(AddFieldReq.builder()
        .fieldName("title")
        .dataType(DataType.VarChar)
        .maxLength(1000)
        .enableAnalyzer(true)
        .analyzerParams(analyzerParams)
        .enableMatch(true) // must enable this if you use TextMatch
        .build());

// Add vector field
schema.addField(AddFieldReq.builder()
        .fieldName("embedding")
        .dataType(DataType.FloatVector)
        .dimension(3)
        .build());
// Add primary field
schema.addField(AddFieldReq.builder()
        .fieldName("id")
        .dataType(DataType.Int64)
        .isPrimaryKey(true)
        .autoID(true)
        .build());
// Create schema
const schema = {
  auto_id: true,
  fields: [
    {
      name: "id",
      type: DataType.INT64,
      is_primary: true,
    },
    {
      name: "title_en",
      data_type: DataType.VARCHAR,
      max_length: 1000,
      enable_analyzer: true,
      analyzer_params: analyzerParamsBuiltIn,
      enable_match: true,
    },
    {
      name: "title",
      data_type: DataType.VARCHAR,
      max_length: 1000,
      enable_analyzer: true,
      analyzer_params: analyzerParamsCustom,
      enable_match: true,
    },
    {
      name: "embedding",
      data_type: DataType.FLOAT_VECTOR,
      dim: 4,
    },
  ],
};
schema.WithField(entity.NewField().
    WithName("id").
    WithDataType(entity.FieldTypeInt64).
    WithIsPrimaryKey(true).
    WithIsAutoID(true),
).WithField(entity.NewField().
    WithName("embedding").
    WithDataType(entity.FieldTypeFloatVector).
    WithDim(3),
).WithField(entity.NewField().
    WithName("title").
    WithDataType(entity.FieldTypeVarChar).
    WithMaxLength(1000).
    WithEnableAnalyzer(true).
    WithAnalyzerParams(analyzerParams).
    WithEnableMatch(true),
)
# restful
步驟 4:準備索引參數並建立集合
# Set up index parameters for the vector field
index_params = client.prepare_index_params()
index_params.add_index(field_name="embedding", metric_type="COSINE", index_type="AUTOINDEX")

# Create the collection with the defined schema and index parameters
client.create_collection(
    collection_name="my_collection",
    schema=schema,
    index_params=index_params
)
// Set up index params for vector field
List<IndexParam> indexes = new ArrayList<>();
indexes.add(IndexParam.builder()
        .fieldName("embedding")
        .indexType(IndexParam.IndexType.AUTOINDEX)
        .metricType(IndexParam.MetricType.COSINE)
        .build());

// Create collection with defined schema
CreateCollectionReq requestCreate = CreateCollectionReq.builder()
        .collectionName("my_collection")
        .collectionSchema(schema)
        .indexParams(indexes)
        .build();
client.createCollection(requestCreate);
// Set up index params for vector field
const indexParams = [
  {
    name: "embedding",
    metric_type: "COSINE",
    index_type: "AUTOINDEX",
  },
];

// Create collection with defined schema
await client.createCollection({
  collection_name: "my_collection",
  schema: schema,
  index_params: indexParams,
});

console.log("Collection created successfully!");
idx := index.NewAutoIndex(index.MetricType(entity.COSINE))
indexOption := milvusclient.NewCreateIndexOption("my_collection", "embedding", idx)

err = client.CreateCollection(ctx,
    milvusclient.NewCreateCollectionOption("my_collection", schema).
        WithIndexOptions(indexOption))
if err != nil {
    fmt.Println(err.Error())
    // handle error
}
# restful
下一步
配置完分析器後,您可以整合 Milvus 提供的文字檢索功能。詳細資訊請參閱:
