

분석기 개요
텍스트 처리에서 분석기 ( analyzer )는 원시 텍스트를 구조화되고 검색 가능한 형식으로 변환하는 핵심 구성 요소입니다. 각 분석기는 일반적으로 토큰화기(tokenizer) 와 필터(filter)라는 두 가지 핵심 요소로 구성됩니다. 이 두 요소는 함께 입력 텍스트를 토큰으로 변환하고, 토큰을 정제하며, 효율적인 색인 생성 및 검색을 위해 토큰을 준비합니다.
Milvus에서는 컬렉션 스키마에 ` VARCHAR ` 필드를 추가할 때 컬렉션 생성 과정에서 분석기를 구성합니다. 분석기가 생성한 토큰은 키워드 일치를 위한 인덱스를 구축하는 데 사용되거나, 전체 텍스트 검색을 위해 스파스 임베딩으로 변환될 수 있습니다. 자세한 내용은 전체 텍스트 검색, 구문 일치 또는 텍스트 일치를 참조하십시오.
분석기를 사용하면 성능에 영향을 미칠 수 있습니다.
전체 텍스트 검색: 전체 텍스트 검색의 경우, DataNode 및 QueryNode 채널은 토큰화가 완료될 때까지 기다려야 하므로 데이터를 더 느리게 처리합니다. 그 결과, 새로 수집된 데이터가 검색에 사용 가능해지는 데 더 오랜 시간이 걸립니다.
키워드 일치: 키워드 일치의 경우, 인덱스를 생성하기 전에 토큰화가 완료되어야 하므로 인덱스 생성 속도도 느려집니다.
분석기의 구조
Milvus의 분석기는 정확히 하나의 토큰화기와 0개 이상의 필터로 구성됩니다.
토큰화기(Tokenizer): 토큰화기는 입력 텍스트를 토큰이라고 하는 개별 단위로 분할합니다. 이러한 토큰은 토큰화기 유형에 따라 단어 또는 구가 될 수 있습니다.
필터: 필터를 토큰에 적용하여 토큰을 더욱 정제할 수 있습니다(예: 소문자로 변환하거나 빈어를 제거하는 등).
토큰화기는 UTF-8 형식만 지원합니다. 다른 형식에 대한 지원은 향후 릴리스에서 추가될 예정입니다.
아래 워크플로는 분석기가 텍스트를 처리하는 과정을 보여줍니다.
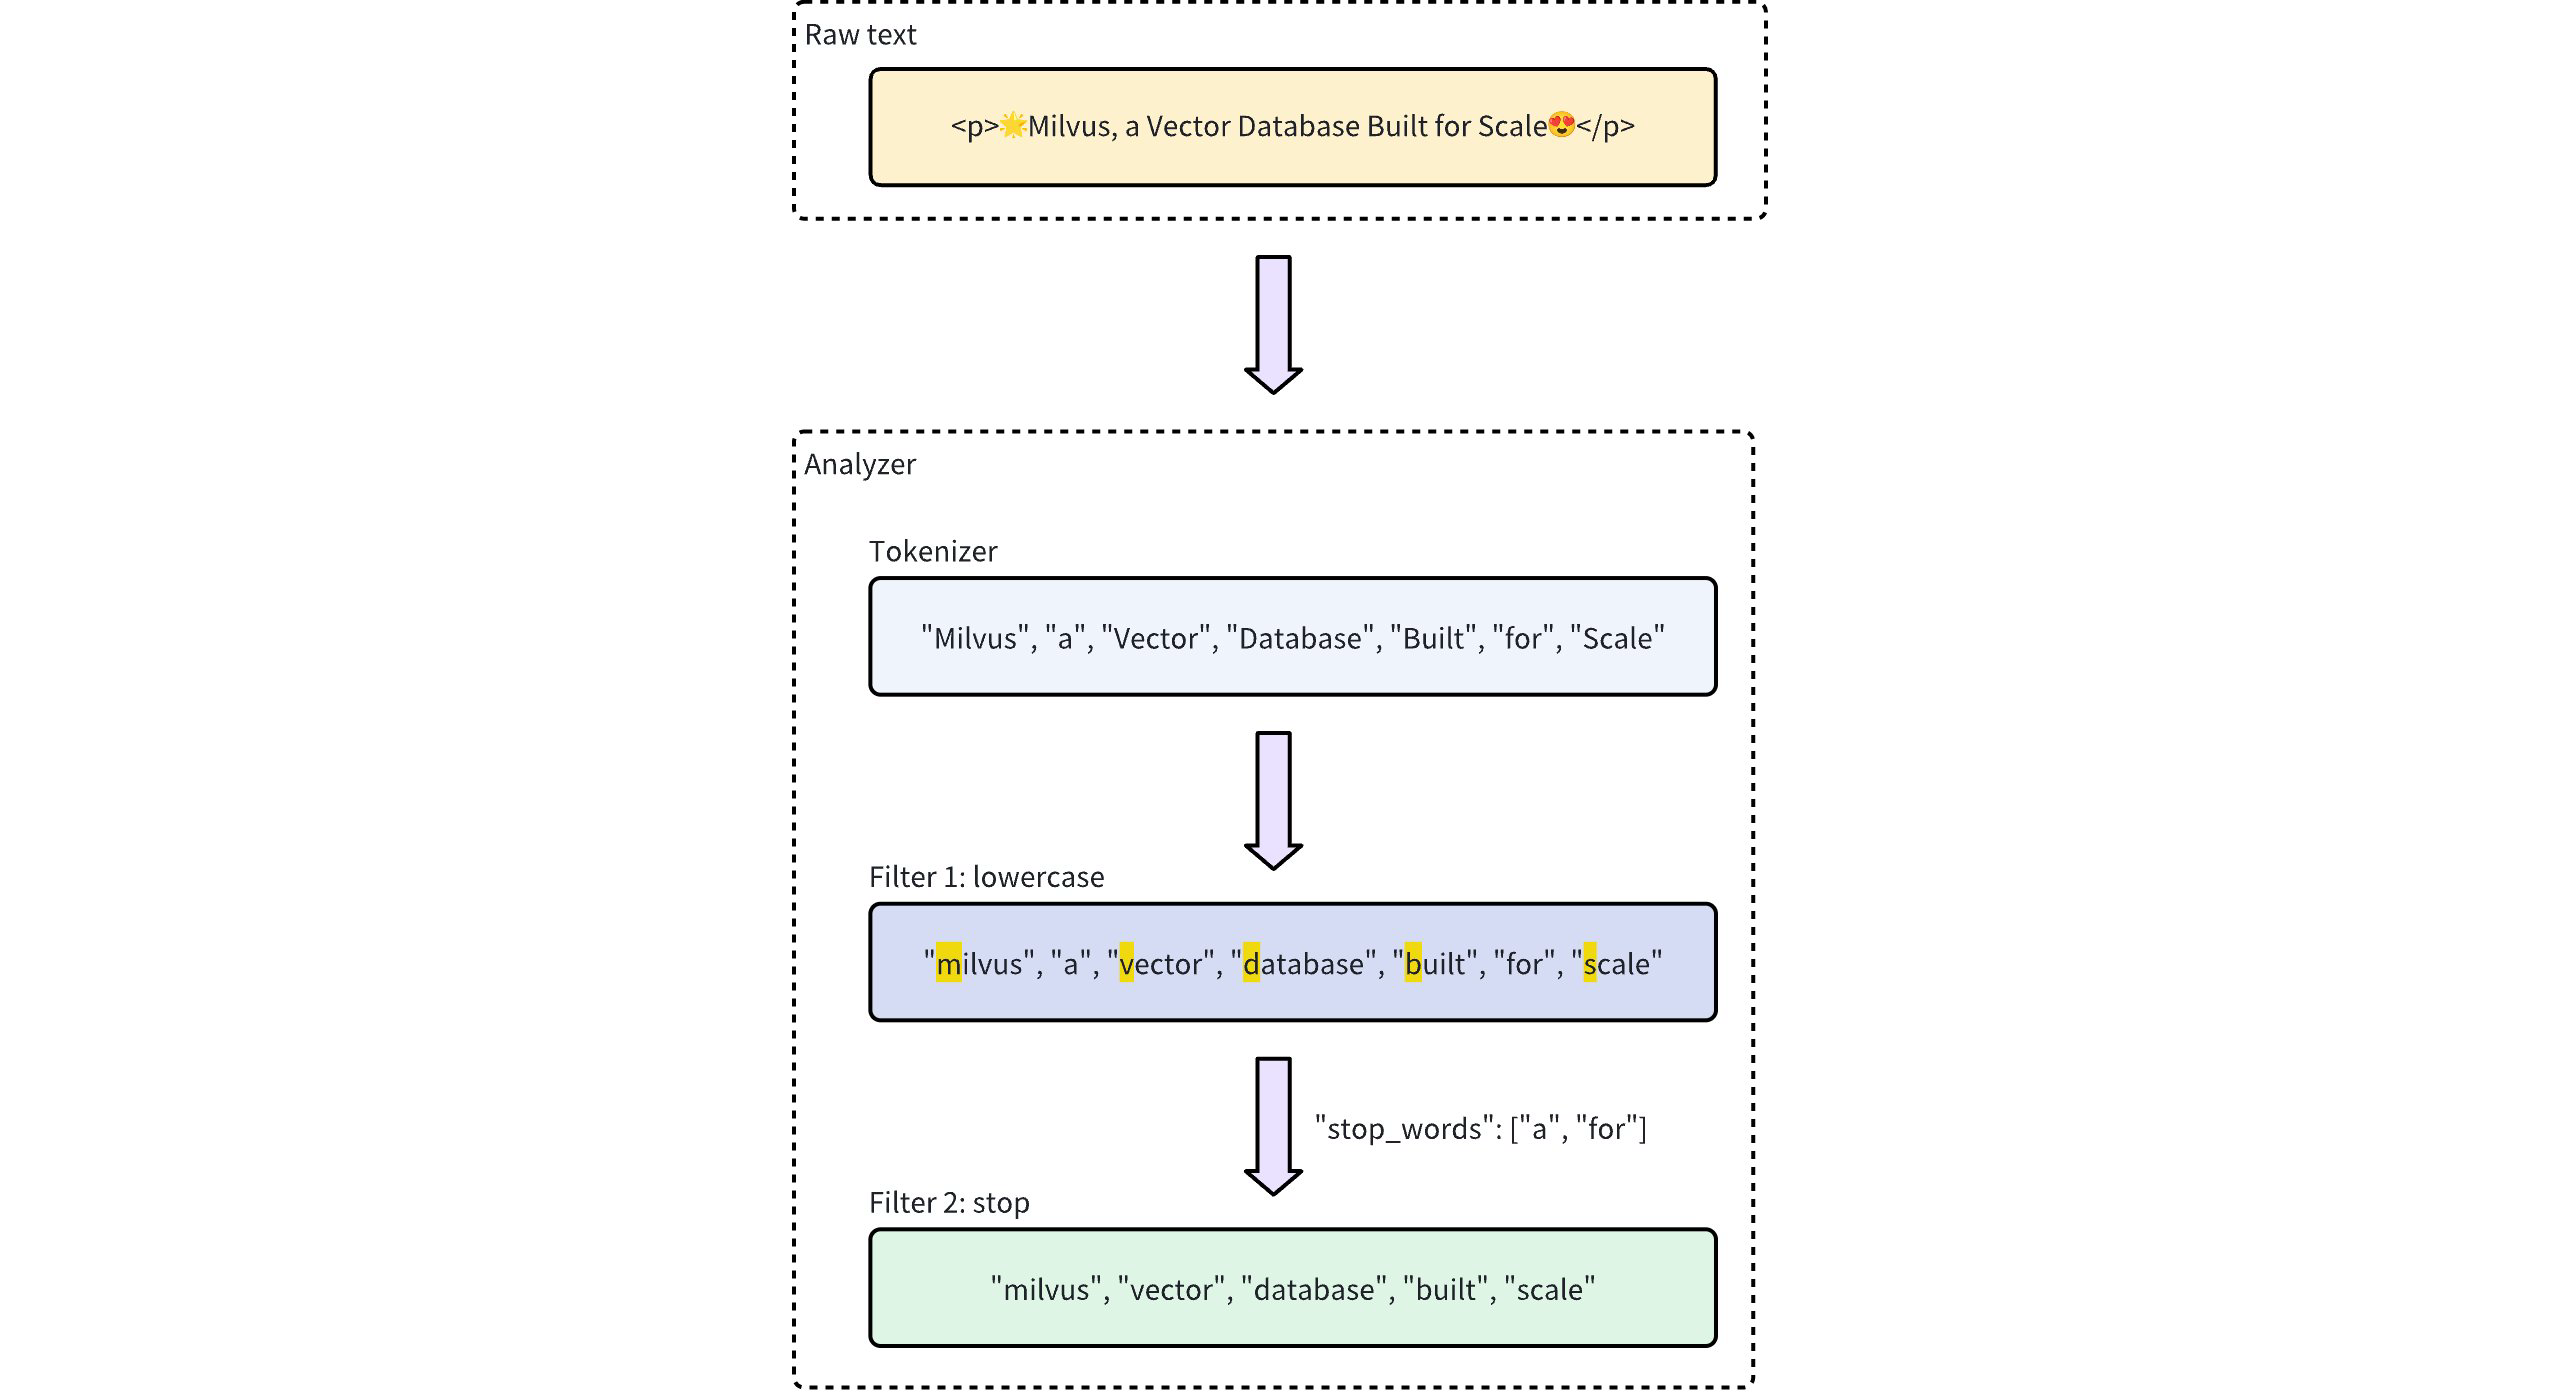 분석기 처리 워크플로
분석기 유형
Milvus는 다양한 텍스트 처리 요구 사항을 충족하기 위해 두 가지 유형의 분석기를 제공합니다.
내장 분석기: 최소한의 설정만으로 일반적인 텍스트 처리 작업을 수행할 수 있도록 미리 정의된 구성입니다. 내장 분석기는 복잡한 구성이 필요하지 않으므로 범용 검색에 이상적입니다.
사용자 정의 분석기: 보다 고급 요구 사항을 충족하기 위해, 사용자 정의 분석기를 사용하면 토큰화기와 0개 이상의 필터를 모두 지정하여 자체 구성을 정의할 수 있습니다. 이러한 수준의 사용자 정의는 텍스트 처리에 대한 정밀한 제어가 필요한 특수한 사용 사례에 특히 유용합니다.
- 컬렉션 생성 시 분석기 구성을 생략하면, Milvus는 기본적으로 모든 텍스트 처리에 ‘
standard’ 분석기를 사용합니다. 자세한 내용은 표준 분석기를 참조하십시오. - 최적의 검색 및 쿼리 성능을 얻으려면 텍스트 데이터의 언어에 맞는 분석기를 선택하십시오. 예를 들어, ‘
standard’ 분석기는 다목적으로 사용할 수 있지만, 중국어, 아랍어, 태국어, 일본어 또는 한국어와 같이 고유한 문법 구조를 가진 언어의 경우 최선의 선택이 아닐 수 있습니다. 이러한 경우에는 다음과 같은 언어별 분석기를 사용하는 것이 좋습니다.chinese,arabic, 또는thai, 또는 특수한 토큰화기를 갖춘 사용자 정의 분석기(예:lindera,icu) 및 필터를 갖춘 사용자 정의 분석기를 사용하는 것이 정확한 토큰화 및 더 나은 검색 결과를 보장하기 위해 적극 권장됩니다.
내장 분석기
Milvus의 내장 분석기는 특정 토큰화기 및 필터가 미리 구성되어 있으므로, 이러한 구성 요소를 직접 정의할 필요 없이 즉시 사용할 수 있습니다. 각 내장 분석기는 사전 설정된 토큰화기와 필터를 포함하는 템플릿 역할을 하며, 사용자 지정을 위한 선택적 매개변수를 제공합니다.
예를 들어, ` standard ` 내장 분석기를 사용하려면 ` type `에 해당 이름 standard 을 지정하고, 선택적으로 ` stop_words`와 같이 이 분석기 유형에 특화된 추가 구성을 포함하면 됩니다:
analyzer_params = {
    "type": "standard", # Uses the standard built-in analyzer
    "stop_words": ["a", "an", "for"] # Defines a list of common words (stop words) to exclude from tokenization
}
Map<String, Object> analyzerParams = new HashMap<>();
analyzerParams.put("type", "standard");
analyzerParams.put("stop_words", Arrays.asList("a", "an", "for"));
const analyzer_params = {
    "type": "standard", // Uses the standard built-in analyzer
    "stop_words": ["a", "an", "for"] // Defines a list of common words (stop words) to exclude from tokenization
};
analyzerParams := map[string]any{"type": "standard", "stop_words": []string{"a", "an", "for"}}
export analyzerParams='{
       "type": "standard",
       "stop_words": ["a", "an", "for"]
    }'
분석기의 실행 결과를 확인하려면 ` run_analyzer ` 메서드를 사용하십시오:
# Sample text to analyze
text = "An efficient system relies on a robust analyzer to correctly process text for various applications."

# Run analyzer
result = client.run_analyzer(
    text,
    analyzer_params
)
import io.milvus.v2.service.vector.request.RunAnalyzerReq;
import io.milvus.v2.service.vector.response.RunAnalyzerResp;

List<String> texts = new ArrayList<>();
texts.add("An efficient system relies on a robust analyzer to correctly process text for various applications.");

RunAnalyzerResp resp = client.runAnalyzer(RunAnalyzerReq.builder()
        .texts(texts)
        .analyzerParams(analyzerParams)
        .build());
List<RunAnalyzerResp.AnalyzerResult> results = resp.getResults();
// javascrip# Sample text to analyze
const text = "An efficient system relies on a robust analyzer to correctly process text for various applications."

// Run analyzer
const result = await client.run_analyzer({
    text,
    analyzer_params
});
import (
    "context"
    "encoding/json"
    "fmt"

    "github.com/milvus-io/milvus/client/v2/milvusclient"
)

bs, _ := json.Marshal(analyzerParams)
texts := []string{"An efficient system relies on a robust analyzer to correctly process text for various applications."}
option := milvusclient.NewRunAnalyzerOption(texts).
    WithAnalyzerParams(string(bs))

result, err := client.RunAnalyzer(ctx, option)
if err != nil {
    fmt.Println(err.Error())
    // handle error
}
# restful
출력 결과는 다음과 같습니다:
['efficient', 'system', 'relies', 'on', 'robust', 'analyzer', 'to', 'correctly', 'process', 'text', 'various', 'applications']
이는 분석기가 중지어(stop words)인 "a", "an", "for" 를 걸러내고, 나머지 의미 있는 토큰을 반환함으로써 입력 텍스트를 올바르게 토큰화했음을 보여줍니다.
위의 standard 내장 분석기 구성은 다음 매개변수를 사용하여 사용자 정의 분석기를 설정하는 것과 동일하며, 여기서 tokenizer 및 filter 옵션은 유사한 기능을 구현하기 위해 명시적으로 정의되었습니다:
analyzer_params = {
    "tokenizer": "standard",
    "filter": [
        "lowercase",
        {
            "type": "stop",
            "stop_words": ["a", "an", "for"]
        }
    ]
}
Map<String, Object> analyzerParams = new HashMap<>();
analyzerParams.put("tokenizer", "standard");
analyzerParams.put("filter",
        Arrays.asList("lowercase",
                new HashMap<String, Object>() {{
                    put("type", "stop");
                    put("stop_words", Arrays.asList("a", "an", "for"));
                }}));
const analyzer_params = {
    "tokenizer": "standard",
    "filter": [
        "lowercase",
        {
            "type": "stop",
            "stop_words": ["a", "an", "for"]
        }
    ]
};
analyzerParams = map[string]any{"tokenizer": "standard",
    "filter": []any{"lowercase", map[string]any{
        "type":       "stop",
        "stop_words": []string{"a", "an", "for"},
    }}}
export analyzerParams='{
       "type": "standard",
       "filter":  [
       "lowercase",
       {
            "type": "stop",
            "stop_words": ["a", "an", "for"]
       }
   ]
}'
Milvus는 다음과 같은 내장 분석기를 제공하며, 각 분석기는 특정 텍스트 처리 요구 사항에 맞게 설계되었습니다:
standard: 범용 텍스트 처리에 적합하며, 표준 토큰화 및 소문자 필터링을 적용합니다.english: 영어 텍스트에 최적화되어 있으며, 영어 스톱워드를 지원합니다.chinese: 중국어 텍스트 처리에 특화되어 있으며, 중국어 언어 구조에 맞춘 토큰화를 포함합니다.arabic: 아랍어 텍스트 처리에 특화되어 있으며, 아랍어 정규화, 소수점 자리 수 정규화, 아랍어 어근 추출 및 아랍어 스톱워드 제거 기능을 제공합니다.thai: 태국어 텍스트 처리에 특화되어 있으며, 태국어 단어 분할, 소수점 숫자 정규화 및 태국어 스톱워드 제거 기능을 제공합니다.
사용자 정의 분석기
보다 고급 텍스트 처리를 위해 Milvus의 사용자 정의 분석기를 사용하면 토큰화기와 필터를 모두 지정하여 맞춤형 텍스트 처리 파이프라인을 구축할 수 있습니다. 이 설정은 정밀한 제어가 필요한 특수한 사용 사례에 이상적입니다.
토큰화기
토큰화기는 사용자 정의 분석기의 필수 구성 요소로, 입력 텍스트를 개별 단위 또는 토큰으로 분할하여 분석기 파이프라인을 시작합니다. 토큰화는 토큰화기 유형에 따라 공백이나 구두점에 의한 분할과 같은 특정 규칙을 따릅니다. 이 과정을 통해 각 단어나 구를 보다 정밀하고 독립적으로 처리할 수 있습니다.
예를 들어, 토큰화기는 “ "Vector Database Built for Scale" ”라는 텍스트를 다음과 같이 개별 토큰으로 변환합니다:
["Vector", "Database", "Built", "for", "Scale"]
토큰화기 지정 예시:
analyzer_params = {
    "tokenizer": "whitespace",
}
Map<String, Object> analyzerParams = new HashMap<>();
analyzerParams.put("tokenizer", "whitespace");
const analyzer_params = {
    "tokenizer": "whitespace",
};
analyzerParams = map[string]any{"tokenizer": "whitespace"}
export analyzerParams='{
       "type": "whitespace"
    }'
필터
필터는 토큰화기가 생성한 토큰을 처리하여 필요에 따라 변환하거나 정제하는 선택적 구성 요소입니다. 예를 들어, 토큰화된 용어 ` ["Vector", "Database", "Built", "for", "Scale"]`에 ` lowercase ` 필터를 적용하면 결과는 다음과 같을 수 있습니다:
["vector", "database", "built", "for", "scale"]
사용자 정의 분석기의 필터는 구성 요구 사항에 따라 내장 필터이거나 사용자 정의 필터일 수 있습니다.
내장 필터: Milvus에서 미리 구성되어 있어 최소한의 설정만 필요합니다. 필터 이름을 지정하면 바로 사용할 수 있습니다. 다음 필터들은 바로 사용할 수 있도록 내장되어 있습니다:
lowercase: 텍스트를 소문자로 변환하여 대소문자를 구분하지 않는 일치 처리를 보장합니다. 자세한 내용은 소문자 변환을 참조하십시오.asciifolding: 비 ASCII 문자를 ASCII 등가 문자로 변환하여 다국어 텍스트 처리를 간소화합니다. 자세한 내용은 ASCII 폴딩을 참조하십시오.alphanumonly: 영숫자 외의 문자를 제거하여 영숫자만 남깁니다. 자세한 내용은 Alphanumonly를 참조하십시오.cnalphanumonly: 한자, 영어 알파벳 또는 숫자 이외의 문자가 포함된 토큰을 제거합니다. 자세한 내용은 Cnalphanumonly를 참조하십시오.cncharonly: 한자 이외의 문자가 포함된 토큰을 제거합니다. 자세한 내용은 Cncharonly를 참조하십시오.pinyin: 중국어 토큰에 병음 토큰 형태를 추가하여, 중국어 텍스트에 대해 병음 기반 일치를 가능하게 합니다. 자세한 내용은 ‘병음’을 참조하십시오.
내장 필터 사용 예시:
analyzer_params = {
    "tokenizer": "standard", # Mandatory: Specifies tokenizer
    "filter": ["lowercase"], # Optional: Built-in filter that converts text to lowercase
}
Map<String, Object> analyzerParams = new HashMap<>(); analyzerParams.put("tokenizer", "standard"); analyzerParams.put("filter", Collections.singletonList("lowercase"));const analyzer_params = { "tokenizer": "standard", // Mandatory: Specifies tokenizer "filter": ["lowercase"], // Optional: Built-in filter that converts text to lowercase }analyzerParams = map[string]any{"tokenizer": "standard", "filter": []any{"lowercase"}}export analyzerParams='{ "type": "standard", "filter": ["lowercase"] }'사용자 정의 필터: 사용자 정의 필터를 사용하면 특수한 구성이 가능합니다. 유효한 필터 유형(
filter.type)을 선택하고 각 필터 유형에 대한 구체적인 설정을 추가하여 사용자 정의 필터를 정의할 수 있습니다. 사용자 정의를 지원하는 필터 유형의 예:stop: 중지어(stop word) 목록을 설정하여 지정된 일반 단어를 제거합니다(예:"stop_words": ["of", "to"]). 자세한 내용은 중지어(Stop)를 참조하십시오.length: 최대 토큰 길이 설정과 같은 길이 기준에 따라 토큰을 제외합니다. 자세한 내용은 ‘길이(Length)’를 참조하십시오.stemmer: 보다 유연한 일치를 위해 단어를 어근 형태로 변환합니다. 자세한 내용은 ‘Stemmer’를 참조하십시오.
사용자 정의 필터 구성 예시:
analyzer_params = {
    "tokenizer": "standard", # Mandatory: Specifies tokenizer
    "filter": [
        {
            "type": "stop", # Specifies 'stop' as the filter type
            "stop_words": ["of", "to"], # Customizes stop words for this filter type
        }
    ]
}
Map<String, Object> analyzerParams = new HashMap<>(); analyzerParams.put("tokenizer", "standard"); analyzerParams.put("filter", Collections.singletonList(new HashMap<String, Object>() {{ put("type", "stop"); put("stop_words", Arrays.asList("a", "an", "for")); }}));const analyzer_params = { "tokenizer": "standard", // Mandatory: Specifies tokenizer "filter": [ { "type": "stop", // Specifies 'stop' as the filter type "stop_words": ["of", "to"], // Customizes stop words for this filter type } ] };analyzerParams = map[string]any{"tokenizer": "standard", "filter": []any{map[string]any{ "type": "stop", "stop_words": []string{"of", "to"}, }}}export analyzerParams='{ "type": "standard", "filter": [ { "type": "stop", "stop_words": ["a", "an", "for"] } ] }'
사용 예시
이 예제에서는 다음을 포함하는 컬렉션 스키마를 생성합니다:
임베딩을 위한 벡터 필드.
텍스트 처리를 위한 두 개의
VARCHAR필드:한 필드는 내장 분석기를 사용합니다.
다른 하나는 사용자 정의 분석기를 사용합니다.
이러한 구성을 컬렉션에 적용하기 전에, ` run_analyzer ` 메서드를 사용하여 각 분석기를 검증합니다.
1단계: MilvusClient 초기화 및 스키마 생성
먼저 Milvus 클라이언트를 설정하고 새 스키마를 생성합니다.
from pymilvus import MilvusClient, DataType

# Set up a Milvus client
client = MilvusClient(uri="http://localhost:19530")

# Create a new schema
schema = client.create_schema(auto_id=True, enable_dynamic_field=False)
import io.milvus.v2.client.ConnectConfig;
import io.milvus.v2.client.MilvusClientV2;
import io.milvus.v2.common.DataType;
import io.milvus.v2.common.IndexParam;
import io.milvus.v2.service.collection.request.AddFieldReq;
import io.milvus.v2.service.collection.request.CreateCollectionReq;

// Set up a Milvus client
ConnectConfig config = ConnectConfig.builder()
        .uri("http://localhost:19530")
        .build();
MilvusClientV2 client = new MilvusClientV2(config);

// Create schema
CreateCollectionReq.CollectionSchema schema = CreateCollectionReq.CollectionSchema.builder()
        .enableDynamicField(false)
        .build();
import { MilvusClient, DataType } from "@zilliz/milvus2-sdk-node";

// Set up a Milvus client
const client = new MilvusClient("http://localhost:19530");
import (
    "context"
    "fmt"

    "github.com/milvus-io/milvus/client/v2/column"
    "github.com/milvus-io/milvus/client/v2/entity"
    "github.com/milvus-io/milvus/client/v2/index"
    "github.com/milvus-io/milvus/client/v2/milvusclient"
)

ctx, cancel := context.WithCancel(context.Background())
defer cancel()

cli, err := milvusclient.New(ctx, &milvusclient.ClientConfig{
    Address: "localhost:19530",
})
if err != nil {
    fmt.Println(err.Error())
    // handle err
}
defer client.Close(ctx)

schema := entity.NewSchema().WithAutoID(true).WithDynamicFieldEnabled(false)
# restful
2단계: 분석기 구성 정의 및 검증
내장 분석기(
english)를 구성하고 검증합니다:구성: 내장된 영어 분석기의 분석기 매개변수를 정의합니다.
검증:
run_analyzer를 사용하여 해당 구성이 예상된 토큰화를 생성하는지 확인합니다.
# Built-in analyzer configuration for English text processing
analyzer_params_built_in = {
    "type": "english"
}

# Verify built-in analyzer configuration
sample_text = "Milvus simplifies text analysis for search."
result = client.run_analyzer(sample_text, analyzer_params_built_in)
print("Built-in analyzer output:", result)

# Expected output:
# Built-in analyzer output: ['milvus', 'simplifi', 'text', 'analysi', 'search']
Map<String, Object> analyzerParamsBuiltin = new HashMap<>(); analyzerParamsBuiltin.put("type", "english"); List<String> texts = new ArrayList<>(); texts.add("Milvus simplifies text ana lysis for search."); RunAnalyzerResp resp = client.runAnalyzer(RunAnalyzerReq.builder() .texts(texts) .analyzerParams(analyzerParams) .build()); List<RunAnalyzerResp.AnalyzerResult> results = resp.getResults();// Use a built-in analyzer for VARCHAR field `title_en` const analyzerParamsBuiltIn = { type: "english", }; const sample_text = "Milvus simplifies text analysis for search."; const result = await client.run_analyzer({ text: sample_text, analyzer_params: analyzer_params_built_in });analyzerParams := map[string]any{"type": "english"} bs, _ := json.Marshal(analyzerParams) texts := []string{"Milvus simplifies text analysis for search."} option := milvusclient.NewRunAnalyzerOption(texts). WithAnalyzerParams(string(bs)) result, err := client.RunAnalyzer(ctx, option) if err != nil { fmt.Println(err.Error()) // handle error }# restful사용자 정의 분석기를 구성하고 검증합니다:
구성: 표준 토큰화기와 내장 소문자 변환 필터, 토큰 길이 및 스톱 워드에 대한 사용자 정의 필터를 함께 사용하는 사용자 정의 분석기를 정의합니다.
검증:
run_analyzer를 사용하여 사용자 정의 구성이 텍스트를 의도한 대로 처리하는지 확인합니다.
# Custom analyzer configuration with a standard tokenizer and custom filters
analyzer_params_custom = {
    "tokenizer": "standard",
    "filter": [
        "lowercase",  # Built-in filter: convert tokens to lowercase
        {
            "type": "length",  # Custom filter: restrict token length
            "max": 40
        },
        {
            "type": "stop",  # Custom filter: remove specified stop words
            "stop_words": ["of", "for"]
        }
    ]
}

# Verify custom analyzer configuration
sample_text = "Milvus provides flexible, customizable analyzers for robust text processing."
result = client.run_analyzer(sample_text, analyzer_params_custom)
print("Custom analyzer output:", result)

# Expected output:
# Custom analyzer output: ['milvus', 'provides', 'flexible', 'customizable', 'analyzers', 'robust', 'text', 'processing']
// Configure a custom analyzer Map<String, Object> analyzerParams = new HashMap<>(); analyzerParams.put("tokenizer", "standard"); analyzerParams.put("filter", Arrays.asList("lowercase", new HashMap<String, Object>() {{ put("type", "length"); put("max", 40); }}, new HashMap<String, Object>() {{ put("type", "stop"); put("stop_words", Arrays.asList("of", "for")); }} ) ); List<String> texts = new ArrayList<>(); texts.add("Milvus provides flexible, customizable analyzers for robust text processing."); RunAnalyzerResp resp = client.runAnalyzer(RunAnalyzerReq.builder() .texts(texts) .analyzerParams(analyzerParams) .build()); List<RunAnalyzerResp.AnalyzerResult> results = resp.getResults();// Configure a custom analyzer for VARCHAR field `title` const analyzerParamsCustom = { tokenizer: "standard", filter: [ "lowercase", { type: "length", max: 40, }, { type: "stop", stop_words: ["of", "to"], }, ], }; const sample_text = "Milvus provides flexible, customizable analyzers for robust text processing."; const result = await client.run_analyzer({ text: sample_text, analyzer_params: analyzer_params_built_in });analyzerParams = map[string]any{"tokenizer": "standard", "filter": []any{"lowercase", map[string]any{ "type": "length", "max": 40, map[string]any{ "type": "stop", "stop_words": []string{"of", "to"}, }}} bs, _ := json.Marshal(analyzerParams) texts := []string{"Milvus provides flexible, customizable analyzers for robust text processing."} option := milvusclient.NewRunAnalyzerOption(texts). WithAnalyzerParams(string(bs)) result, err := client.RunAnalyzer(ctx, option) if err != nil { fmt.Println(err.Error()) // handle error }# curl
3단계: 스키마에 필드 추가
분석기 구성을 검증했으므로, 이제 스키마 필드에 이를 추가합니다:
# Add VARCHAR field 'title_en' using the built-in analyzer configuration
schema.add_field(
    field_name='title_en',
    datatype=DataType.VARCHAR,
    max_length=1000,
    enable_analyzer=True,
    analyzer_params=analyzer_params_built_in,
    enable_match=True,
)

# Add VARCHAR field 'title' using the custom analyzer configuration
schema.add_field(
    field_name='title',
    datatype=DataType.VARCHAR,
    max_length=1000,
    enable_analyzer=True,
    analyzer_params=analyzer_params_custom,
    enable_match=True,
)

# Add a vector field for embeddings
schema.add_field(field_name="embedding", datatype=DataType.FLOAT_VECTOR, dim=3)

# Add a primary key field
schema.add_field(field_name="id", datatype=DataType.INT64, is_primary=True)
schema.addField(AddFieldReq.builder()
        .fieldName("title")
        .dataType(DataType.VarChar)
        .maxLength(1000)
        .enableAnalyzer(true)
        .analyzerParams(analyzerParams)
        .enableMatch(true) // must enable this if you use TextMatch
        .build());

// Add vector field
schema.addField(AddFieldReq.builder()
        .fieldName("embedding")
        .dataType(DataType.FloatVector)
        .dimension(3)
        .build());
// Add primary field
schema.addField(AddFieldReq.builder()
        .fieldName("id")
        .dataType(DataType.Int64)
        .isPrimaryKey(true)
        .autoID(true)
        .build());
// Create schema
const schema = {
  auto_id: true,
  fields: [
    {
      name: "id",
      type: DataType.INT64,
      is_primary: true,
    },
    {
      name: "title_en",
      data_type: DataType.VARCHAR,
      max_length: 1000,
      enable_analyzer: true,
      analyzer_params: analyzerParamsBuiltIn,
      enable_match: true,
    },
    {
      name: "title",
      data_type: DataType.VARCHAR,
      max_length: 1000,
      enable_analyzer: true,
      analyzer_params: analyzerParamsCustom,
      enable_match: true,
    },
    {
      name: "embedding",
      data_type: DataType.FLOAT_VECTOR,
      dim: 4,
    },
  ],
};
schema.WithField(entity.NewField().
    WithName("id").
    WithDataType(entity.FieldTypeInt64).
    WithIsPrimaryKey(true).
    WithIsAutoID(true),
).WithField(entity.NewField().
    WithName("embedding").
    WithDataType(entity.FieldTypeFloatVector).
    WithDim(3),
).WithField(entity.NewField().
    WithName("title").
    WithDataType(entity.FieldTypeVarChar).
    WithMaxLength(1000).
    WithEnableAnalyzer(true).
    WithAnalyzerParams(analyzerParams).
    WithEnableMatch(true),
)
# restful
4단계: 인덱스 매개변수 준비 및 컬렉션 생성
# Set up index parameters for the vector field
index_params = client.prepare_index_params()
index_params.add_index(field_name="embedding", metric_type="COSINE", index_type="AUTOINDEX")

# Create the collection with the defined schema and index parameters
client.create_collection(
    collection_name="my_collection",
    schema=schema,
    index_params=index_params
)
// Set up index params for vector field
List<IndexParam> indexes = new ArrayList<>();
indexes.add(IndexParam.builder()
        .fieldName("embedding")
        .indexType(IndexParam.IndexType.AUTOINDEX)
        .metricType(IndexParam.MetricType.COSINE)
        .build());

// Create collection with defined schema
CreateCollectionReq requestCreate = CreateCollectionReq.builder()
        .collectionName("my_collection")
        .collectionSchema(schema)
        .indexParams(indexes)
        .build();
client.createCollection(requestCreate);
// Set up index params for vector field
const indexParams = [
  {
    name: "embedding",
    metric_type: "COSINE",
    index_type: "AUTOINDEX",
  },
];

// Create collection with defined schema
await client.createCollection({
  collection_name: "my_collection",
  schema: schema,
  index_params: indexParams,
});

console.log("Collection created successfully!");
idx := index.NewAutoIndex(index.MetricType(entity.COSINE))
indexOption := milvusclient.NewCreateIndexOption("my_collection", "embedding", idx)

err = client.CreateCollection(ctx,
    milvusclient.NewCreateCollectionOption("my_collection", schema).
        WithIndexOptions(indexOption))
if err != nil {
    fmt.Println(err.Error())
    // handle error
}
# restful
다음 단계
애널라이저를 구성한 후에는 Milvus에서 제공하는 텍스트 검색 기능과 연동할 수 있습니다. 자세한 내용은 다음과 같습니다:
