How to Get Started with Milvus
 How to get started with Milvus
Last updated January 2025
The advancements in Large Language Models (LLMs) and the increasing volume of data necessitate a flexible and scalable infrastructure to store massive amounts of information, such as a database. However, traditional databases are designed to store tabular and structured data, while the information commonly useful for leveraging the power of sophisticated LLMs and information retrieval algorithms is unstructured, such as text, images, videos, or audio.
Vector databases are database systems specifically designed for unstructured data. Not only can we store massive amounts of unstructured data with vector databases, but we can also perform vector searches with them. Vector databases have advanced indexing methods such as Inverted File Index (IVFFlat) or Hierarchical Navigable Small World (HNSW) to perform fast and efficient vector search and information retrieval processes.
Milvus is an open-source vector database that we can use to leverage all of the beneficial features a vector database can offer. Here are what we’ll cover in this post:
What is Milvus?
Milvus is an open-source vector database that enables us to store massive amounts of unstructured data and perform fast and efficient vector searches on them. Milvus is highly useful for many popular GenAI applications, such as recommendation systems, personalized chatbots, anomaly detection, image search, natural language processing, and retrieval augmented generation (RAG).
There are several advantages that you can get by using Milvus as a vector database:
Milvus offers multiple deployment options that you can choose from depending on your use case and the size of the applications you want to build.
Milvus supports a diverse array of indexing methods to meet various data and performance needs, including in-memory options like FLAT, IVFFlat, HNSW, and SCANN, quantized variants for memory efficiency, the on-disk DiskANN for large datasets, and GPU-optimized indexes such as GPU_CAGRA, GPU_IVF_FLAT, and GPU_IVF_PQ for accelerated, memory-efficient searches.
Milvus also offers hybrid search, where we can use a combination of dense embeddings, sparse embeddings, and metadata filtering during vector search operations, leading to more accurate retrieval results. Additionally, Milvus 2.5 now supports a hybrid full-text search and vector search, making your retrieval even more accurate.
Milvus can be fully used on the cloud via Zilliz Cloud, where you can optimize its operational costs and vector search speed due to four advanced features: logical clusters, streaming and historical data disaggregation, tiered storage, autoscaling, and multi-tenancy hot-cold separation.
When using Milvus as your vector database, you can choose three different deployment options, each with its strengths and benefits. We’ll talk about each of them in the next section.
Milvus Deployment Options
We can choose from four deployment options to start using Milvus: Milvus Lite, Milvus Standalone, Milvus Distributed, and Zilliz Cloud (managed Milvus). Each deployment option is designed to suit various scenarios in our use case, such as the size of our data, the purpose of our application, and the scale of our application.
Milvus Lite
Milvus Lite is a lightweight version of Milvus and the easiest way for us to get started. In the next section, we’ll see how we can run Milvus Lite in action, and all we need to do to get started is to install the Pymilvus library with pip. After that, we can perform most of the core functionalities of Milvus as a vector database.
Milvus Lite is perfect for quick prototyping or learning purposes and can be run in a Jupyter notebook without any complicated setup. In terms of vector storage, Milvus Lite is suitable for storing roughly up to a million vector embeddings. Due to its lightweight feature and storage capacity, Milvus Lite is a perfect deployment option for working with edge devices, such as private documents search engine, on-device object detection, etc.
Milvus Standalone
Milvus Standalone is a single-machine server deployment packed in a Docker image. Therefore, all we need to do to get started is to install Milvus in Docker, and then start the Docker container. We’ll also see the detailed implementation of Milvus Standalone in the next section.
Milvus Standalone is ideal for building and productionizing small to medium-scale applications, as it’s able to store up to 10M vector embeddings. Additionally, Milvus Standalone offers high availability through a primary backup mode, making it highly dependable for use in production-ready applications.
We can also use Milvus Standalone, for example, after performing quick prototyping and learning Milvus functionalities with Milvus Lite, as both Milvus Standalone and Milvus Lite share the same client-side API.
Milvus Distributed
Milvus Distributed is a deployment option that leverages a cloud-based architecture, where data ingestion and retrieval are handled separately, allowing for a highly scalable and efficient application.
To run Milvus Distributed, we typically need to use a Kubernetes cluster to allow the container to run on multiple machines and environments. The application of a Kubernetes cluster ensures the scalability and flexibility of Milvus Distributed in customizing the allocated resources depending on demand and workload. This also means that if one part fails, others can take over, ensuring the entire system remains uninterrupted.
Milvus Distributed is able to handle up to tens of billions of vector embeddings and is specially designed for use cases where the data are too big to be stored in a single server machine. Therefore, this deployment option is perfect for Enterprise clients that serve a large user base.
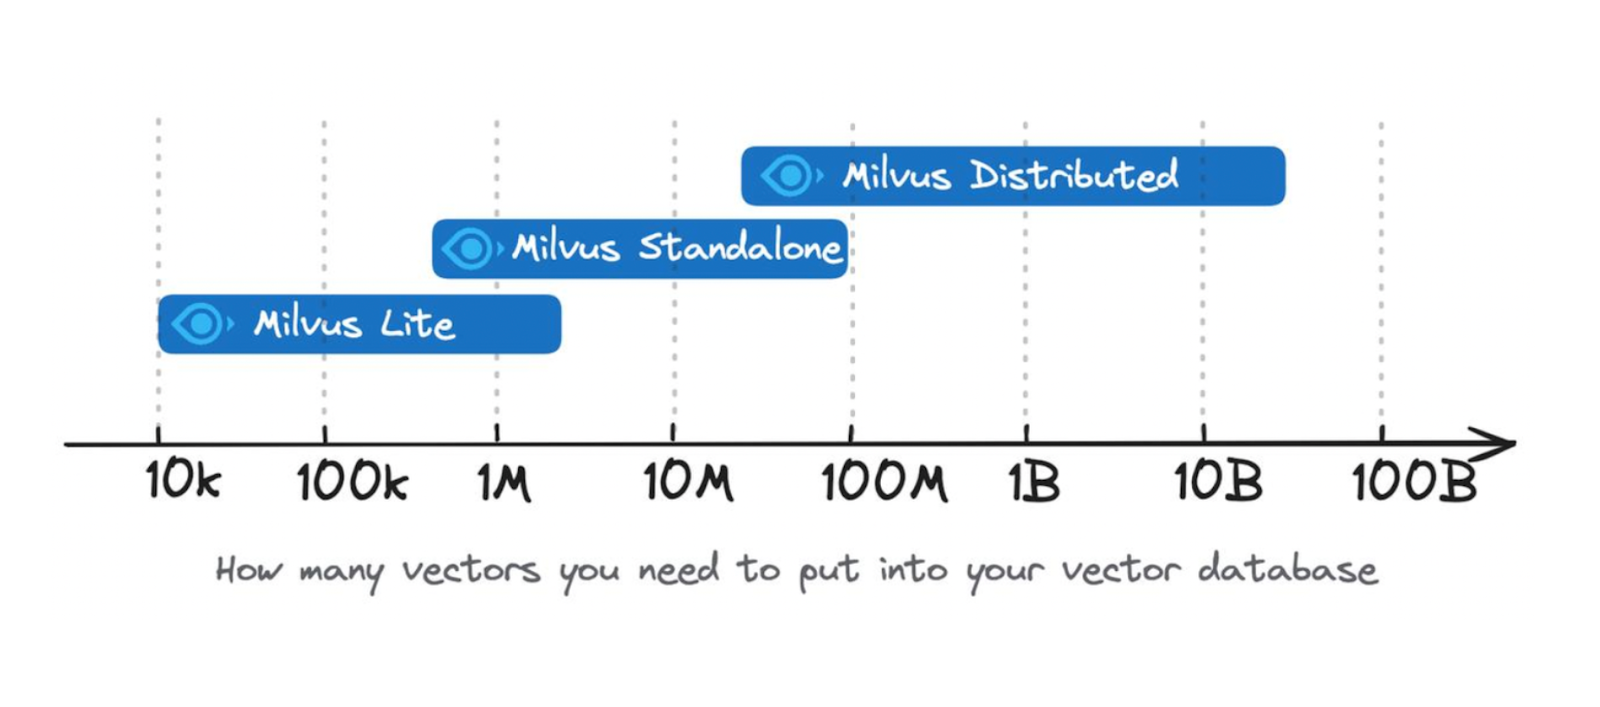
Figure: Vector embedding storage capability of different Milvus deployment options.
In this article, we’re going to show you how to get started with both Milvus Lite and Milvus Standalone, as you can get started quickly with both methods without complicated setup. Milvus Distributed, however, is more complicated to set up. Once we set Milvus Distributed up, the code and logical process to create collections, ingest data, perform vector search, etc. are similar to Milvus Lite and Milvus Standalone, as they share the same client-side API.
In addition to the three deployment options mentioned above, you can also try the managed Milvus on Zilliz Cloud for a hassle-free experience. We’ll also talk about Zilliz Cloud later in this article.
Getting Started with Milvus Lite
Milvus Lite can be implemented straightaway with Python by importing a library called Pymilvus using pip. Before installing Pymilvus, ensure that your environment meets the following requirements:
Ubuntu >= 20.04 (x86_64 and arm64)
MacOS >= 11.0 (Apple Silicon M1/M2 and x86_64)
Python 3.7 or later
Once these requirements are fulfilled, you can install Milvus Lite and the necessary dependencies for demonstration using the following command:
!pip install -U pymilvus
!pip install "pymilvus[model]"
!pip install -U pymilvus: This command installs or upgrades thepymilvuslibrary, the Python SDK of Milvus. Milvus Lite is bunded with PyMilvus, so this single line of code is all you need to install Milvus Lite.!pip install "pymilvus[model]": This command adds advanced features and extra tools pre-integrated with Milvus, including machine learning models like Hugging Face Transformers, Jina AI embedding models, and reranking models.
Here are the steps we’re going to follow with Milvus Lite:
Transform text data into their embedding representation using an embedding model.
Create a schema in our Milvus database to store our text data and their embedding representations.
Store and index our data into our schema.
Perform a simple vector search on the stored data.
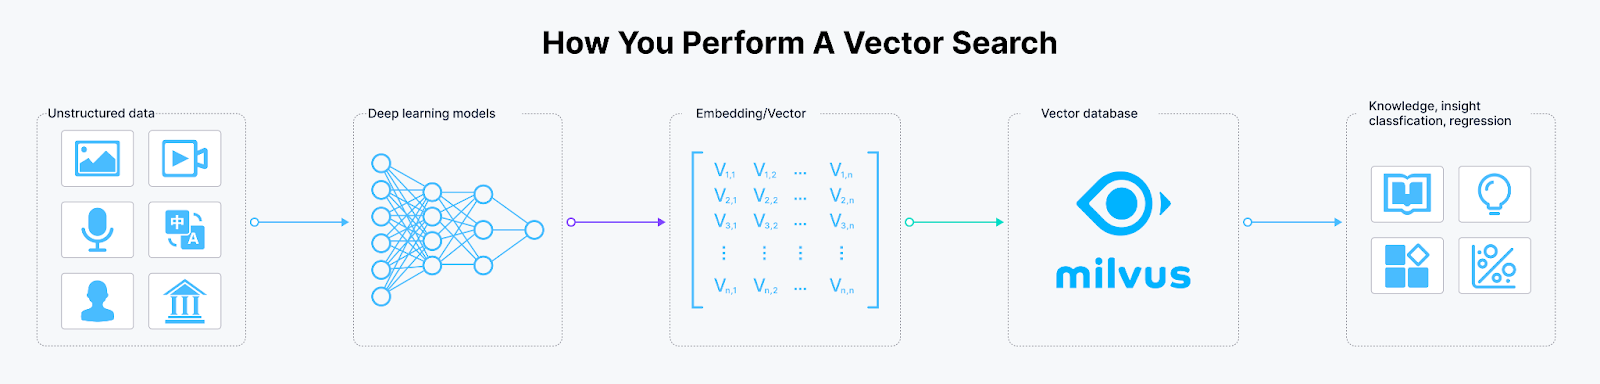
Figure: Workflow of vector search operation.
To transform text data into vector embeddings, we’ll use an embedding model from SentenceTransformers called 'all-MiniLM-L6-v2’. This embedding model transforms our text into a 384-dimensional vector embedding. Let’s load the model, transform our text data, and pack everything together.
from pymilvus import model

docs = [
    "Artificial intelligence was founded as an academic discipline in 1956.",
    "Alan Turing was the first person to conduct substantial research in AI.",
    "Born in Maida Vale, London, Turing was raised in southern England.",
]

sentence_transformer_ef = model.dense.SentenceTransformerEmbeddingFunction(
    model_name='all-MiniLM-L6-v2',
    device='cpu'
)

vectors  = sentence_transformer_ef.encode_documents(docs)
data = [ {"id": i, "vector": vectors[i], "text": docs[i]} for i in range(len(vectors)) ]
Next, let’s create a schema to store all of the data above into Milvus. As you can see above, our data consists of three fields: ID, vector, and text. Therefore, we’re going to create a schema with these three fields.
from pymilvus import MilvusClient, DataType

schema = MilvusClient.create_schema(
    auto_id=False,
    enable_dynamic_field=True,
)

# Add fields to schema
schema.add_field(field_name="id", datatype=DataType.INT64, is_primary=True)
schema.add_field(field_name="vector", datatype=DataType.FLOAT_VECTOR, dim=384)
schema.add_field(field_name="text", datatype=DataType.VARCHAR, max_length=512)
With Milvus Lite, we can easily create a collection on a particular database based on the schema defined above, as well as inserting and indexing the data into the collection in just a few lines of code.
client = MilvusClient("./milvus_demo.db")

index_params = client.prepare_index_params()

#  Add indexes
index_params.add_index(
    field_name="vector",
    index_type="AUTOINDEX",
    metric_type="COSINE"
)

# Create collection
client.create_collection(
    collection_name="demo_collection",
    schema=schema,
    index_params=index_params
)

# Insert data into collection
res = client.insert(
    collection_name="demo_collection",
    data=data
)
In the code above, we create a collection called “demo_collection” inside a Milvus database named "milvus_demo". Next, we index all of our data into the “demo_collection” that we just created.
Now that we have our data inside the database, we can perform a vector search on them for any given query. Let’s say we have a query: "Who is Alan Turing?". We can get the most appropriate answer to the query by implementing the following steps:
Transform our query into a vector embedding using the same embedding model that we used to transform our data in the database into embeddings.
Calculate the similarity between our query embedding and the embedding of each entry in the database using metrics like cosine similarity or Euclidean distance.
Fetch the most similar entry as the appropriate answer to our query.
Below is the implementation of the above steps with Milvus:
query = ["Who is Alan Turing"]
query_embedding = sentence_transformer_ef.encode_queries(query)

# Load collection
client.load_collection(
    collection_name="demo_collection"
)

# Vector search
res = client.search(
    collection_name="demo_collection",
    data=query_embedding,
    limit=1,
    output_fields=["text"],
)
print(res)
"""
Output:
data: ["[{'id': 1, 'distance': 0.7199002504348755, 'entity': {'text': 'Alan Turing was the first person to conduct substantial research in AI.'}}]"]
"""
And that’s it! You can also learn more about other functionalities that Milvus offers, such as managing databases, inserting and deleting collections, choosing the right indexing method, and performing more advanced vector searches with metadata filtering and hybrid search in Milvus documentation.
Getting Started with Milvus Standalone
Milvus Standalone is a deployment option in which everything is packed in a Docker container. Therefore, we need to install Milvus in Docker and then start the Docker container to get started with Milvus Standalone.
Before installing Milvus Standalone, make sure that both your hardware and software fulfill the requirements described on this page. Also, ensure that you’ve installed Docker. To install Docker, refer to this page.
Once our system fulfills the requirements and we have installed Docker, we can proceed with Milvus installation in Docker using the following command:
# Download the installation script
$ curl -sfL <https://raw.githubusercontent.com/milvus-io/milvus/master/scripts/standalone_embed.sh> -o standalone_embed.sh

# Start the Docker container
$ bash standalone_embed.sh start
In the above code, we also start the Docker container and once it’s started, you’ll get similar output as below:

Figure: Message after successful starting of the Docker container.
After running the installation script “standalone_embed.sh” above, a Docker container named “milvus” is started at port 19530. Therefore, we can create a new database as well as access all the things related to the Milvus database by pointing to this port when initiating the client.
Let’s say we want to create a database called “milvus_demo”, similar to what we have done in Milvus Lite above. We can do so as follows:
from pymilvus import MilvusClient

client = MilvusClient(
    uri="http://localhost:19530",
    token="root:Milvus",
)
client.create_database("milvus_demo")
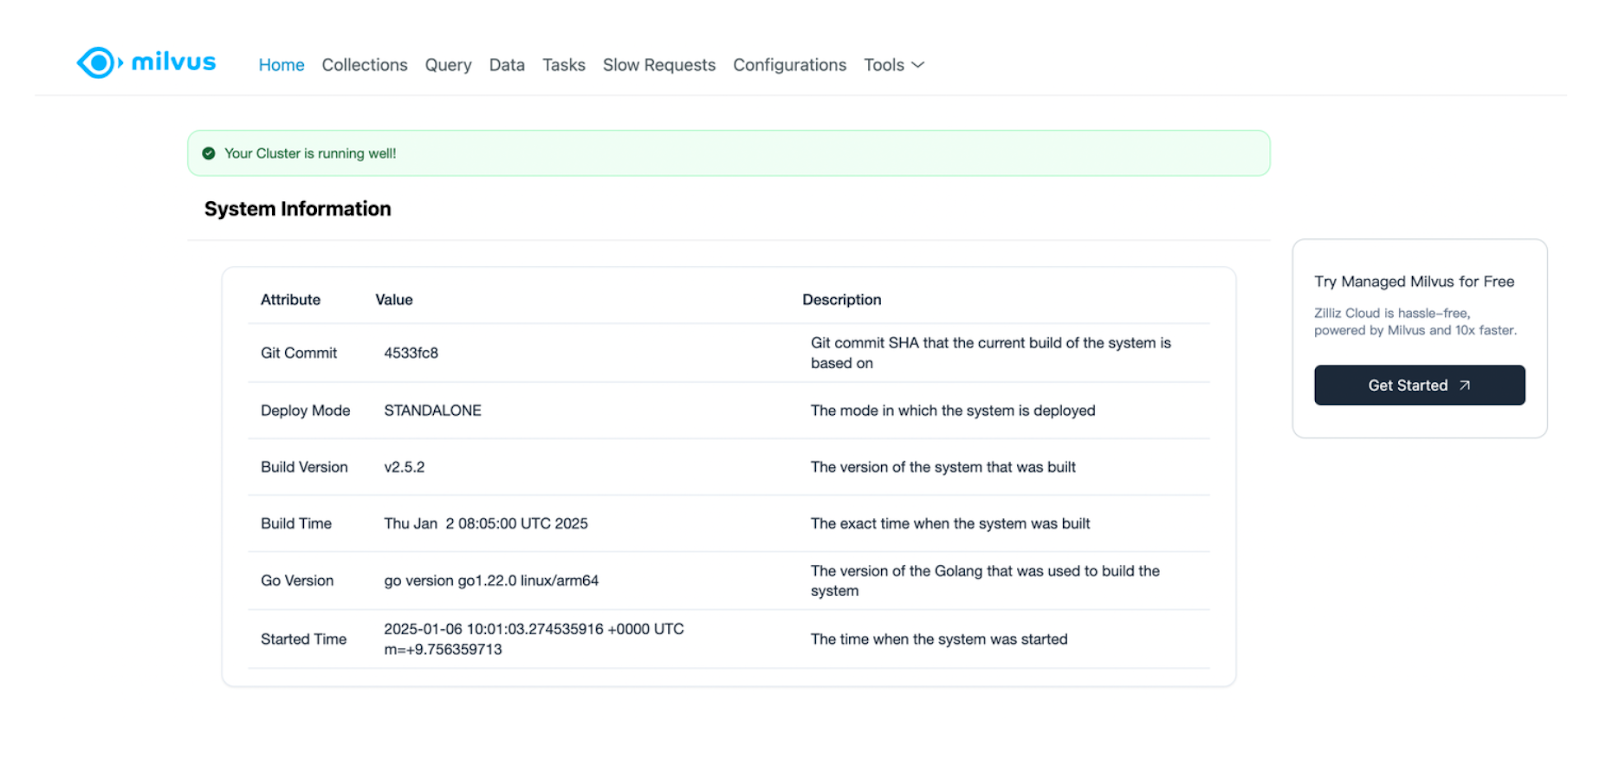
Next, you can verify whether the newly created database called “milvus_demo” truly exists in your Milvus instance by accessing the Milvus Web UI. As the name suggests, Milvus Web UI is a graphical user interface provided by Milvus to observe the statistics and metrics of the components, check the list and details of databases, collections, and configurations. You can access Milvus Web UI once you’ve started the Docker container above at http://127.0.0.1:9091/webui/.
If you access the above link, you’ll see a landing page like this:
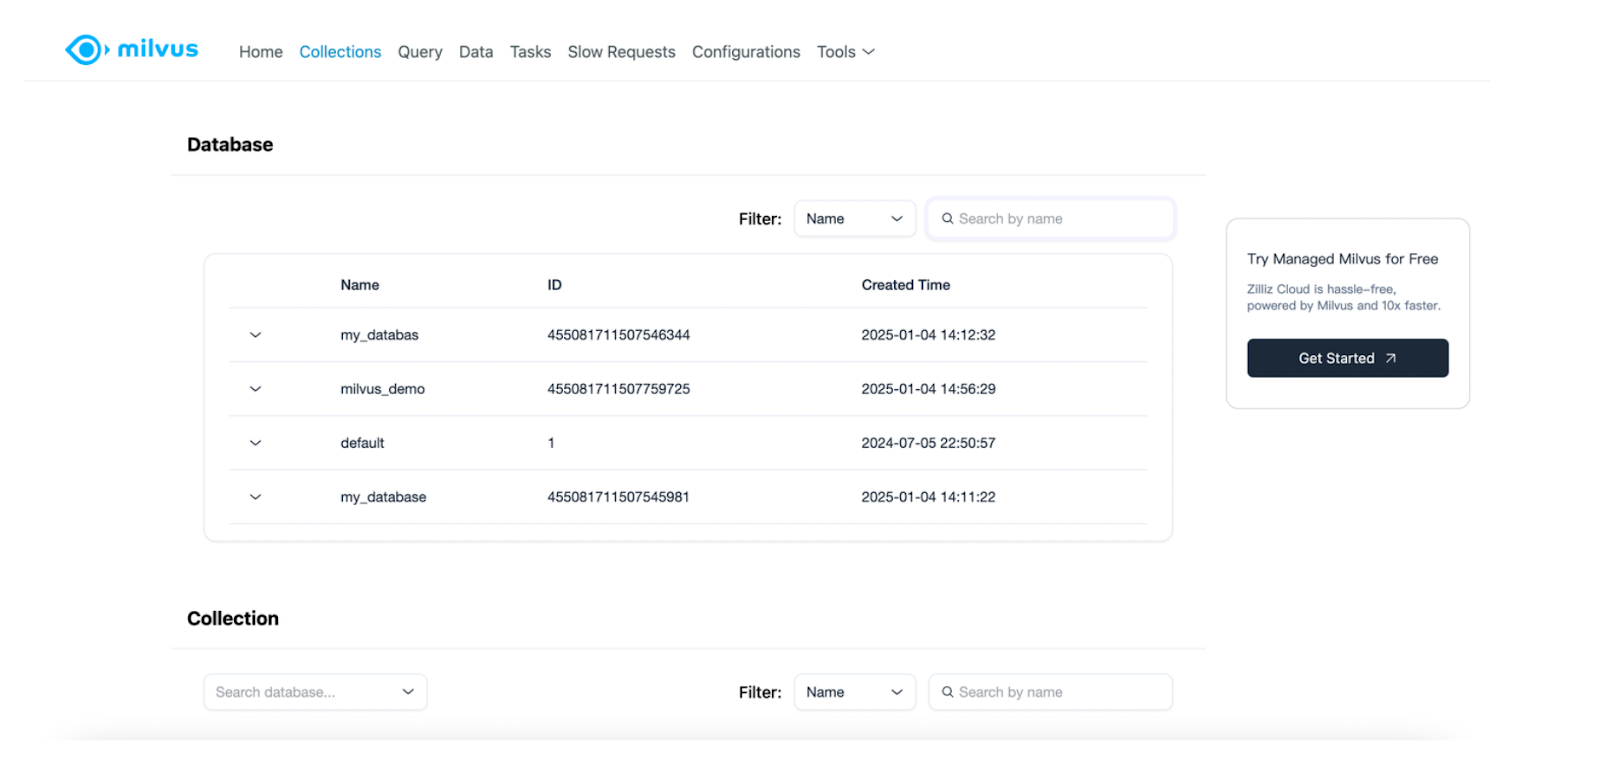
Under the “Collections” tab, you’ll see that our “milvus_demo” database has been successfully created. As you can see, you can also check other things such as the list of collections, configurations, the queries you’ve performed, etc., with this Web UI.
Now we can perform everything exactly as we’ve seen in the Milvus Lite section above. Let’s create a collection called “demo_collection” inside the “milvus_demo” database that consists of three fields, the same as what we had in the Milvus Lite section before. Then, we’ll insert our data into the collection.
index_params = client.prepare_index_params()

#  Add indexes
index_params.add_index(
    field_name="vector",
    index_type="AUTOINDEX",
    metric_type="COSINE"
)

# Create collection
client.create_collection(
    collection_name="demo_collection",
    schema=schema,
    index_params=index_params
)

# Insert data into collection
res = client.insert(
    collection_name="demo_collection",
    data=data
)
The code to perform a vector search operation is also the same as Milvus Lite, as you can see in the below code:
query = ["Who is Alan Turing"]
query_embedding = sentence_transformer_ef.encode_queries(query)

# Load collection
client.load_collection(
    collection_name="demo_collection"
)

# Vector search
res = client.search(
    collection_name="demo_collection",
    data=query_embedding,
    limit=1,
    output_fields=["text"],
)
print(res)
"""
Output:
data: ["[{'id': 1, 'distance': 0.7199004292488098, 'entity': {'text': 'Alan Turing was the first person to conduct substantial research in AI.'}}]"]
"""
Aside from using Docker, you can also use Milvus Standalone with Docker Compose (for Linux) and Docker Desktop (for Windows).
When we’re not using our Milvus instance anymore, we can stop Milvus Standalone with the following command:
$ bash standalone_embed.sh stop
Fully Managed Milvus
An alternative way to get started with Milvus is through a native cloud-based infrastructure in Zilliz Cloud, where you can get a hassle-free, 10x faster experience.
Zilliz Cloud offers dedicated clusters with dedicated environments and resources to support your AI application. Since it is a cloud-based database built on Milvus, we do not need to set up and manage local infrastructure. Zilliz Cloud also provides more advanced features, such as separation between vector storage and computation, data backup to popular object storage systems like S3, and data caching to speed up vector search and retrieval operations.
However, one thing to consider when considering cloud-based services is the operational cost. In most cases, we still need to pay even when the cluster is idle with no data ingestion or vector search activity. If you want to optimize your application’s operational cost and performance further, Zilliz Cloud Serverless would be an excellent option.
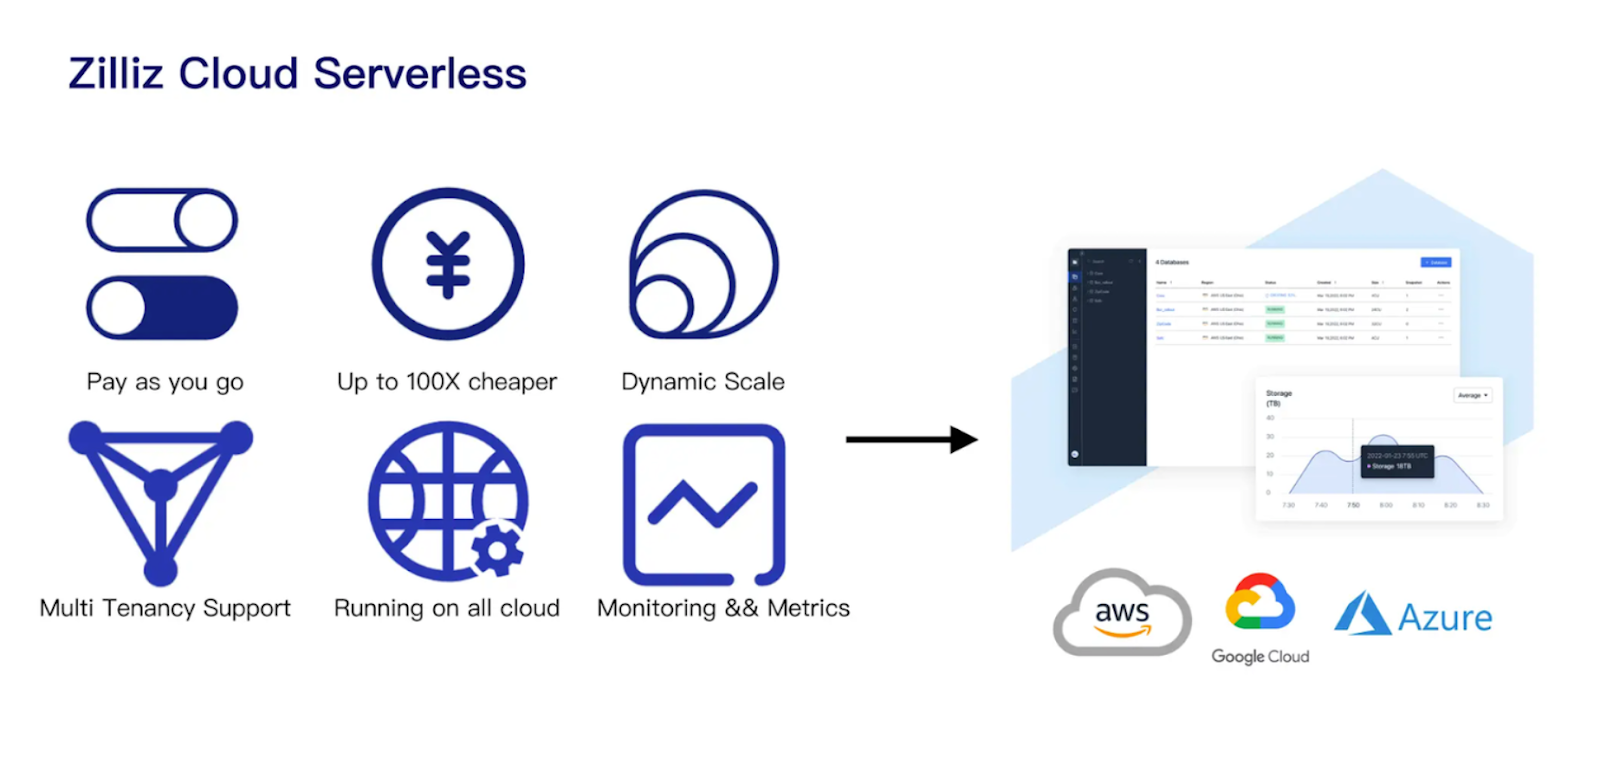
Figure: Key benefits of using Zilliz Cloud Serverless.
Zilliz Cloud Serverless is available on major cloud providers such as AWS, Azure, and GCP. It offers features like pay-as-you-go pricing, meaning you only pay when you use the cluster.
Zilliz Cloud Serverless also implements advanced technologies such as logical clusters, auto-scaling, tiered storage, disaggregation of streaming and historical data, and hot-cold data separation. These features enable Zilliz Cloud Serverless to achieve up to 50x cost savings and approximately 10x faster vector search operations compared to in-memory Milvus.
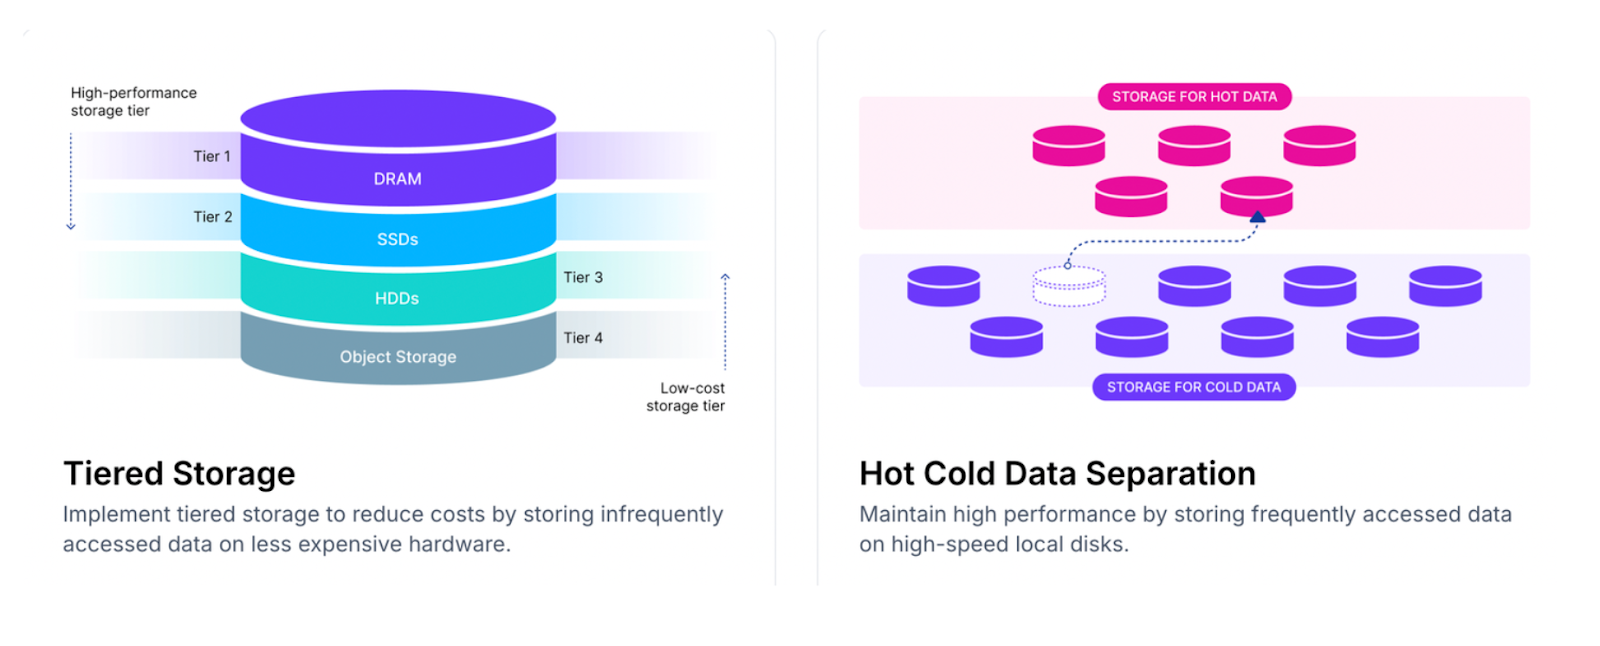
Figure: Illustration of tiered storage and hot-cold data separation.
If you’d like to get started with Zilliz Cloud Serverless, check out this page for more information.
Conclusion
Milvus stands out as a versatile and powerful vector database designed to meet the challenges of managing unstructured data and performing fast, efficient vector search operations in modern AI applications. With deployment options such as Milvus Lite for quick prototyping, Milvus Standalone for small to medium-scale applications, and Milvus Distributed for enterprise-level scalability, it offers flexibility to match any project’s size and complexity.
Additionally, Zilliz Cloud Serverless extends Milvus’s capabilities into the cloud and provides a cost-effective, pay-as-you-go model that eliminates the need for local infrastructure. With advanced features like tiered storage and auto-scaling, Zilliz Cloud Serverless ensures faster vector search operations while optimizing costs.
- What is Milvus?
- Milvus Deployment Options
- Milvus Lite
- Milvus Standalone
- Milvus Distributed
- Getting Started with Milvus Lite
- Getting Started with Milvus Standalone
- Fully Managed Milvus
- Conclusion
On This Page
Try Managed Milvus for Free
Zilliz Cloud is hassle-free, powered by Milvus and 10x faster.
Get StartedLike the article? Spread the word