Using Embedded Milvus to Instantly Install and Run Milvus with Python
 Cover
Cover
Milvus is an open-source vector database for AI applications. It provides a variety of installation methods including building from source code, and installing Milvus with Docker Compose/Helm/APT/YUM/Ansible. Users can choose one of the installation methods depending on their operating systems and preferences. However, there are many data scientists and AI engineers in the Milvus community who work with Python and yearn for a much simpler installation method than the currently available ones.
Therefore, we released embedded Milvus, a Python user-friendly version, along with Milvus 2.1 to empower more Python developers in our community. This article introduces what embedded Milvus is and provides instructions on how to install and use it.
Jump to:
An overview of embedded Milvus
Embedded Milvus enables you to quickly install and use Milvus with Python. It can quickly bring up a Milvus instance and allows you to start and stop the Milvus service whenever you wish to. All data and logs are persisted even if you stop embedded Milvus.
Embedded Milvus itself does not have any internal dependencies and do not require pre-installing and running any third-party dependencies like etcd, MinIO, Pulsar, etc.
Everything you do with embedded Milvus, and every piece of code you write for it can be safely migrated to other Milvus modes - standalone, cluster, cloud version, etc. This reflects one of the most distinctive features of embedded Milvus - “Write once, run anywhere”.
When to use embedded Milvus?
Embedded Milvus and PyMilvus are constructed for different purposes. You may consider choosing embedded Milvus in the following scenarios:
You want to use Milvus without installing Milvus in any of the ways provided here.
You want to use Milvus without keeping a long-running Milvus process in your machine.
You want to quickly use Milvus without starting a separate Milvus process and other required components like etcd, MinIO, Pulsar, etc.
It is suggested that you should NOT use embedded Milvus:
In a production environment. (To use Milvus for production, consider Milvus cluster or Zilliz cloud, a fully managed Milvus service.)
If you have a high demand for performance. (Comparatively speaking, embedded Milvus might not provide the best performance.)
A comparison of different modes of Milvus
The table below compares several modes of Milvus: standalone, cluster, embedded Milvus, and the Zilliz Cloud, a fully managed Milvus service.
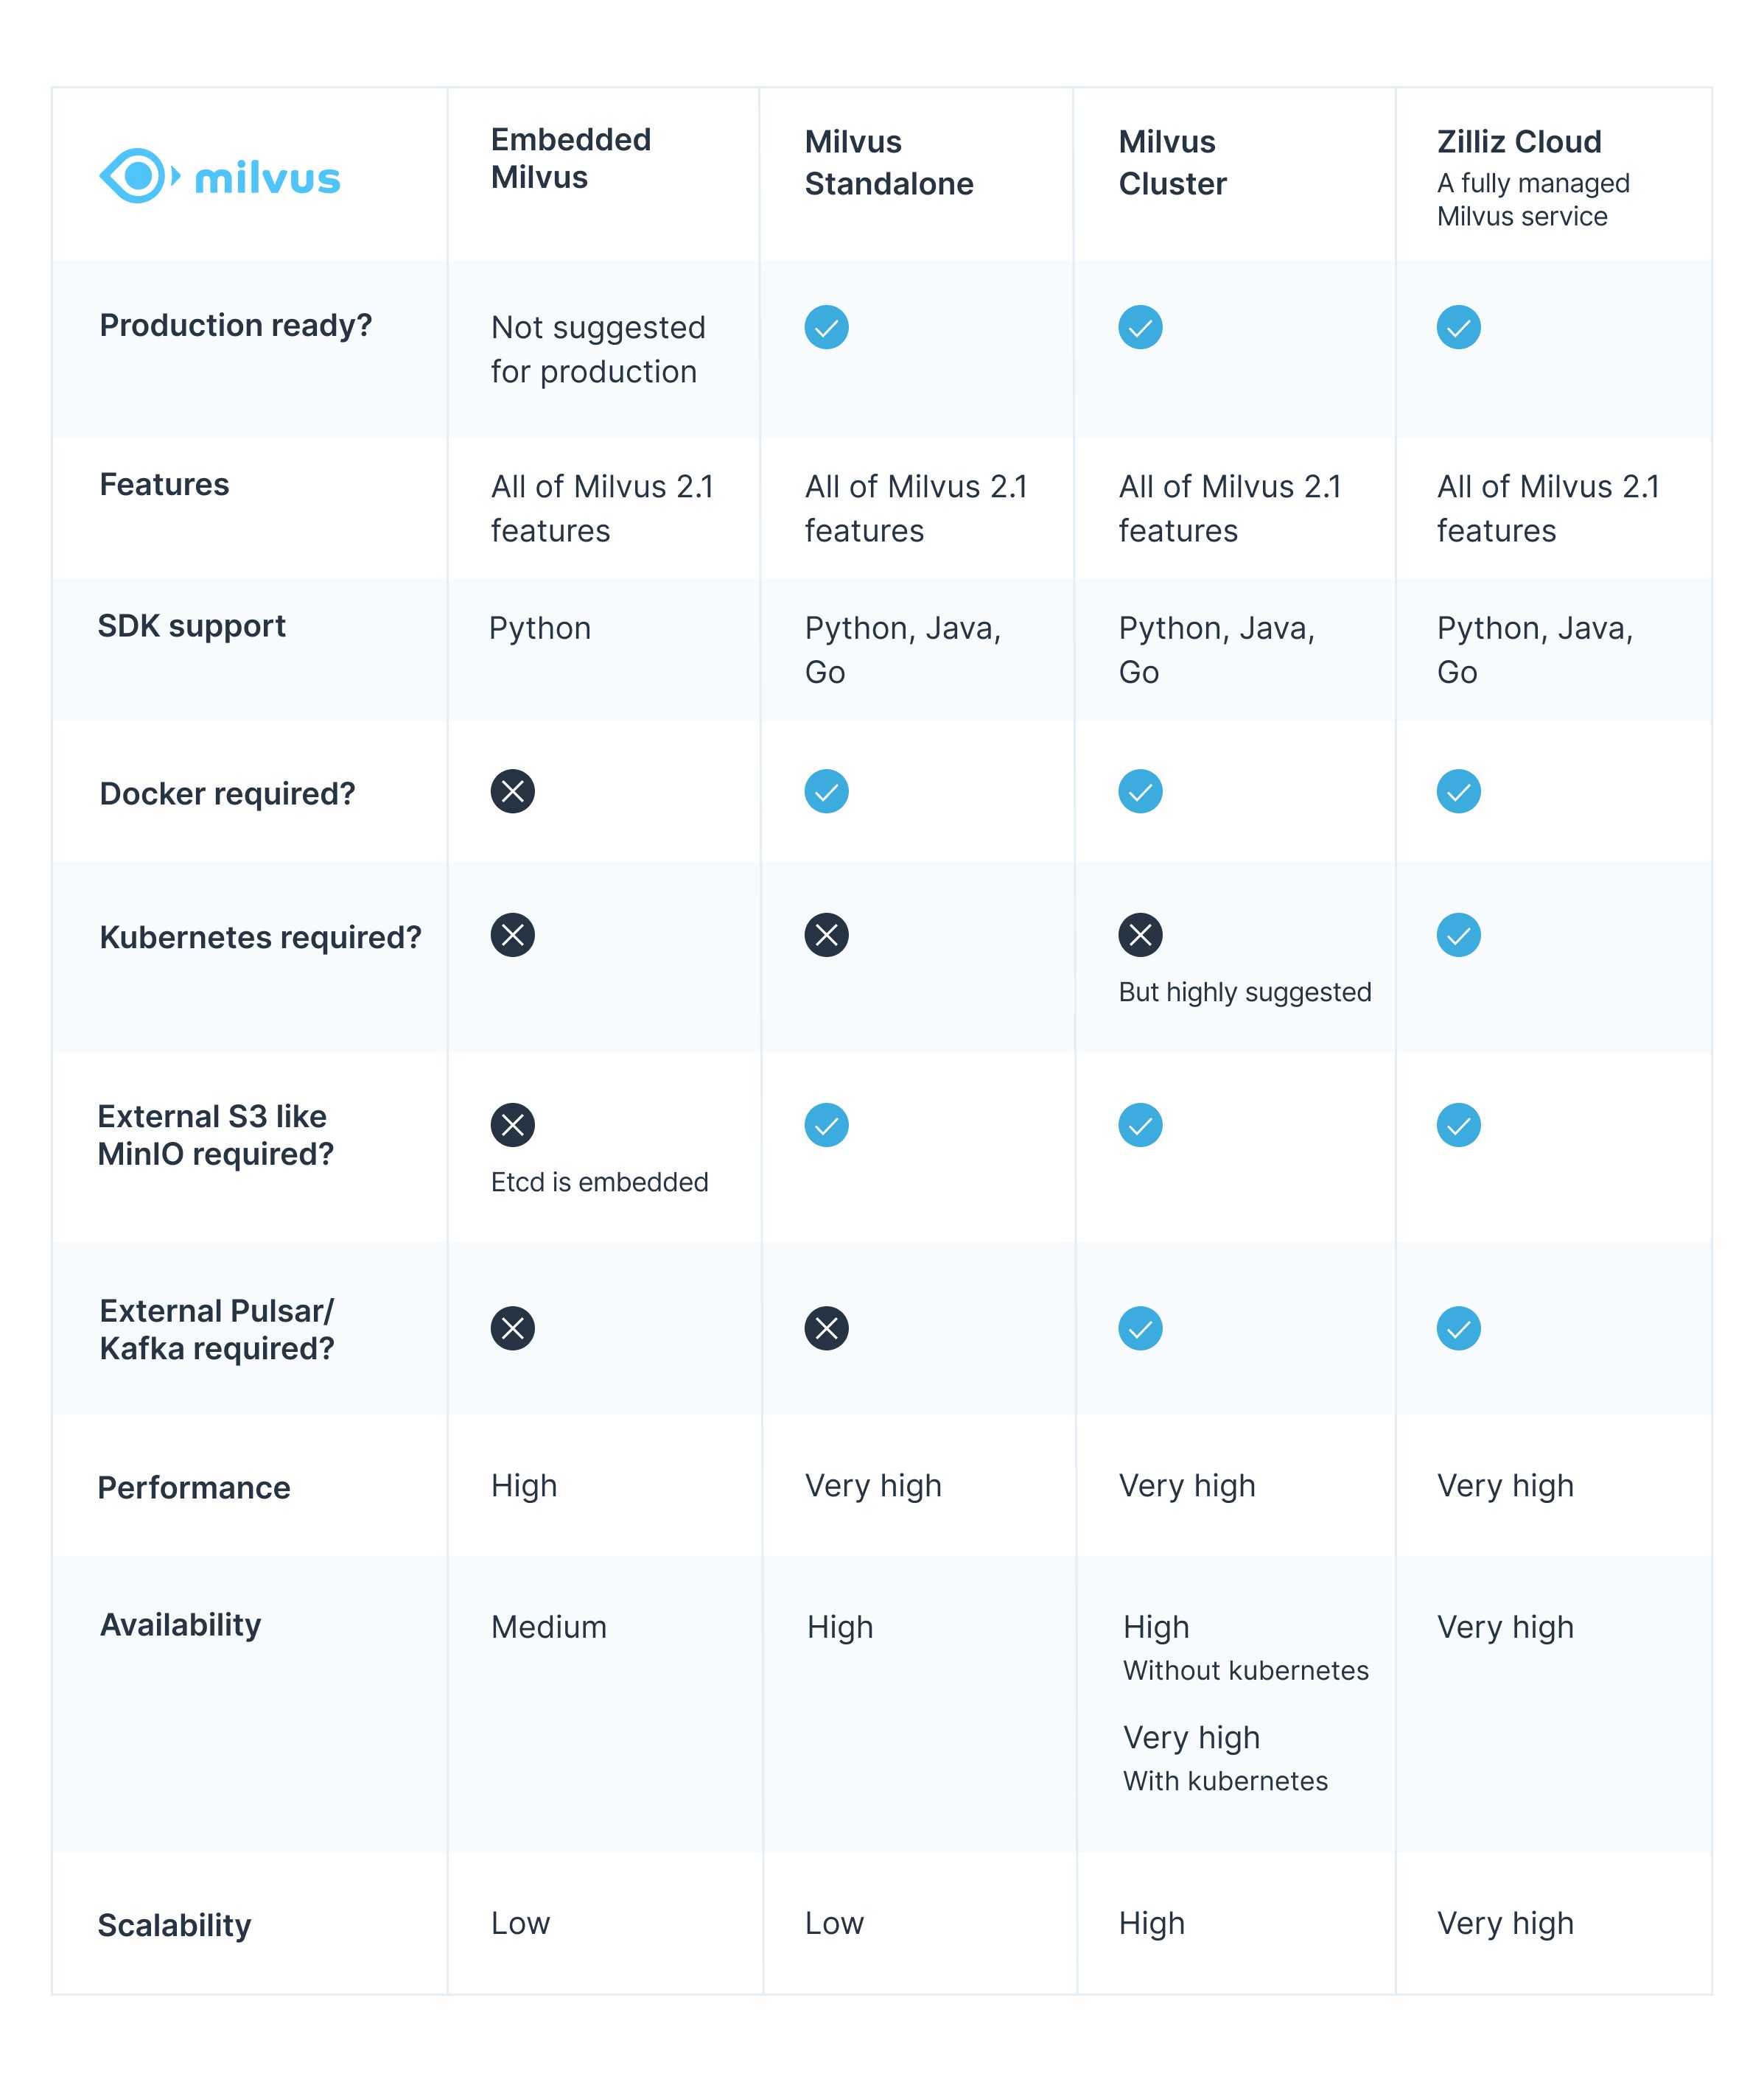 comparison
How to install embedded Milvus?
Before installing embedded Milvus, you need to first ensure that you have installed Python 3.6 or later. Embedded Milvus supports the following operating systems:
Ubuntu 18.04
Mac x86_64 >= 10.4
Mac M1 >= 11.0
If the requirements are met, you can run $ python3 -m pip install milvus to install embedded Milvus. You can also add the version in the command to install a specific version of embedded Milvus. For instance, if you want to install the 2.1.0 version, run $ python3 -m pip install milvus==2.1.0. And later when new version of embedded Milvus is released, you can also run $ python3 -m pip install --upgrade milvus to upgrade embedded Milvus to the latest version.
If you are an old user of Milvus who has already installed PyMilvus before and wants to install embedded Milvus, you can run $ python3 -m pip install --no-deps milvus.
After running the installation command, you need to create a data folder for embedded Milvus under /var/bin/e-milvus by running the following command:
sudo mkdir -p /var/bin/e-milvus
sudo chmod -R 777 /var/bin/e-milvus
Start and stop embedded Milvus
When the installation is successful, you can start the service.
If you are running embedded Milvus for the first time you need to import Milvus and set up embedded Milvus first.
$ python3
Python 3.9.10 (main, Jan 15 2022, 11:40:53)
[Clang 13.0.0 (clang-1300.0.29.3)] on darwin
Type "help", "copyright", "credits" or "license" for more information.
>>> import milvus
>>> milvus.before()
please do the following if you have not already done so:
1. install required dependencies: bash /var/bin/e-milvus/lib/install_deps.sh
2. export LD_PRELOAD=/SOME_PATH/embd-milvus.so
3. export LD_LIBRARY_PATH=$LD_LIBRARY_PATH:/usr/lib:/usr/local/lib:/var/bin/e-milvus/lib/
>>>
If you have successfully started embedded Milvus before and comes back to restart it, you can directly run milvus.start() after importing Milvus.
$ python3
Python 3.9.10 (main, Jan 15 2022, 11:40:53)
[Clang 13.0.0 (clang-1300.0.29.3)] on darwinType "help", "copyright", "credits" or "license" for more information.
>>> import milvus
>>> milvus.start()
>>>
You will see the following output if you have successfully started the embedded Milvus service.
---Milvus Proxy successfully initialized and ready to serve!---
After the service starts, you can start another terminal window and run the example code of "Hello Milvus" to play around with embedded Milvus!
# Download hello_milvus script
$ wget https://raw.githubusercontent.com/milvus-io/pymilvus/v2.1.0/examples/hello_milvus.py
# Run Hello Milvus
$ python3 hello_milvus.py
When you are done with using embedded Milvus, we recommend stopping it gracefully and clean up the environment variables by run the following command or press Ctrl-D.
>>> milvus.stop()
if you need to clean up the environment variables, run:
export LD_PRELOAD=
export LD_LIBRARY_PATH=
>>>
>>> exit()
What’s next
With the official release of Milvus 2.1, we have prepared a series of blogs introducing the new features. Read more in this blog series:
- How to Use String Data to Empower Your Similarity Search Applications
- Using Embedded Milvus to Instantly Install and Run Milvus with Python
- Increase Your Vector Database Read Throughput with In-Memory Replicas
- Understanding Consistency Level in the Milvus Vector Database
- Understanding Consistency Level in the Milvus Vector Database (Part II)
- How Does the Milvus Vector Database Ensure Data Security?
- An overview of embedded Milvus
- When to use embedded Milvus?
- A comparison of different modes of Milvus
- How to install embedded Milvus?
- Start and stop embedded Milvus
- What's next
On This Page
Try Managed Milvus for Free
Zilliz Cloud is hassle-free, powered by Milvus and 10x faster.
Get StartedLike the article? Spread the word