How Does the Milvus Vector Database Ensure Data Security?
 Cover image
In full consideration of your data security, user authentication and transport layer security (TLS) connection are now officially available in Milvus 2.1. Without user authentication, anyone can access all data in your vector database with SDK. However, starting from Milvus 2.1, only those with a valid username and password can access the Milvus vector database. In addition, in Milvus 2.1 data security is further protected by TLS, which ensures secure communications in a computer network.
This article aims to analyze how Milvus the vector database ensures data security with user authentication and TLS connection and explain how you can utilize these two features as a user who wants to ensure data security when using the vector database.
Jump to:
- What is database security and why is it important?
- How does the Milvus vector database ensure data security?
What is database security and why is it important?
Database security refers to the measures taken to ensure that all data in the database are safe and kept confidential. Recent data breach and data leak cases at Twitter, Marriott, and Texas Department of Insurance, etc makes us all the more vigilant to the issue of data security. All these cases constantly remind us that companies and businesses can suffer from severe loss if the data are not well protected and the databases they use are secure.
How does the Milvus vector database ensure data security?
In the current release of 2.1, the Milvus vector database attempts to ensure database security via authentication and encryption. More specifically, on the access level, Milvus supports basic user authentication to control who can access the database. Meanwhile, on the database level, Milvus adopts the transport layer security (TLS) encryption protocol to protect data communication.
User authentication
The basic user authentication feature in Milvus supports accessing the vector database using a username and password for the sake of data security. This means clients can only access the Milvus instance upon providing an authenticated username and password.
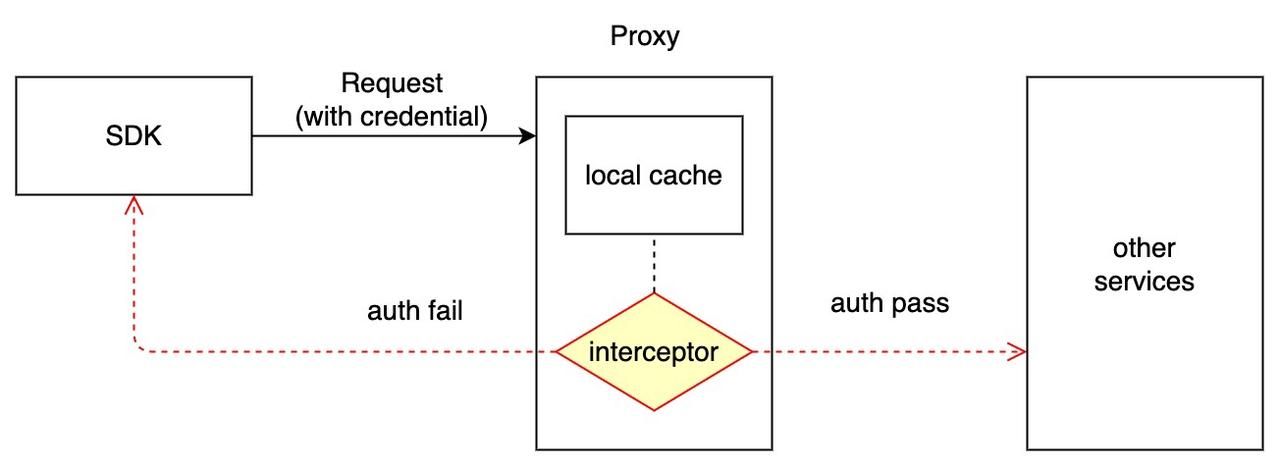
The authentication workflow in the Milvus vector database
All gRPC requests are handled by the Milvus proxy, hence authentication is completed by the proxy. The workflow of logging in with the credentials to connect to the Milvus instance is as follows.
- Create credentials for each Milvus instance and the encrypted passwords are stored in etcd. Milvus uses bcrypt for encryption as it implements Provos and Mazières’s adaptive hashing algorithm.
- On the client side, SDK sends ciphertext when connecting to the Milvus service. The base64 ciphertext (
: ) is attached to the metadata with the key authorization. - The Milvus proxy intercepts the request and verifies the credentials.
- Credentials are cached locally in the proxy.
 authetication_workflow
When the credentials are updated, the system workflow in Milvus is as follows
- Root coord is in charge of the credentials when insert, query, delete APIs are called.
- When you update the credentials because you forget the password for instance, the new password is persisted in etcd. Then all the old credentials in the proxy’s local cache are invalidated.
- The authentication interceptor looks for the records from local cache first. If the credentials in the cache is not correct, the RPC call to fetch the most updated record from root coord will be triggered. And the credentials in the local cache are updated accordingly.
 credential_update_workflow
How to manage user authentication in the Milvus vector database
To enable authentication, you need to first set common.security.authorizationEnabled to true when configuring Milvus in the milvus.yaml file.
Once enabled, a root user will be created for the Milvus instance. This root user can use the initial password of Milvus to connect to the Milvus vector database.
from pymilvus import connections
connections.connect(
    alias='default',
    host='localhost',
    port='19530',
    user='root_user',
    password='Milvus',
)
We highly recommend changing the password of the root user when starting Milvus for the first time.
Then root user can further create more new users for authenticated access by running the following command to create new users.
from pymilvus import utility
utility.create_credential('user', 'password', using='default')
There are two things to remember when creating new users:
As for the new username, it can not exceed 32 characters in length and must start with a letter. Only underscores, letters, or numbers are allowed in the username. For example a username of “2abc!” is not accepted.
As for the password, its length should be 6-256 characters.
Once the new credential is set up, the new user can connect to the Milvus instance with the username and password.
from pymilvus import connections
connections.connect(
    alias='default',
    host='localhost',
    port='19530',
    user='user',
    password='password',
)
Like all authentication processes, you do not have to worry if you forget the password. The password for an existing user can be reset with the following command.
from pymilvus import utility
utility.reset_password('user', 'new_password', using='default')
Read the Milvus documentation to learn more about user authentication.
TLS connection
Transport layer security (TLS) is a type of authentication protocol to provide communications security in a computer network. TLS uses certificates to provide authentication services between two or more communicating parties.
How to enable TLS in the Milvus vector database
To enable TLS in Milvus, you need to first run the following command to perpare two files for generating the certificate: a default OpenSSL configuration file named openssl.cnf and a file named gen.sh used to generate relevant certificates.
mkdir cert && cd cert
touch openssl.cnf gen.sh
Then you can simply copy and paste the configuration we provide here to the two files. Or you can also make modifications based on our configuration to better suit your application.
When the two files are ready, you can run the gen.sh file to create nine certificate files. Likewise, you can also modify the configurations in the nine certificate files to suit your need.
chmod +x gen.sh
./gen.sh
There is one final step before you can connect to the Milvus service with TLS. You have to set tlsEnabled to true and configure the file paths of server.pem, server.key, and ca.pem for the server in config/milvus.yaml. The code below is an example.
tls:
  serverPemPath: configs/cert/server.pem
  serverKeyPath: configs/cert/server.key
  caPemPath: configs/cert/ca.pem

common:
  security:
    tlsEnabled: true
Then you are all set and can connect to the Milvus service with TLS as long as you specify the file paths of client.pem, client.key, and ca.pem for the client when using the Milvus connection SDK. The code below is also an example.
from pymilvus import connections

_HOST = '127.0.0.1'
_PORT = '19530'

print(f"\nCreate connection...")
connections.connect(host=_HOST, port=_PORT, secure=True, client_pem_path="cert/client.pem",
                        client_key_path="cert/client.key",
                        ca_pem_path="cert/ca.pem", server_name="localhost")
print(f"\nList connections:")
print(connections.list_connections())
What’s next
With the official release of Milvus 2.1, we have prepared a series of blogs introducing the new features. Read more in this blog series:
- How to Use String Data to Empower Your Similarity Search Applications
- Using Embedded Milvus to Instantly Install and Run Milvus with Python
- Increase Your Vector Database Read Throughput with In-Memory Replicas
- Understanding Consistency Level in the Milvus Vector Database
- Understanding Consistency Level in the Milvus Vector Database (Part II)
- How Does the Milvus Vector Database Ensure Data Security?
- What is database security and why is it important?
- How does the Milvus vector database ensure data security?
- User authentication
- TLS connection
- What's next
On This Page
Try Managed Milvus for Free
Zilliz Cloud is hassle-free, powered by Milvus and 10x faster.
Get StartedLike the article? Spread the word