Migrate Between Instances in One Bucket (Different Root Paths)
This topic details the process of backing up a collection from one Milvus instance and restoring it to another while using a shared bucket for object storage, with distinct root paths for each instance.
Overview
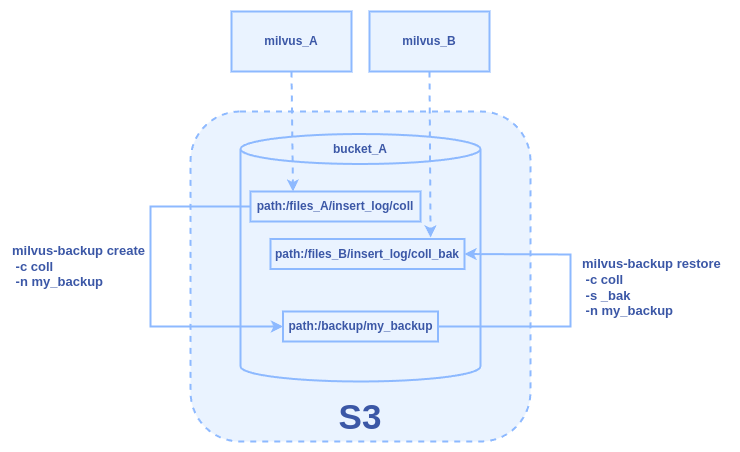
The diagram below illustrates the backup and restore process using a shared bucket.
 shared-bucket-backup-and-restore.png
Assume we have Milvus instances, milvus_A and milvus_B, both utilizing
the default MinIO storage engine for object storage. These instances
share the same bucket, bucket_A, but store their data in different root
paths: files_A for milvus_A and files_B for milvus_B. In this example,
our goal is to complete the following tasks:
Create a backup (my_backup) for collection coll that is stored under the
files_Apath formilvus_A.Restore from the backup and store it to files_B for
milvus_B.
Prerequisites
Ensure the milvus-backup tool is installed.
Familiarize yourself with configuring Milvus object storage settings. For details, refer to Object Storage.
Back up a collection from milvus_A
Step 1: Prepare configuration
Go to the directory of the milvus-backup project and create a directory named configs:
mkdir configs
cd configs
Download the backup config file backup.yaml:
wget https://raw.githubusercontent.com/zilliztech/milvus-backup/main/configs/backup.yaml
The file structure looks like this:
├── configs
│   └── backup.yaml
├── milvus-backup
└── README.md
Step 2: Edit configuration file
Modify the backup.yaml file to set the appropriate configurations for
milvus_A:
Connection configs
# milvus proxy address, compatible to milvus.yaml milvus: address: milvus_A port: 19530 authorizationEnabled: false # tls mode values [0, 1, 2] # 0 is close, 1 is one-way authentication, 2 is two-way authentication. tlsMode: 0 user: "root" password: "Milvus"milvus.address: IP address or hostname of themilvus_Aserver.milvus.port: TCP port on which Milvus server is listening (default 19530).
Storage configs (MinIO/S3 settings)
# Related configuration of minio, which is responsible for data persistence for Milvus. minio: # cloudProvider: "minio" # deprecated use storageType instead storageType: "minio" # support storage type: local, minio, s3, aws, gcp, ali(aliyun), azure, tc(tencent) address: milvus_A # Address of MinIO/S3 port: 9000 # Port of MinIO/S3 accessKeyID: minioadmin # accessKeyID of MinIO/S3 secretAccessKey: minioadmin # MinIO/S3 encryption string useSSL: false # Access to MinIO/S3 with SSL useIAM: false iamEndpoint: "" bucketName: "bucket_A" # Milvus Bucket name in MinIO/S3, make it the same as your milvus instance rootPath: "files_A" # Milvus storage root path in MinIO/S3, make it the same as your milvus instance # only for azure backupAccessKeyID: minioadmin # accessKeyID of MinIO/S3 backupSecretAccessKey: minioadmin # MinIO/S3 encryption string backupBucketName: "bucket_A" # Bucket name to store backup data. Backup data will store to backupBucketName/backupRootPath backupRootPath: "backup" # Rootpath to store backup data. Backup data will store to backupBucketName/backupRootPathminio.bucketName: Name of the bucket used formilvus_Astorage. In this example, set tobucket_A.minio.rootPath: Root path within the bucket where data frommilvus_Ais stored. In this example, set tofiles_A.minio.backupBucketName: Name of the bucket used for storage. In this example,milvus_Aandmilvus_Bshare the bucket. Therefore, set tobucket_A.minio.backupRootPath: Root path within the bucket designated for storing backup files inmilvus_B. In this example, use a different path frommilvus_A. Therefore, set tobackup.
Step 3: Create backup
Once backup.yaml is saved, create a backup named my_backup:
./milvus-backup create -c coll -n my_backup
This command creates the backup bucket_A/backup/my_backup in object
storage for the collection coll.
Restore the backup to milvus_B
Step 1: Configure restoration settings
Repeat step
2 to modify configs for restoration to milvus_B, ensuring minio.bucketName is set to bucket_A and minio.rootPath to files_B to distinguish storage locations between the two instances.
Here’s a sample configuration:
...
# milvus proxy address, compatible to milvus.yaml
milvus:
  address: milvus_B
  port: 19530
  authorizationEnabled: false
  # tls mode values [0, 1, 2]
  # 0 is close, 1 is one-way authentication, 2 is two-way authentication.
  tlsMode: 0
  user: "root"
  password: "Milvus"

# Related configuration of minio, which is responsible for data persistence for Milvus.
minio:
  # cloudProvider: "minio" # deprecated use storageType instead
  storageType: "minio" # support storage type: local, minio, s3, aws, gcp, ali(aliyun), azure, tc(tencent)

  address: milvus_B # Address of MinIO/S3
  port: 9000   # Port of MinIO/S3
  accessKeyID: minioadmin  # accessKeyID of MinIO/S3
  secretAccessKey: minioadmin # MinIO/S3 encryption string
  useSSL: false # Access to MinIO/S3 with SSL
  useIAM: false
  iamEndpoint: ""

  bucketName: "bucket_A" # Milvus Bucket name in MinIO/S3, make it the same as your milvus instance
  rootPath: "files_B" # Milvus storage root path in MinIO/S3, make it the same as your milvus instance
  ...
Step 2: Restore backup
Restore the backup to milvus_B:
./milvus-backup restore -c coll -n my_backup -s _bak
This command restores the backup into a new collection named coll_bak in milvus_B, with data stored in bucket_A/files_B/insert_log/[ID of new collection].