Migrate Between Instances Across S3 Environments
This topic details the process of backing up a collection from one Milvus instance and restoring it to another, with each instance using different object storage.
Overview
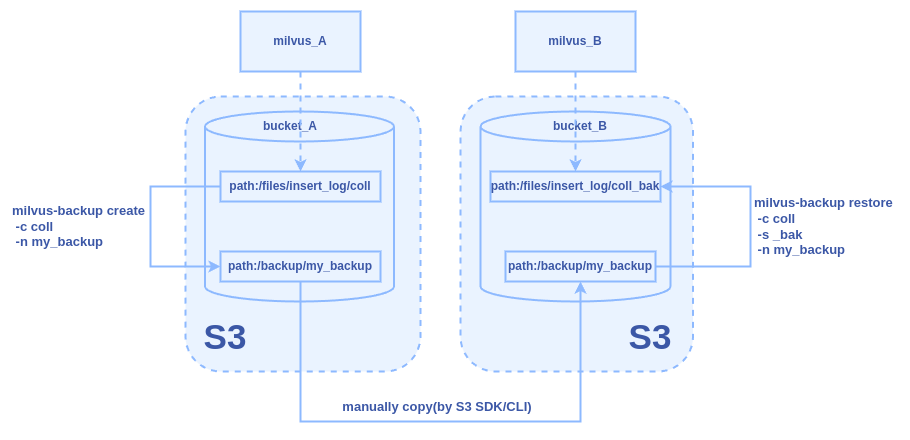
The diagram below illustrates the backup and restore process using different object storage.
 multi-storage-backup-and-restore.png
Assume we have two Milvus instances, milvus_A and milvus_B, utilizing
different object storage. In this example, our goal is to complete the
following tasks:
Create a backup (my_backup) for collection
collinbucket_Aofmilvus_A's object storage.Transfer the backup my_backup to
bucket_Bofmilvus_B's object storage.
In bucket_B, restore from the backup and name the restored collection
coll_bak.
Prerequisites
Ensure the milvus-backup tool is installed.
Familiarize yourself with configuring Milvus object storage settings. For details, refer to Object Storage.
Back up a collection from milvus_A
Step 1: Prepare configuration
Go to the directory of the milvus-backup project and create a directory named configs:
mkdir configs
cd configs
Download the backup config file backup.yaml:
wget https://raw.githubusercontent.com/zilliztech/milvus-backup/main/configs/backup.yaml
The file structure looks like this:
├── configs
│   └── backup.yaml
├── milvus-backup
└── README.md
Step 2: Edit configuration file
Modify the backup.yaml file to set the appropriate configurations for
milvus_A:
Connection configs
# milvus proxy address, compatible to milvus.yaml milvus: address: milvus_A port: 19530 authorizationEnabled: false # tls mode values [0, 1, 2] # 0 is close, 1 is one-way authentication, 2 is two-way authentication. tlsMode: 0 user: "root" password: "Milvus"milvus.address: IP address or hostname of the milvus_A server.milvus.port: TCP port on which Milvus server is listening (default 19530).
Storage configs (MinIO/S3 settings)
# Related configuration of minio, which is responsible for data persistence for Milvus. minio: # cloudProvider: "minio" # deprecated use storageType instead storageType: "minio" # support storage type: local, minio, s3, aws, gcp, ali(aliyun), azure, tc(tencent) address: minio_A # Address of MinIO/S3 port: 9000 # Port of MinIO/S3 accessKeyID: minioadmin # accessKeyID of MinIO/S3 secretAccessKey: minioadmin # MinIO/S3 encryption string useSSL: false # Access to MinIO/S3 with SSL useIAM: false iamEndpoint: "" bucketName: "bucket_A" # Milvus Bucket name in MinIO/S3, make it the same as your milvus instance rootPath: "files" # Milvus storage root path in MinIO/S3, make it the same as your milvus instance # only for azure backupAccessKeyID: minioadmin # accessKeyID of MinIO/S3 backupSecretAccessKey: minioadmin # MinIO/S3 encryption string backupBucketName: "bucket_A" # Bucket name to store backup data. Backup data will store to backupBucketName/backupRootPath backupRootPath: "backup" # Rootpath to store backup data. Backup data will store to backupBucketName/backupRootPathminio.bucketName: Name of the bucket used for data storage in milvus_A. In this example, set tobucket_A.minio.rootPath: Root path within the bucket where data from milvus_A is stored. In this example, set tofiles.minio.backupBucketName: Name of the bucket used for backup storage. In this example, set tobucket_A.minio.backupRootPath: Root path within the bucket designated for storing backup files inmilvus_B. In this example, set tobackup.
Step 3: Create backup
Once backup.yaml is saved, create a backup named my_backup:
./milvus-backup create -c coll -n my_backup
This command creates the backup bucket_A/backup/my_backup in the object
storage of milvus_A.
Manually transfer the backup to milvus_B
Since milvus_A and milvus_B use different object storage, you need to
manually download the backup from milvus_A’s storage and upload it to
milvus_B's storage.
Using MinIO console
Log into the MinIO console.
Locate the bucket specified in minio.address for milvus_A.
Select the backup files in the bucket.
Click Download to download the files to your machine.
Using the mc client
Alternatively, you can use the mc client to download the backup files:
- Configure a MinIO host:
# configure a Minio host
mc alias set my_minio https://<minio_endpoint> <accessKey> <secretKey>
- List the available buckets:
# List the available buckets
mc ls my_minio
- Download a bucket recursively:
# Download a bucket recursively
mc cp --recursive my_minio/<your-bucket-path> <local_dir_path>
Once the backup files are downloaded, you can upload them to the object
storage used by milvus_B for future restoration. Alternatively, you can
upload the backup to Zilliz Cloud to create
a managed vector database with your data. For details, refer to Migrate
from Milvus to Zilliz
Cloud.
Restore from the backup to milvus_B
Step 1: Configure restoration settings
Repeat step
2 to modify configs for restoration to milvus_B, ensuring minio.bucketName is set to bucket_B.
Here’s a sample configuration:
# milvus proxy address, compatible to milvus.yaml
milvus:
  address: milvus_B
  port: 19530
  authorizationEnabled: false
  # tls mode values [0, 1, 2]
  # 0 is close, 1 is one-way authentication, 2 is two-way authentication.
  tlsMode: 0
  user: "root"
  password: "Milvus"

# Related configuration of minio, which is responsible for data persistence for Milvus.
minio:
  # cloudProvider: "minio" # deprecated use storageType instead
  storageType: "minio" # support storage type: local, minio, s3, aws, gcp, ali(aliyun), azure, tc(tencent)

  address: minio_B # Address of MinIO/S3
  port: 9000   # Port of MinIO/S3
  accessKeyID: minioadmin  # accessKeyID of MinIO/S3
  secretAccessKey: minioadmin # MinIO/S3 encryption string
  useSSL: false # Access to MinIO/S3 with SSL
  useIAM: false
  iamEndpoint: ""

  bucketName: "bucket_B" # Milvus Bucket name in MinIO/S3, make it the same as your milvus instance
  rootPath: "files" # Milvus storage root path in MinIO/S3, make it the same as your milvus instance

  # only for azure
  backupAccessKeyID: minioadmin  # accessKeyID of MinIO/S3
  backupSecretAccessKey: minioadmin # MinIO/S3 encryption string

  backupBucketName: "bucket_B" # Bucket name to store backup data. Backup data will store to backupBucketName/backupRootPath
  backupRootPath: "backup" # Rootpath to store backup data. Backup data will store to backupBucketName/backupRootPath
Step 2: Restore from the backup
Restore the backup to milvus_B:
./milvus-backup restore -c coll -n my_backup -s _bak
This command restores the backup into a new collection named coll_bak in
milvus_B, with data stored in bucket_B/files/insert_log/[ID of new collection] within milvus_B's object storage.