Milvus RBAC Explained: Secure Your Vector Database with Role-Based Access Control
When building a database system, engineers spend most of their time on performance: index types, recall, latency, throughput, and scaling. But once a system moves beyond a single developer’s laptop, another question becomes just as critical: who can do what inside your Milvus cluster? In other words—access control.
Across the industry, many operational incidents stem from simple permission mistakes. A script runs against the wrong environment. A service account has broader access than intended. A shared admin credential ends up in CI. These issues usually surface as very practical questions:
Are developers allowed to delete production collections?
Why can a test account read production vector data?
Why are multiple services logging in with the same admin role?
Can analytics jobs have read-only access with zero write privileges?
Milvus addresses these challenges with role-based access control (RBAC). Instead of giving every user superadmin rights or trying to enforce restrictions in application code, RBAC lets you define precise permissions at the database layer. Each user or service gets exactly the capabilities it needs—nothing more.
This post explains how RBAC works in Milvus, how to configure it, and how to apply it safely in production environments.
Why Access Control Matters When Using Milvus
When teams are small, and their AI applications serve only a limited number of users, infrastructure is usually simple. A few engineers manage the system; Milvus is used only for development or testing; and operational workflows are straightforward. In this early stage, access control rarely feels urgent—because the risk surface is small and any mistakes can be easily reversed.
As Milvus moves into production and the number of users, services, and operators grows, the usage model changes quickly. Common scenarios include:
Multiple business systems sharing the same Milvus instance
Multiple teams accessing the same vector collections
Test, staging, and production data coexisting in a single cluster
Different roles needing different levels of access, from read-only queries to writes and operational control
Without well-defined access boundaries, these setups create predictable risks:
Test workflows might accidentally delete production collections
Developers might unintentionally modify indexes used by live services
Widespread use of the
rootaccount makes actions impossible to trace or auditA compromised application might gain unrestricted access to all vector data
As usage grows, relying on informal conventions or shared admin accounts is no longer sustainable. A consistent, enforceable access model becomes essential—and this is exactly what Milvus RBAC provides.
What is RBAC in Milvus
RBAC (Role-Based Access Control) is a permission model that controls access based on roles rather than individual users. In Milvus, RBAC lets you define exactly which operations a user or service is allowed to perform—and on which specific resources. It provides a structured, scalable way to manage security as your system grows from a single developer to a complete production environment.
Milvus RBAC is built around the following core components:
 Users Roles Privileges
Resource: The entity being accessed. In Milvus, resources include the instance, database, and collection.
Privilege: A specific allowed operation on a resource—for example, creating a collection, inserting data, or deleting entities.
Privilege Group: A predefined set of related privileges, such as “read-only” or “write.”
Role: A combination of privileges and the resources they apply to. A role determines what operations can be performed and where.
User: An identity in Milvus. Each user has a unique ID and is assigned one or more roles.
These components form a clear hierarchy:
Users are assigned roles
Roles define privileges
Privileges apply to specific resources
A key design principle in Milvus is that permissions are never assigned directly to users. All access goes through roles. This indirection simplifies administration, reduces configuration errors, and makes permission changes predictable.
This model scales cleanly in real deployments. When multiple users share a role, updating the role’s privileges instantly updates permissions for all of them—without modifying each user individually. It’s a single point of control aligned with how modern infrastructure manages access.
How RBAC Works in Milvus
When a client sends a request to Milvus, the system evaluates it through a series of authorization steps. Each step must pass before the operation is allowed to proceed:
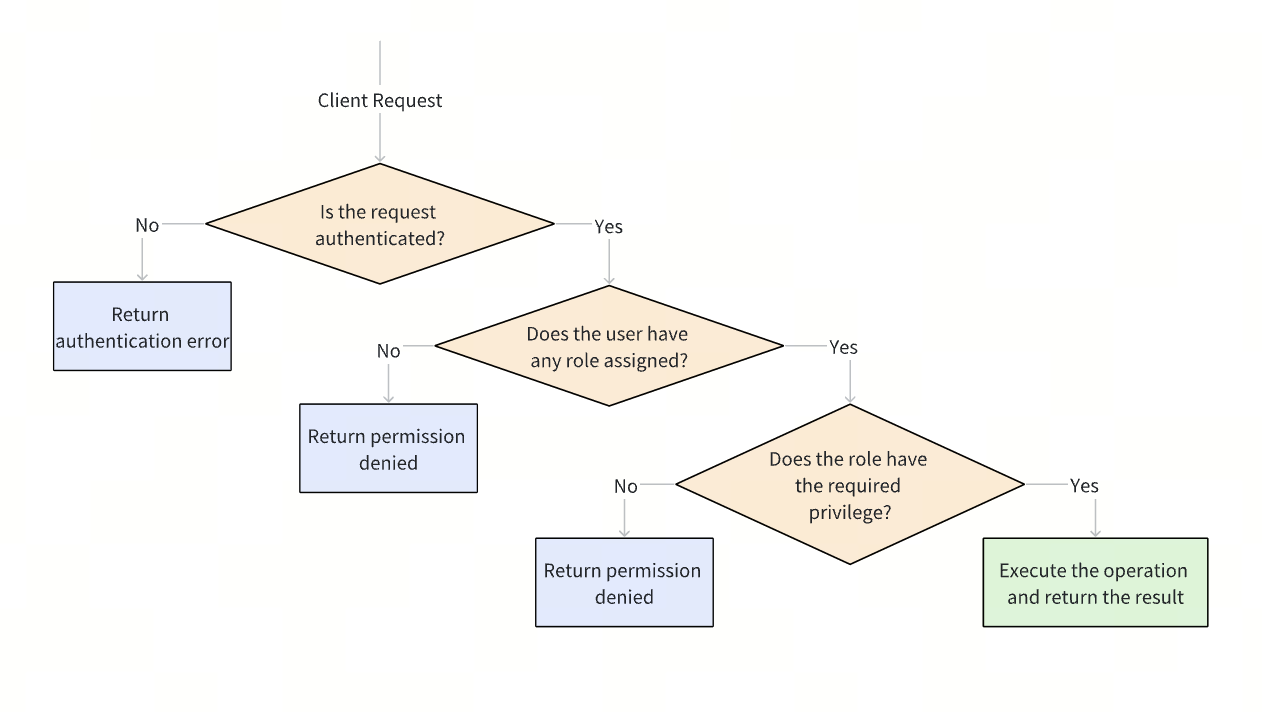 How RBAC Works in Milvus
Authenticate the request: Milvus first verifies the user identity. If authentication fails, the request is rejected with an authentication error.
Check role assignment: After authentication, Milvus checks whether the user has at least one role assigned. If no role is found, the request is rejected with a permission denied error.
Verify required privileges: Milvus then evaluates whether the user’s role grants the required privilege on the target resource. If the privilege check fails, the request is rejected with a permission denied error.
Execute the operation: If all checks pass, Milvus executes the requested operation and returns the result.
How to Configure Access Control via RBAC in Milvus
1. Prerequisites
Before RBAC rules can be evaluated and enforced, user authentication must be enabled so that every request to Milvus can be associated with a specific user identity.
Here are two standard deployment methods.
- Deploying with Docker Compose
If Milvus is deployed using Docker Compose, edit the milvus.yaml configuration file and enable authorization by setting common.security.authorizationEnabled to true:
common:
  security:
    authorizationEnabled: true
- Deploying with Helm Charts
If Milvus is deployed using Helm Charts, edit the values.yaml file and add the following configuration under extraConfigFiles.user.yaml:
extraConfigFiles:
  user.yaml: |+
    common:
      security:
        authorizationEnabled: true
2. Initialization
By default, Milvus creates a built-in root user when the system starts. The default password for this user is Milvus.
As an initial security step, use the root user to connect to Milvus and change the default password immediately. It is strongly recommended to use a complex password to prevent unauthorized access.
from pymilvus import MilvusClient
# Connect to Milvus using the default root user
client = MilvusClient(
    uri='http://localhost:19530',
    token="root:Milvus"
)
# Update the root password
client.update_password(
    user_name="root",
    old_password="Milvus",
    new_password="xgOoLudt3Kc#Pq68"
)
3. Core Operations
Create Users
For daily usage, it is recommended to create dedicated users instead of using the root account.
client.create_user(user_name="user_1", password="P@ssw0rd")
Create Roles
Milvus provides a built-in admin role with full administrative privileges. For most production scenarios, however, it is recommended to create custom roles to achieve finer-grained access control.
client.create_role(role_name="role_a")
Create Privilege Groups
A privilege group is a collection of multiple privileges. To simplify permission management, related privileges can be grouped and granted together.
Milvus includes the following built-in privilege groups:
COLL_RO,COLL_RW,COLL_ADMINDB_RO,DB_RW,DB_ADMINCluster_RO,Cluster_RW,Cluster_ADMIN
Using these built-in privilege groups can significantly reduce the complexity of permission design and improve consistency across roles.
You can either use the built-in privilege groups directly or create custom privilege groups as needed.
# Create a privilege group
client.create_privilege_group(group_name='privilege_group_1')
# Add privileges to the privilege group
client.add_privileges_to_group(group_name='privilege_group_1', privileges=['Query', 'Search'])
Grant Privileges or Privilege Groups to Roles
After a role is created, privileges or privilege groups can be granted to the role. The target resources for these privileges can be specified at different levels, including the instance, database, or individual Collections.
client.grant_privilege_v2(
    role_name="role_a",
    privilege="Search",
    collection_name='collection_01',
    db_name='default',
)
client.grant_privilege_v2(
    role_name="role_a",
    privilege="privilege_group_1",
    collection_name='collection_01',
    db_name='default',
)
client.grant_privilege_v2(
    role_name="role_a",
    privilege="ClusterReadOnly",
    collection_name='*',
    db_name='*',
)
Grant Roles to Users
Once roles are assigned to a user, the user can access resources and perform the operations defined by those roles. A single user can be granted one or multiple roles, depending on the required access scope.
client.grant_role(user_name="user_1", role_name="role_a")
4. Inspect and Revoke Access
Inspect Roles Assigned to a User
client.describe_user(user_name="user_1")
Inspect Privileges Assigned to a Role
client.describe_role(role_name="role_a")
Revoke Privileges from a Role
client.revoke_privilege_v2(
    role_name="role_a",
    privilege="Search",
    collection_name='collection_01',
    db_name='default',
)
client.revoke_privilege_v2(
    role_name="role_a",
    privilege="privilege_group_1",
    collection_name='collection_01',
    db_name='default',
)
Revoke Roles from a User
client.revoke_role(
    user_name='user_1',
    role_name='role_a'
)
Delete Users and Roles
client.drop_user(user_name="user_1")
client.drop_role(role_name="role_a")
Example: Access Control Design for a Milvus-Powered RAG System
Consider a Retrieval-Augmented Generation (RAG) system built on top of Milvus.
In this system, different components and users have clearly separated responsibilities, and each requires a different level of access.
| Actor | Responsibility | Required Access |
|---|---|---|
| Platform Administrator | System operations and configuration | Instance-level administration |
| Vector Ingestion Service | Vector data ingestion and updates | Read and write access |
| Search Service | Vector search and retrieval | Read-only access |
from pymilvus import MilvusClient
client = MilvusClient(
    uri='http://localhost:19530',
    token="root:xxx"  # Replace with the updated root password
)
# 1. Create a user (use a strong password)
client.create_user(user_name="rag_admin", password="xxx")
client.create_user(user_name="rag_reader", password="xxx")
client.create_user(user_name="rag_writer", password="xxx")
# 2. Create roles
client.create_role(role_name="role_admin")
client.create_role(role_name="role_read_only")
client.create_role(role_name="role_read_write")
# 3. Grant privileges to the role
## Using built-in Milvus privilege groups
client.grant_privilege_v2(
    role_name="role_admin",
    privilege="Cluster_Admin",
    collection_name='*',
    db_name='*',
)
client.grant_privilege_v2(
    role_name="role_read_only",
    privilege="COLL_RO",
    collection_name='*',
    db_name='default',
)
client.grant_privilege_v2(
    role_name="role_read_write",
    privilege="COLL_RW",
    collection_name='*',
    db_name='default',
)
# 4. Assign the role to the user
client.grant_role(user_name="rag_admin", role_name="role_admin")
client.grant_role(user_name="rag_reader", role_name="role_read_only")
client.grant_role(user_name="rag_writer", role_name="role_read_write")
Quick Tips: How to Operate Access Control Safely in Production
To ensure access control remains effective and manageable in long-running production systems, follow these practical guidelines.
1. Change the default root password and limit the use of root account
Update the default root password immediately after initialization and restrict its use to administrative tasks only. Avoid using or sharing the root account for routine operations. Instead, create dedicated users and roles for day-to-day access to reduce risk and improve accountability.
2. Physically isolate Milvus instances across environments
Deploy separate Milvus instances for development, staging, and production. Physical isolation provides a stronger safety boundary than logical access control alone and significantly reduces the risk of cross-environment mistakes.
3. Follow the principle of least privilege
Grant only the permissions required for each role:
Development environments: permissions can be more permissive to support iteration and testing
Production environments: permissions should be strictly limited to what is necessary
Regular audits: periodically review existing permissions to ensure they are still required
4. Actively revoke permissions when they are no longer needed
Access control is not a one-time setup—it requires ongoing maintenance. Revoke roles and privileges promptly when users, services, or responsibilities change. This prevents unused permissions from accumulating over time and becoming hidden security risks.
Conclusion
Configuring access control in Milvus is not inherently complex, but it is essential for operating the system safely and reliably in production. With a well-designed RBAC model, you can:
Reduce risk by preventing accidental or destructive operations
Improve security by enforcing least-privilege access to vector data
Standardize operations through a clear separation of responsibilities
Scale with confidence, laying the foundation for multi-tenant and large-scale deployments
Access control is not an optional feature or a one-time task. It is a foundational part of operating Milvus safely over the long term.
👉 Start building a solid security baseline with RBAC for your Milvus deployment.
Have questions or want a deep dive on any feature of the latest Milvus? Join our Discord channel or file issues on GitHub. You can also book a 20-minute one-on-one session to get insights, guidance, and answers to your questions through Milvus Office Hours.
- Why Access Control Matters When Using Milvus
- What is RBAC in Milvus
- How RBAC Works in Milvus
- How to Configure Access Control via RBAC in Milvus
- 1. Prerequisites
- 2. Initialization
- 3. Core Operations
- 4. Inspect and Revoke Access
- Example: Access Control Design for a Milvus-Powered RAG System
- Quick Tips: How to Operate Access Control Safely in Production
- Conclusion
On This Page
Try Managed Milvus for Free
Zilliz Cloud is hassle-free, powered by Milvus and 10x faster.
Get StartedLike the article? Spread the word