How to Migrate Your Data to Milvus Seamlessly: A Comprehensive Guide
Milvus is a robust open-source vector database for similarity search that can store, process, and retrieve billions and even trillions of vector data with minimal latency. It is also highly scalable, reliable, cloud-native, and feature-rich. The newest release of Milvus introduces even more exciting features and improvements, including GPU support for over 10x faster performance and MMap for greater storage capacity on a single machine.
As of September 2023, Milvus has earned almost 23,000 stars on GitHub and has tens of thousands of users from diverse industries with varying needs. It is becoming even more popular as Generative AI technology like ChatGPT becomes more prevalent. It is an essential component of various AI stacks, especially the retrieval augmented generation framework, which addresses the hallucination problem of large language models.
To meet the growing demand from new users who want to migrate to Milvus and existing users who wish to upgrade to the latest Milvus versions, we developed Milvus Migration. In this blog, we’ll explore the features of Milvus Migration and guide you through quickly transitioning your data to Milvus from Milvus 1.x, FAISS, and Elasticsearch 7.0 and beyond.
Milvus Migration, a powerful data migration tool
Milvus Migration is a data migration tool written in Go. It enables users to move their data seamlessly from older versions of Milvus (1.x), FAISS, and Elasticsearch 7.0 and beyond to Milvus 2.x versions.
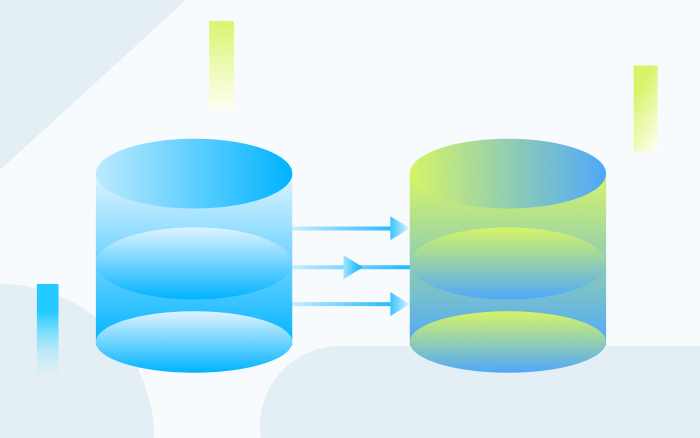
The diagram below demonstrates how we built Milvus Migration and how it works.
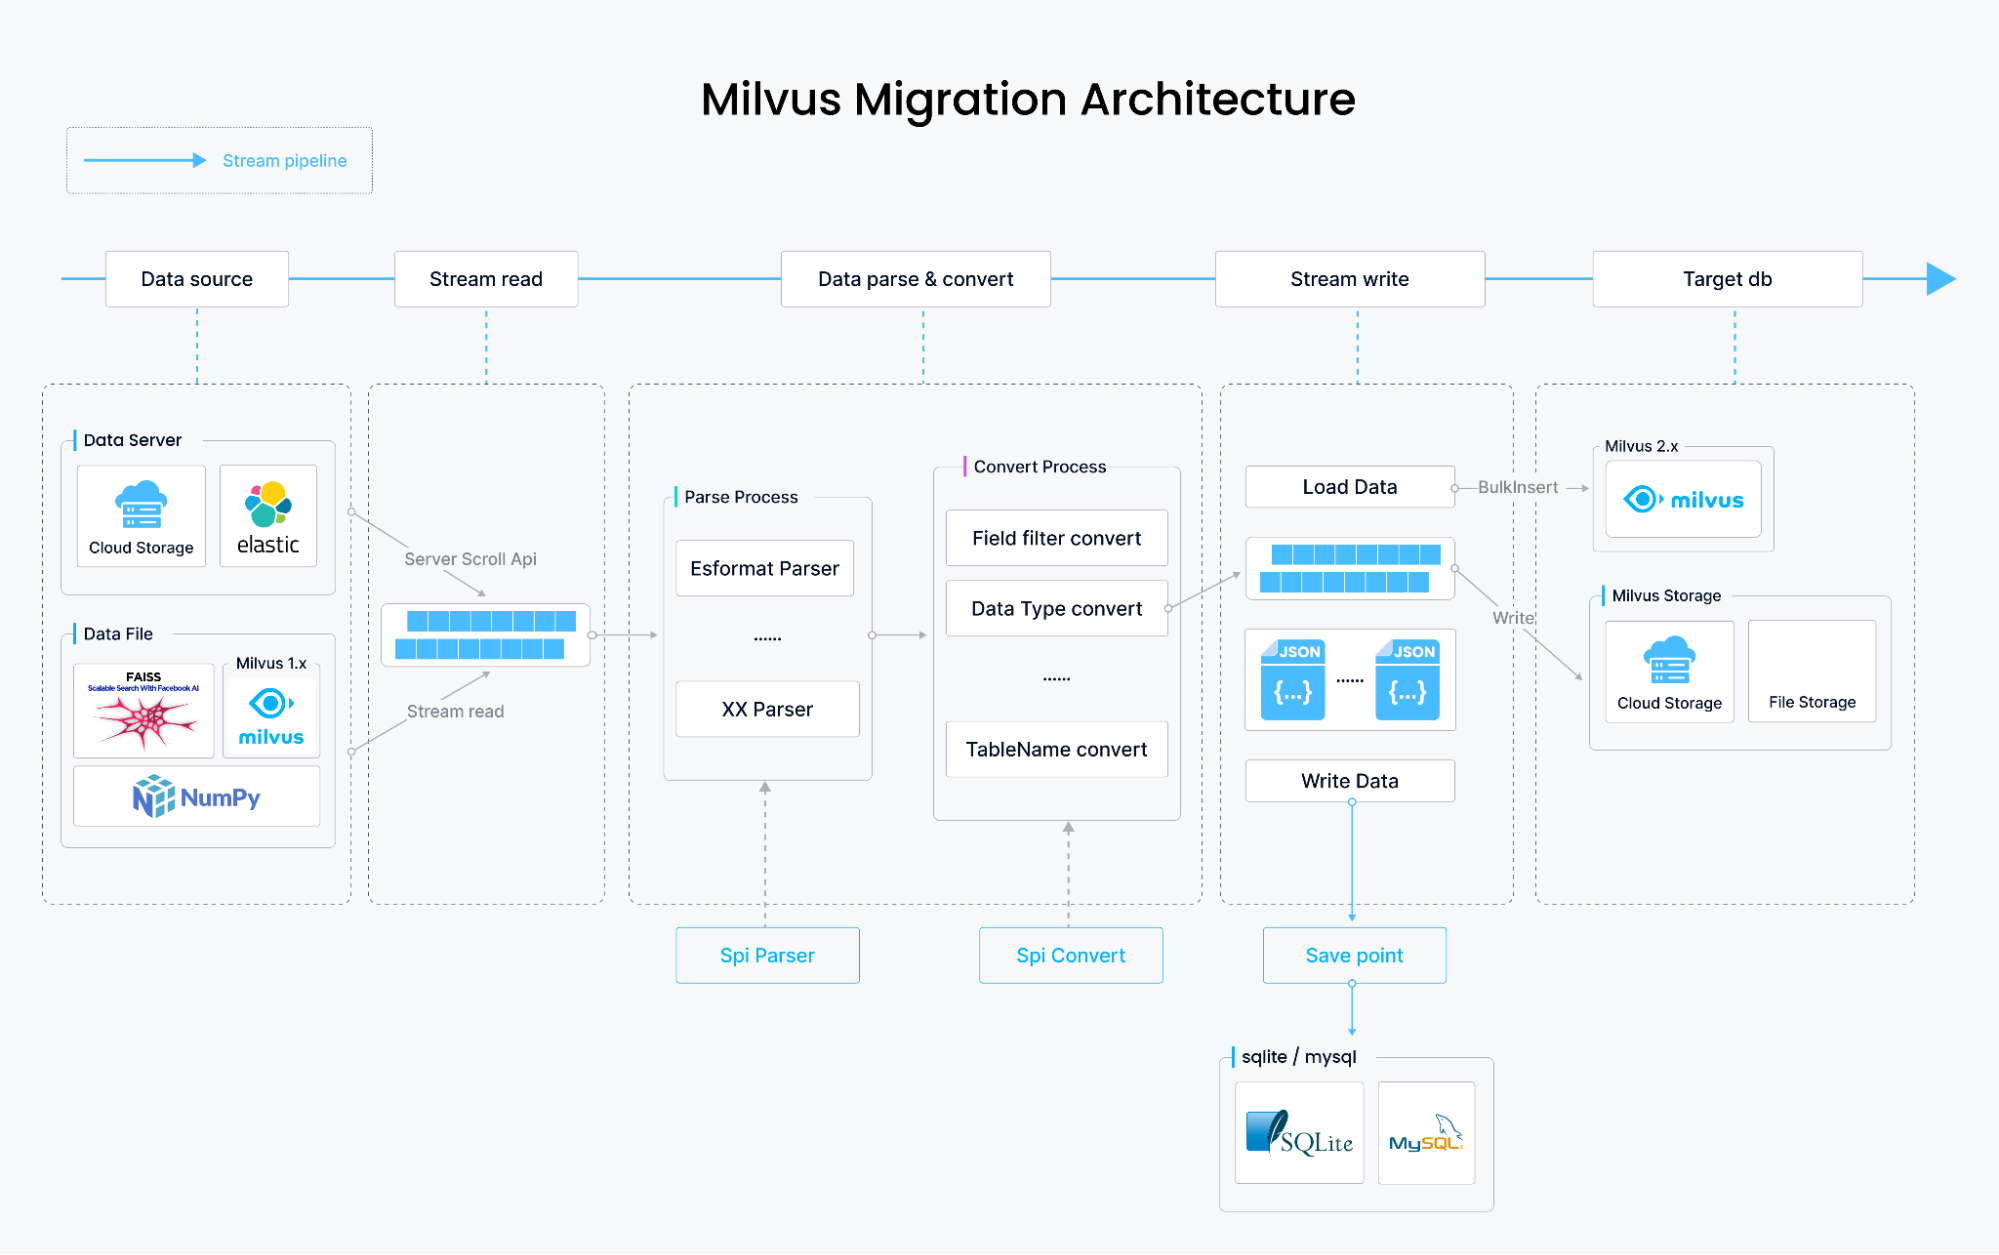
How Milvus Migration migrates data
From Milvus 1.x and FAISS to Milvus 2.x
The data migration from Milvus 1.x and FAISS involves parsing the content of the original data files, transforming them into the data storage format of Milvus 2.x, and writing the data using Milvus SDK’s bulkInsert. This entire process is stream-based, theoretically limited only by disk space, and stores data files on your local disk, S3, OSS, GCP, or Minio.
From Elasticsearch to Milvus 2.x
In the Elasticsearch data migration, data retrieval is different. Data is not obtained from files but sequentially fetched using Elasticsearch’s scroll API. The data is then parsed and transformed into Milvus 2.x storage format, followed by writing it using bulkInsert. Besides migrating dense_vector type vectors stored in Elasticsearch, Milvus Migration also supports migrating other field types, including long, integer, short, boolean, keyword, text, and double.
Milvus Migration feature set
Milvus Migration simplifies the migration process through its robust feature set:
Supported Data Sources:
Milvus 1.x to Milvus 2.x
Elasticsearch 7.0 and beyond to Milvus 2.x
FAISS to Milvus 2.x
Multiple Interaction Modes:
Command-line interface (CLI) using the Cobra framework
Restful API with a built-in Swagger UI
Integration as a Go module in other tools
Versatile File Format Support:
Local files
Amazon S3
Object Storage Service (OSS)
Google Cloud Platform (GCP)
Flexible Elasticsearch Integration:
Migration of
dense_vectortype vectors from ElasticsearchSupport for migrating other field types such as long, integer, short, boolean, keyword, text, and double
Interface definitions
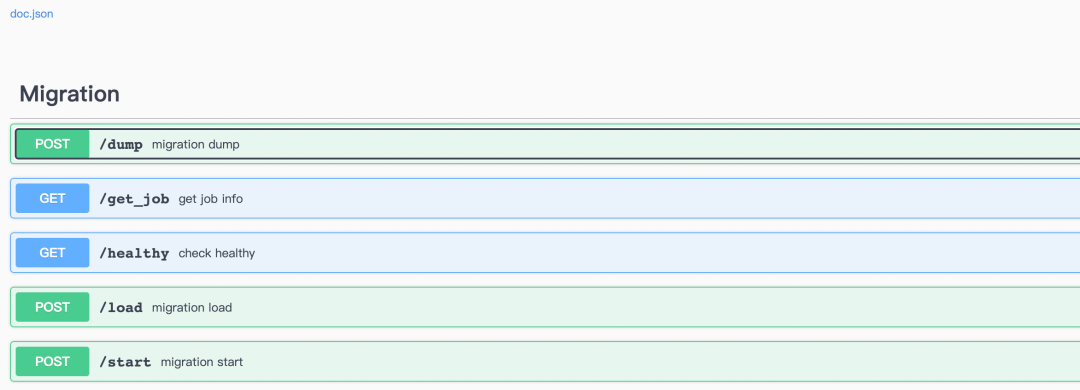
Milvus Migration provides the following key interfaces:
/start: Initiates a migration job (equivalent to a combination of dump and load, currently only supports ES migration)./dump: Initiates a dump job (writes source data into the target storage medium)./load: Initiates a load job (writes data from the target storage medium into Milvus 2.x)./get_job: Allows users to view job execution results. (For more details, refer to the project’s server.go)
Next, let’s use some example data to explore how to use Milvus Migration in this section. You can find these examples here on GitHub.
Migration from Elasticsearch to Milvus 2.x
- Prepare Elasticsearch Data
To migrate Elasticsearch data, you should already set up your own Elasticsearch server. You should store vector data in the dense_vector field and index them with other fields. The index mappings are as shown below.

- Compile and Build
First, download the Milvus Migration’s source code from GitHub. Then, run the following commands to compile it.
go get
go build
This step will generate an executable file named milvus-migration.
- Configure
migration.yaml
Before starting the migration, you must prepare a configuration file named migration.yaml that includes information about the data source, target, and other relevant settings. Here’s an example configuration:
# Configuration for Elasticsearch to Milvus 2.x migration


dumper:
  worker:
    workMode: Elasticsearch
    reader:
      bufferSize: 2500
meta:
  mode: config
  index: test_index
  fields:
    - name: id
      pk: true
      type: long
    - name: other_field
      maxLen: 60
      type: keyword
    - name: data
      type: dense_vector
      dims: 512
  milvus:
      collection: "rename_index_test"
      closeDynamicField: false
      consistencyLevel: Eventually
      shardNum: 1


source:
  es:
    urls:
      - http://localhost:9200
    username: xxx
    password: xxx


target:
  mode: remote
  remote:
    outputDir: outputPath/migration/test1
    cloud: aws
    region: us-west-2
    bucket: xxx
    useIAM: true
    checkBucket: false
  milvus2x:
    endpoint: {yourMilvusAddress}:{port}
    username: ******
    password: ******
For a more detailed explanation of the configuration file, refer to this page on GitHub.
- Execute the migration job
Now that you have configured your migration.yaml file, you can start the migration task by running the following command:
./milvus-migration start --config=/{YourConfigFilePath}/migration.yaml
Observe the log output. When you see logs similar to the following, it means the migration was successful.
[task/load_base_task.go:94] ["[LoadTasker] Dec Task Processing-------------->"] [Count=0] [fileName=testfiles/output/zwh/migration/test_mul_field4/data_1_1.json] [taskId=442665677354739304][task/load_base_task.go:76] ["[LoadTasker] Progress Task --------------->"] [fileName=testfiles/output/zwh/migration/test_mul_field4/data_1_1.json] [taskId=442665677354739304][dbclient/cus_field_milvus2x.go:86] ["[Milvus2x] begin to ShowCollectionRows"][loader/cus_milvus2x_loader.go:66] ["[Loader] Static: "] [collection=test_mul_field4_rename1] [beforeCount=50000] [afterCount=100000] [increase=50000][loader/cus_milvus2x_loader.go:66] ["[Loader] Static Total"] ["Total Collections"=1] [beforeTotalCount=50000] [afterTotalCount=100000] [totalIncrease=50000][migration/es_starter.go:25] ["[Starter] migration ES to Milvus finish!!!"] [Cost=80.009174459][starter/starter.go:106] ["[Starter] Migration Success!"] [Cost=80.00928425][cleaner/remote_cleaner.go:27] ["[Remote Cleaner] Begin to clean files"] [bucket=a-bucket] [rootPath=testfiles/output/zwh/migration][cmd/start.go:32] ["[Cleaner] clean file success!"]
In addition to the command-line approach, Milvus Migration also supports migration using Restful API.
To use the Restful API, start the API server using the following command:
./milvus-migration server run -p 8080
Once the service runs, you can initiate the migration by calling the API.
curl -XPOST http://localhost:8080/api/v1/start
When the migration is complete, you can use Attu, an all-in-one vector database administration tool, to view the total number of successful rows migrated and perform other collection-related operations.
 The Attu interface
Migration from Milvus 1.x to Milvus 2.x
- Prepare Milvus 1.x Data
To help you quickly experience the migration process, we’ve put 10,000 Milvus 1.x test data records in the source code of Milvus Migration. However, in real cases, you must export your own meta.json file from your Milvus 1.x instance before starting the migration process.
- You can export the data with the following command.
./milvus-migration export -m "user:password@tcp(adderss)/milvus?charset=utf8mb4&parseTime=True&loc=Local" -o outputDir
Make sure to:
Replace the placeholders with your actual MySQL credentials.
Stop the Milvus 1.x server or halt data writes before performing this export.
Copy the Milvus
tablesfolder and themeta.jsonfile to the same directory.
Note: If you use Milvus 2.x on Zilliz Cloud (the fully managed service of Milvus), you can start the migration using Cloud Console.
- Compile and Build
First, download the Milvus Migration’s source code from GitHub. Then, run the following commands to compile it.
go get
go build
This step will generate an executable file named milvus-migration.
- Configure
migration.yaml
Prepare a migration.yaml configuration file, specifying details about the source, target, and other relevant settings. Here’s an example configuration:
# Configuration for Milvus 1.x to Milvus 2.x migration


dumper:
  worker:
    limit: 2
    workMode: milvus1x
    reader:
      bufferSize: 1024
    writer:
      bufferSize: 1024
loader:
  worker:
    limit: 16
meta:
  mode: local
  localFile: /outputDir/test/meta.json


source:
  mode: local
  local:
    tablesDir: /db/tables/


target:
  mode: remote
  remote:
    outputDir: "migration/test/xx"
    ak: xxxx
    sk: xxxx
    cloud: aws
    endpoint: 0.0.0.0:9000
    region: ap-southeast-1
    bucket: a-bucket
    useIAM: false
    useSSL: false
    checkBucket: true
  milvus2x:
    endpoint: localhost:19530
    username: xxxxx
    password: xxxxx
For a more detailed explanation of the configuration file, refer to this page on GitHub.
- Execute Migration Job
You must execute the dump and load commands separately to finish the migration. These commands convert the data and import it into Milvus 2.x.
Note: We’ll simplify this step and enable users to finish migration using just one command shortly. Stay tuned.
Dump Command:
./milvus-migration dump --config=/{YourConfigFilePath}/migration.yaml
Load Command:
./milvus-migration load --config=/{YourConfigFilePath}/migration.yaml
After the migration, the generated collection in Milvus 2.x will contain two fields: id and data. You can view more details using Attu, an all-in-one vector database administration tool.
Migration from FAISS to Milvus 2.x
- Prepare FAISS Data
To migrate Elasticsearch data, you should have your own FAISS data ready. To help you quickly experience the migration process, we’ve put some FAISS test data in the source code of Milvus Migration.
- Compile and Build
First, download the Milvus Migration’s source code from GitHub. Then, run the following commands to compile it.
go get
go build
This step will generate an executable file named milvus-migration.
- Configure
migration.yaml
Prepare a migration.yaml configuration file for FAISS migration, specifying details about the source, target, and other relevant settings. Here’s an example configuration:
# Configuration for FAISS to Milvus 2.x migration


dumper:
  worker:
    limit: 2
    workMode: FAISS
    reader:
      bufferSize: 1024
    writer:
      bufferSize: 1024
loader:
  worker:
    limit: 2
source:
  mode: local
  local:
    FAISSFile: ./testfiles/FAISS/FAISS_ivf_flat.index


target:
  create:
    collection:
      name: test1w
      shardsNums: 2
      dim: 256
      metricType: L2
  mode: remote
  remote:
    outputDir: testfiles/output/
    cloud: aws
    endpoint: 0.0.0.0:9000
    region: ap-southeast-1
    bucket: a-bucket
    ak: minioadmin
    sk: minioadmin
    useIAM: false
    useSSL: false
    checkBucket: true
  milvus2x:
    endpoint: localhost:19530
    username: xxxxx
    password: xxxxx
For a more detailed explanation of the configuration file, refer to this page on GitHub.
- Execute Migration Job
Like Milvus 1.x to Milvus 2.x migration, FAISS migration requires executing both the dump and load commands. These commands convert the data and import it into Milvus 2.x.
Note: We’ll simplify this step and enable users to finish migration using just one command shortly. Stay tuned.
Dump Command:
./milvus-migration dump --config=/{YourConfigFilePath}/migration.yaml
Load Command:
./milvus-migration load --config=/{YourConfigFilePath}/migration.yaml
You can view more details using Attu, an all-in-one vector database administration tool.
Stay tuned for future migration plans
In the future, we’ll support migration from more data sources and add more migration features, including:
Support migration from Redis to Milvus.
Support migration from MongoDB to Milvus.
Support resumable migration.
Simplify migration commands by merging the dump and load processes into one.
Support migration from other mainstream data sources to Milvus.
Conclusion
Milvus 2.3, the latest release of Milvus, brings exciting new features and performance improvements that cater to the growing needs of data management. Migrating your data to Milvus 2.x can unlock these benefits, and the Milvus Migration project makes the migration process streamlined and easy. Give it a try, and you won’t be disappointed.
Note: The information in this blog is based on the state of the Milvus and Milvus Migration projects as of September 2023. Check the official Milvus documentation for the most up-to-date information and instructions.
- Milvus Migration, a powerful data migration tool
- How Milvus Migration migrates data
- Milvus Migration feature set
- Interface definitions
- Migration from Elasticsearch to Milvus 2.x
- Migration from Milvus 1.x to Milvus 2.x
- Migration from FAISS to Milvus 2.x
- Stay tuned for future migration plans
- Conclusion
On This Page
Try Managed Milvus for Free
Zilliz Cloud is hassle-free, powered by Milvus and 10x faster.
Get StartedLike the article? Spread the word