Milvus Access Control Guide: How to Configure RBAC for Production
Here’s a story that’s more common than it should be: a QA engineer runs a cleanup script against what they think is the staging environment. Except the connection string points to production. A few seconds later, core vector collections are gone — feature data lost, similarity search returning empty results, services degrading across the board. The postmortem finds the same root cause it always does: everyone was connecting as root, there were no access boundaries, and nothing stopped a test account from dropping production data.
This isn’t a one-off. Teams building on Milvus — and vector databases in general — tend to focus on index performance, throughput, and data scale, while treating access control as something to deal with later. But “later” usually arrives in the form of an incident. As Milvus moves from prototype to the backbone of production RAG pipelines, recommendation engines, and real-time vector search, the question becomes unavoidable: who can access your Milvus cluster, and what exactly are they allowed to do?
Milvus includes a built-in RBAC system to answer that question. This guide covers what RBAC is, how Milvus implements it, and how to design an access control model that keeps production safe — complete with code examples and a full RAG system walkthrough.
What Is RBAC (Role-Based Access Control)?
Role-Based Access Control (RBAC) is a security model where permissions are not assigned directly to individual users. Instead, permissions are grouped into roles, and users are assigned one or more roles. A user’s effective access is the union of all permissions from their assigned roles. RBAC is the standard access control model in production database systems — PostgreSQL, MySQL, MongoDB, and most cloud services use it.
RBAC solves a fundamental scaling problem: when you have dozens of users and services, managing permissions per-user becomes unmaintainable. With RBAC, you define a role once (e.g., “read-only on collection X”), assign it to ten services, and update it in one place when requirements change.
How Does Milvus Implement RBAC?
Milvus RBAC is built on four concepts:
| Concept | What It Is | Example |
|---|---|---|
| Resource | The thing being accessed | A Milvus instance, a database, or a specific collection |
| Privilege / Privilege Group | The action being performed | Search, Insert, DropCollection, or a group like COLL_RO (collection read-only) |
| Role | A named set of privileges scoped to resources | role_read_only: can search and query all collections in default database |
| User | A Milvus account (human or service) | rag_writer: the service account used by the ingestion pipeline |
Access is never assigned directly to users. Users get roles, roles contain privileges, and privileges are scoped to resources. This is the same RBAC model used in most production database systems. If ten users share the same role, you update the role once and the change applies to all of them.
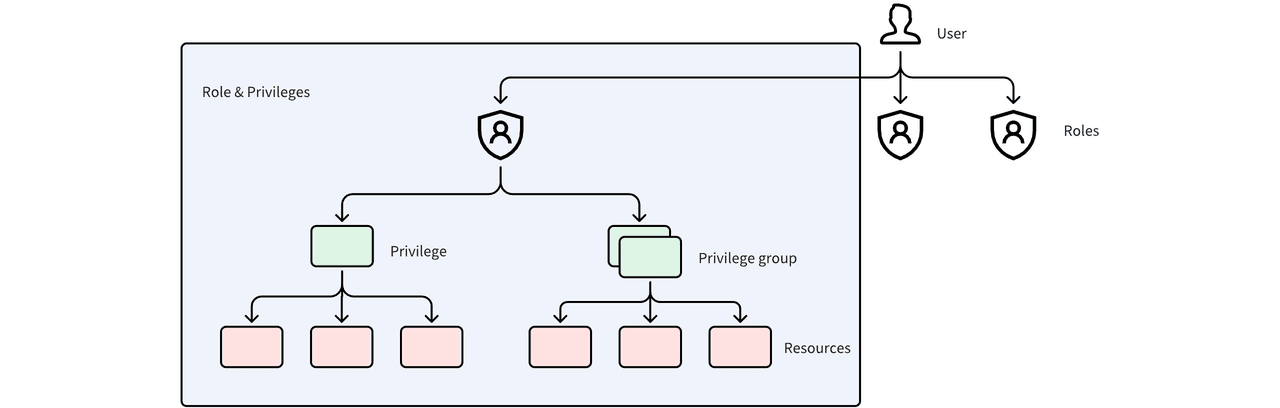 Milvus RBAC model showing how Users are assigned to Roles, and Roles contain Privileges and Privilege Groups that apply to Resources
When a request hits Milvus, it goes through three checks:
- Authentication — is this a valid user with correct credentials?
- Role check — does this user have at least one role assigned?
- Privilege check — does any of the user’s roles grant the requested action on the requested resource?
If any check fails, the request is rejected.
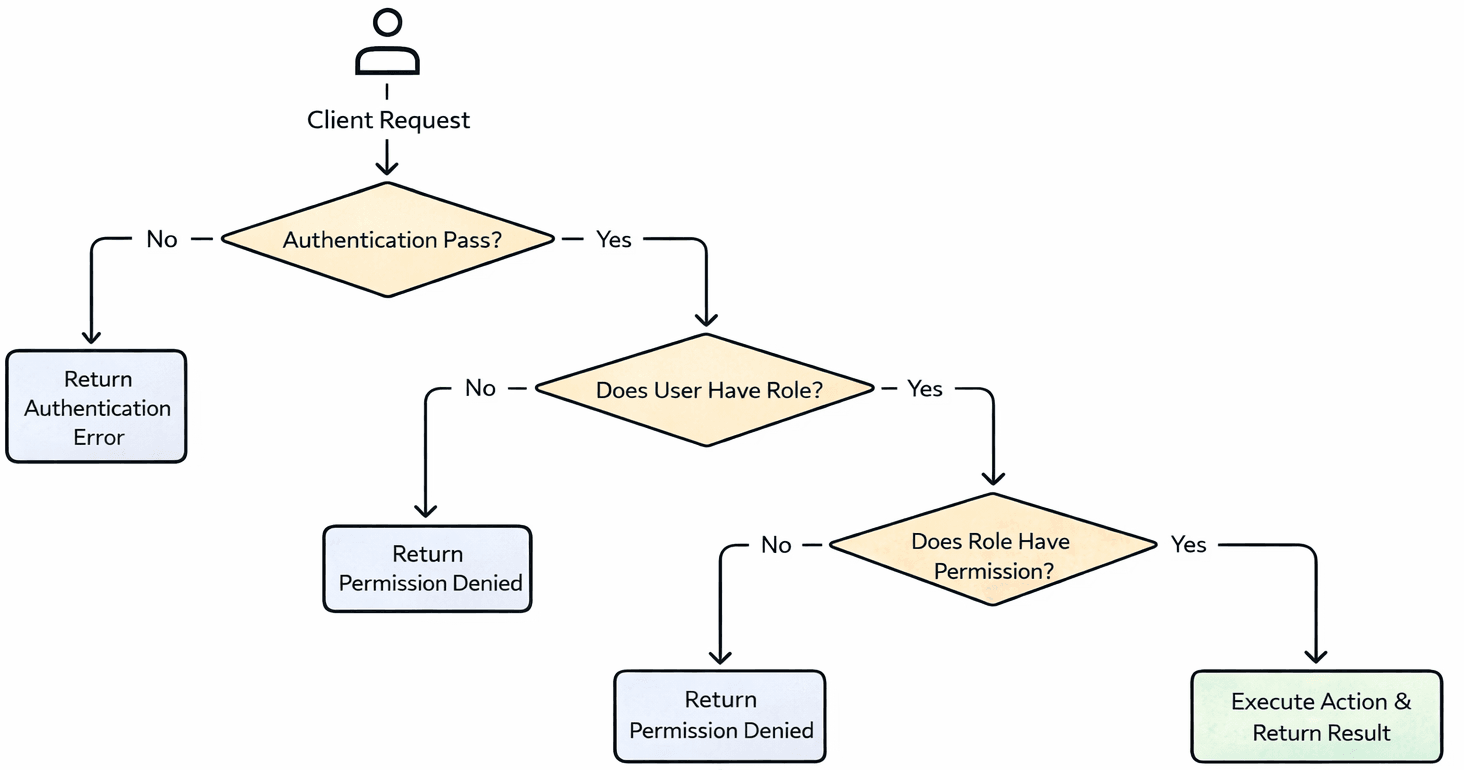 Milvus authentication and authorization flow: Client Request goes through Authentication, Role Check, and Privilege Check — rejected at any failed step, executed only if all pass
How to Enable Authentication in Milvus
By default, Milvus runs with authentication disabled — every connection has full access. The first step is turning it on.
Docker Compose
Edit milvus.yaml and set authorizationEnabled to true:
common:
  security:
    authorizationEnabled: true
Helm Charts
Edit values.yaml and add the setting under extraConfigFiles:
extraConfigFiles:
  user.yaml: |+
    common:
      security:
        authorizationEnabled: true
For Milvus Operator deployments on Kubernetes, the same configuration goes into the Milvus CR’s spec.config section.
Once authentication is enabled and Milvus restarts, every connection must provide credentials. Milvus creates a default root user with the password Milvus — change this immediately.
from pymilvus import MilvusClient

# Connect with the default root account
client = MilvusClient(
    uri='http://localhost:19530',
    token="root:Milvus"
)

# Change the password
client.update_password(
    user_name="root",
    old_password="Milvus",
    new_password="xgOoLudt3Kc#Pq68"
)
How to Configure Users, Roles, and Privileges
With authentication enabled, here’s the typical setup workflow.
Step 1: Create Users
Don’t let services or team members use root. Create dedicated accounts for each user or service.
client.create_user(user_name="user_1", password="P@ssw0rd")
Step 2: Create Roles
Milvus has a built-in admin role, but in practice you’ll want custom roles that match your actual access patterns.
client.create_role(role_name="role_a")
Step 3: Create Privilege Groups
A privilege group bundles multiple privileges under one name, making it easier to manage access at scale. Milvus provides 9 built-in privilege groups:
| Built-in Group | Scope | What It Allows |
|---|---|---|
COLL_RO | Collection | Read-only operations (Query, Search, etc.) |
COLL_RW | Collection | Read and write operations |
COLL_Admin | Collection | Full collection management |
DB_RO | Database | Read-only database operations |
DB_RW | Database | Read and write database operations |
DB_Admin | Database | Full database management |
Cluster_RO | Cluster | Read-only cluster operations |
Cluster_RW | Cluster | Read and write cluster operations |
Cluster_Admin | Cluster | Full cluster management |
You can also create custom privilege groups when the built-in ones don’t fit:
# Create a privilege group
client.create_privilege_group(group_name='privilege_group_1')

# Add privileges to the group
client.add_privileges_to_group(
    group_name='privilege_group_1',
    privileges=['Query', 'Search']
)
Step 4: Grant Privileges to a Role
Grant individual privileges or privilege groups to a role, scoped to specific resources. The collection_name and db_name parameters control the scope — use * for all.
# Grant a single privilege
client.grant_privilege_v2(
    role_name="role_a",
    privilege="Search",
    collection_name='collection_01',
    db_name='default',
)

# Grant a privilege group
client.grant_privilege_v2(
    role_name="role_a",
    privilege="privilege_group_1",
    collection_name='collection_01',
    db_name='default',
)

# Grant a cluster-level privilege (* means all resources)
client.grant_privilege_v2(
    role_name="role_a",
    privilege="ClusterReadOnly",
    collection_name='*',
    db_name='*',
)
Step 5: Assign Roles to Users
A user can hold multiple roles. Their effective permissions are the union of all assigned roles.
client.grant_role(user_name="user_1", role_name="role_a")
How to Audit and Revoke Access
Knowing what access exists is just as important as granting it. Stale permissions — from former team members, retired services, or one-off debugging sessions — accumulate silently and widen the attack surface.
Check Current Permissions
View a user’s assigned roles:
client.describe_user(user_name="user_1")
View a role’s granted privileges:
client.describe_role(role_name="role_a")
Revoke Privileges from a Role
# Remove a single privilege
client.revoke_privilege_v2(
    role_name="role_a",
    privilege="Search",
    collection_name='collection_01',
    db_name='default',
)

# Remove a privilege group
client.revoke_privilege_v2(
    role_name="role_a",
    privilege="privilege_group_1",
    collection_name='collection_01',
    db_name='default',
)
Unassign a Role from a User
client.revoke_role(
    user_name='user_1',
    role_name='role_a'
)
Delete Users or Roles
Remove all role assignments before deleting a user, and revoke all privileges before dropping a role:
client.drop_user(user_name="user_1")
client.drop_role(role_name="role_a")
Example: How to Design RBAC for a Production RAG System
Abstract concepts click faster with a concrete example. Consider a RAG system built on Milvus with three distinct services:
| Service | Responsibility | Required Access |
|---|---|---|
| Platform admin | Manages the Milvus cluster — creates collections, monitors health, handles upgrades | Full cluster admin |
| Ingestion service | Generates vector embeddings from documents and writes them to collections | Read + write on collections |
| Search service | Handles vector search queries from end users | Read-only on collections |
Here’s a complete setup using PyMilvus:
from pymilvus import MilvusClient

client = MilvusClient(
    uri='http://localhost:19530',
    token="root:xxx"  # Replace with your updated root password
)

# 1. Create users
client.create_user(user_name="rag_admin", password="xxx")
client.create_user(user_name="rag_reader", password="xxx")
client.create_user(user_name="rag_writer", password="xxx")

# 2. Create roles
client.create_role(role_name="role_admin")
client.create_role(role_name="role_read_only")
client.create_role(role_name="role_read_write")

# 3. Grant access to roles

# Admin role: cluster-level admin access
client.grant_privilege_v2(
    role_name="role_admin",
    privilege="Cluster_Admin",
    collection_name='*',
    db_name='*',
)

# Read-only role: collection-level read-only access
client.grant_privilege_v2(
    role_name="role_read_only",
    privilege="COLL_RO",
    collection_name='*',
    db_name='default',
)

# Read-write role: collection-level read and write access
client.grant_privilege_v2(
    role_name="role_read_write",
    privilege="COLL_RW",
    collection_name='*',
    db_name='default',
)

# 4. Assign roles to users
client.grant_role(user_name="rag_admin", role_name="role_admin")
client.grant_role(user_name="rag_reader", role_name="role_read_only")
client.grant_role(user_name="rag_writer", role_name="role_read_write")
Each service gets exactly the access it needs. The search service can’t accidentally delete data. The ingestion service can’t modify cluster settings. And if the search service’s credentials leak, the attacker can read embedding vectors — but can’t write, delete, or escalate to admin.
For teams managing access across multiple Milvus deployments, Zilliz Cloud (managed Milvus) provides built-in RBAC with a web console for managing users, roles, and permissions — no scripting required. Useful when you’d rather manage access through a UI than maintain setup scripts across environments.
Access Control Best Practices for Production
The setup steps above are the mechanics. Here are the design principles that keep access control effective over time.
Lock Down the Root Account
Change the default root password before anything else. In production, the root account should be used only for emergency operations and stored in a secrets manager — not hardcoded in application configs or shared over Slack.
Separate Environments Completely
Use different Milvus instances for development, staging, and production. Environment separation by RBAC alone is fragile — one misconfigured connection string and a dev service is writing to production data. Physical separation (different clusters, different credentials) eliminates this class of incident entirely.
Apply Least Privilege
Give each user and service the minimum access needed to do its job. Start narrow and widen only when there’s a specific, documented need. In development environments you can be more relaxed, but production access should be strict and reviewed regularly.
Clean Up Stale Access
When someone leaves the team or a service gets decommissioned, revoke their roles and delete their accounts immediately. Unused accounts with active permissions are the most common vector for unauthorized access — they’re valid credentials that nobody is monitoring.
Scope Privileges to Specific Collections
Avoid granting collection_name='*' unless the role genuinely needs access to every collection. In multi-tenant setups or systems with multiple data pipelines, scope each role to only the collections it operates on. This limits the blast radius if credentials are compromised.
If you’re deploying Milvus in production and working through access control, security, or multi-tenant design, we’d love to help:
- Join the Milvus Slack community to discuss real deployment practices with other engineers running Milvus at scale.
- Book a free 20-minute Milvus Office Hours session to walk through your RBAC design — whether it’s role structure, collection-level scoping, or multi-environment security.
- If you’d rather skip the infrastructure setup and manage access control through a UI, Zilliz Cloud (managed Milvus) includes built-in RBAC with a web console — plus encryption, network isolation, and SOC 2 compliance out of the box.
A few questions that come up when teams start configuring access control in Milvus:
Q: Can I restrict a user to only specific collections, not all of them?
Yes. When you call grant_privilege_v2, set collection_name to the specific collection rather than *. The user’s role will only have access to that collection. You can grant the same role privileges on multiple collections by calling the function once per collection.
Q: What’s the difference between a privilege and a privilege group in Milvus?
A privilege is a single action like Search, Insert, or DropCollection. A privilege group bundles multiple privileges under one name — for example, COLL_RO includes all read-only collection operations. Granting a privilege group is functionally the same as granting each of its constituent privileges individually, but easier to manage.
Q: Does enabling authentication affect Milvus query performance?
The overhead is negligible. Milvus validates credentials and checks role permissions on each request, but this is an in-memory lookup — it adds microseconds, not milliseconds. There is no measurable impact on search or insert latency.
Q: Can I use Milvus RBAC in a multi-tenant setup?
Yes. Create separate roles per tenant, scope each role’s privileges to that tenant’s collections, and assign the corresponding role to each tenant’s service account. This gives you collection-level isolation without needing separate Milvus instances. For larger-scale multi-tenancy, see the Milvus multi-tenancy guide.
- What Is RBAC (Role-Based Access Control)?
- How Does Milvus Implement RBAC?
- How to Enable Authentication in Milvus
- Docker Compose
- Helm Charts
- How to Configure Users, Roles, and Privileges
- Step 1: Create Users
- Step 2: Create Roles
- Step 3: Create Privilege Groups
- Step 4: Grant Privileges to a Role
- Step 5: Assign Roles to Users
- How to Audit and Revoke Access
- Check Current Permissions
- Revoke Privileges from a Role
- Unassign a Role from a User
- Delete Users or Roles
- Example: How to Design RBAC for a Production RAG System
- Access Control Best Practices for Production
- Lock Down the Root Account
- Separate Environments Completely
- Apply Least Privilege
- Clean Up Stale Access
- Scope Privileges to Specific Collections
On This Page
Try Managed Milvus for Free
Zilliz Cloud is hassle-free, powered by Milvus and 10x faster.
Get StartedLike the article? Spread the word