

分析器概述
在文本处理中,分析器是一个关键组件,用于将原始文本转换为结构化且可搜索的格式。每个分析器通常由两个核心元素组成:分词器和 过滤器。它们共同将输入文本转换为词元,对这些词元进行精炼,并为高效的索引和检索做好准备。
在 Milvus 中,分析器是在创建 Collection 时配置的,具体是在 Schema 中添加VARCHAR 字段时进行配置。分析器生成的词元可用于构建用于关键词匹配的索引,或转换为稀疏 Embeddings 以进行全文搜索。有关更多信息,请参阅《全文搜索》、《短语匹配》或《文本匹配》。
分析器的使用可能会影响性能:
全文搜索:对于全文搜索,DataNode和QueryNode通道处理数据的速度会变慢,因为它们必须等待分词过程完成。因此,新摄入的数据需要更长时间才能用于搜索。
关键词匹配:对于关键词匹配,由于必须在分词完成后才能构建索引,因此索引创建速度也会变慢。
分析器的构成
Milvus 中的分析器由一个分词器和零个或多个过滤器组成。
分词器:分词器将输入文本拆分为称为“词元”的离散单元。这些词元可以是单词或短语,具体取决于分词器的类型。
过滤器:可对分词结果应用过滤器进行进一步处理,例如将其转换为小写或去除常见词。
分词器目前仅支持 UTF-8 格式。未来版本将增加对其他格式的支持。
下图的工作流展示了分析器如何处理文本。
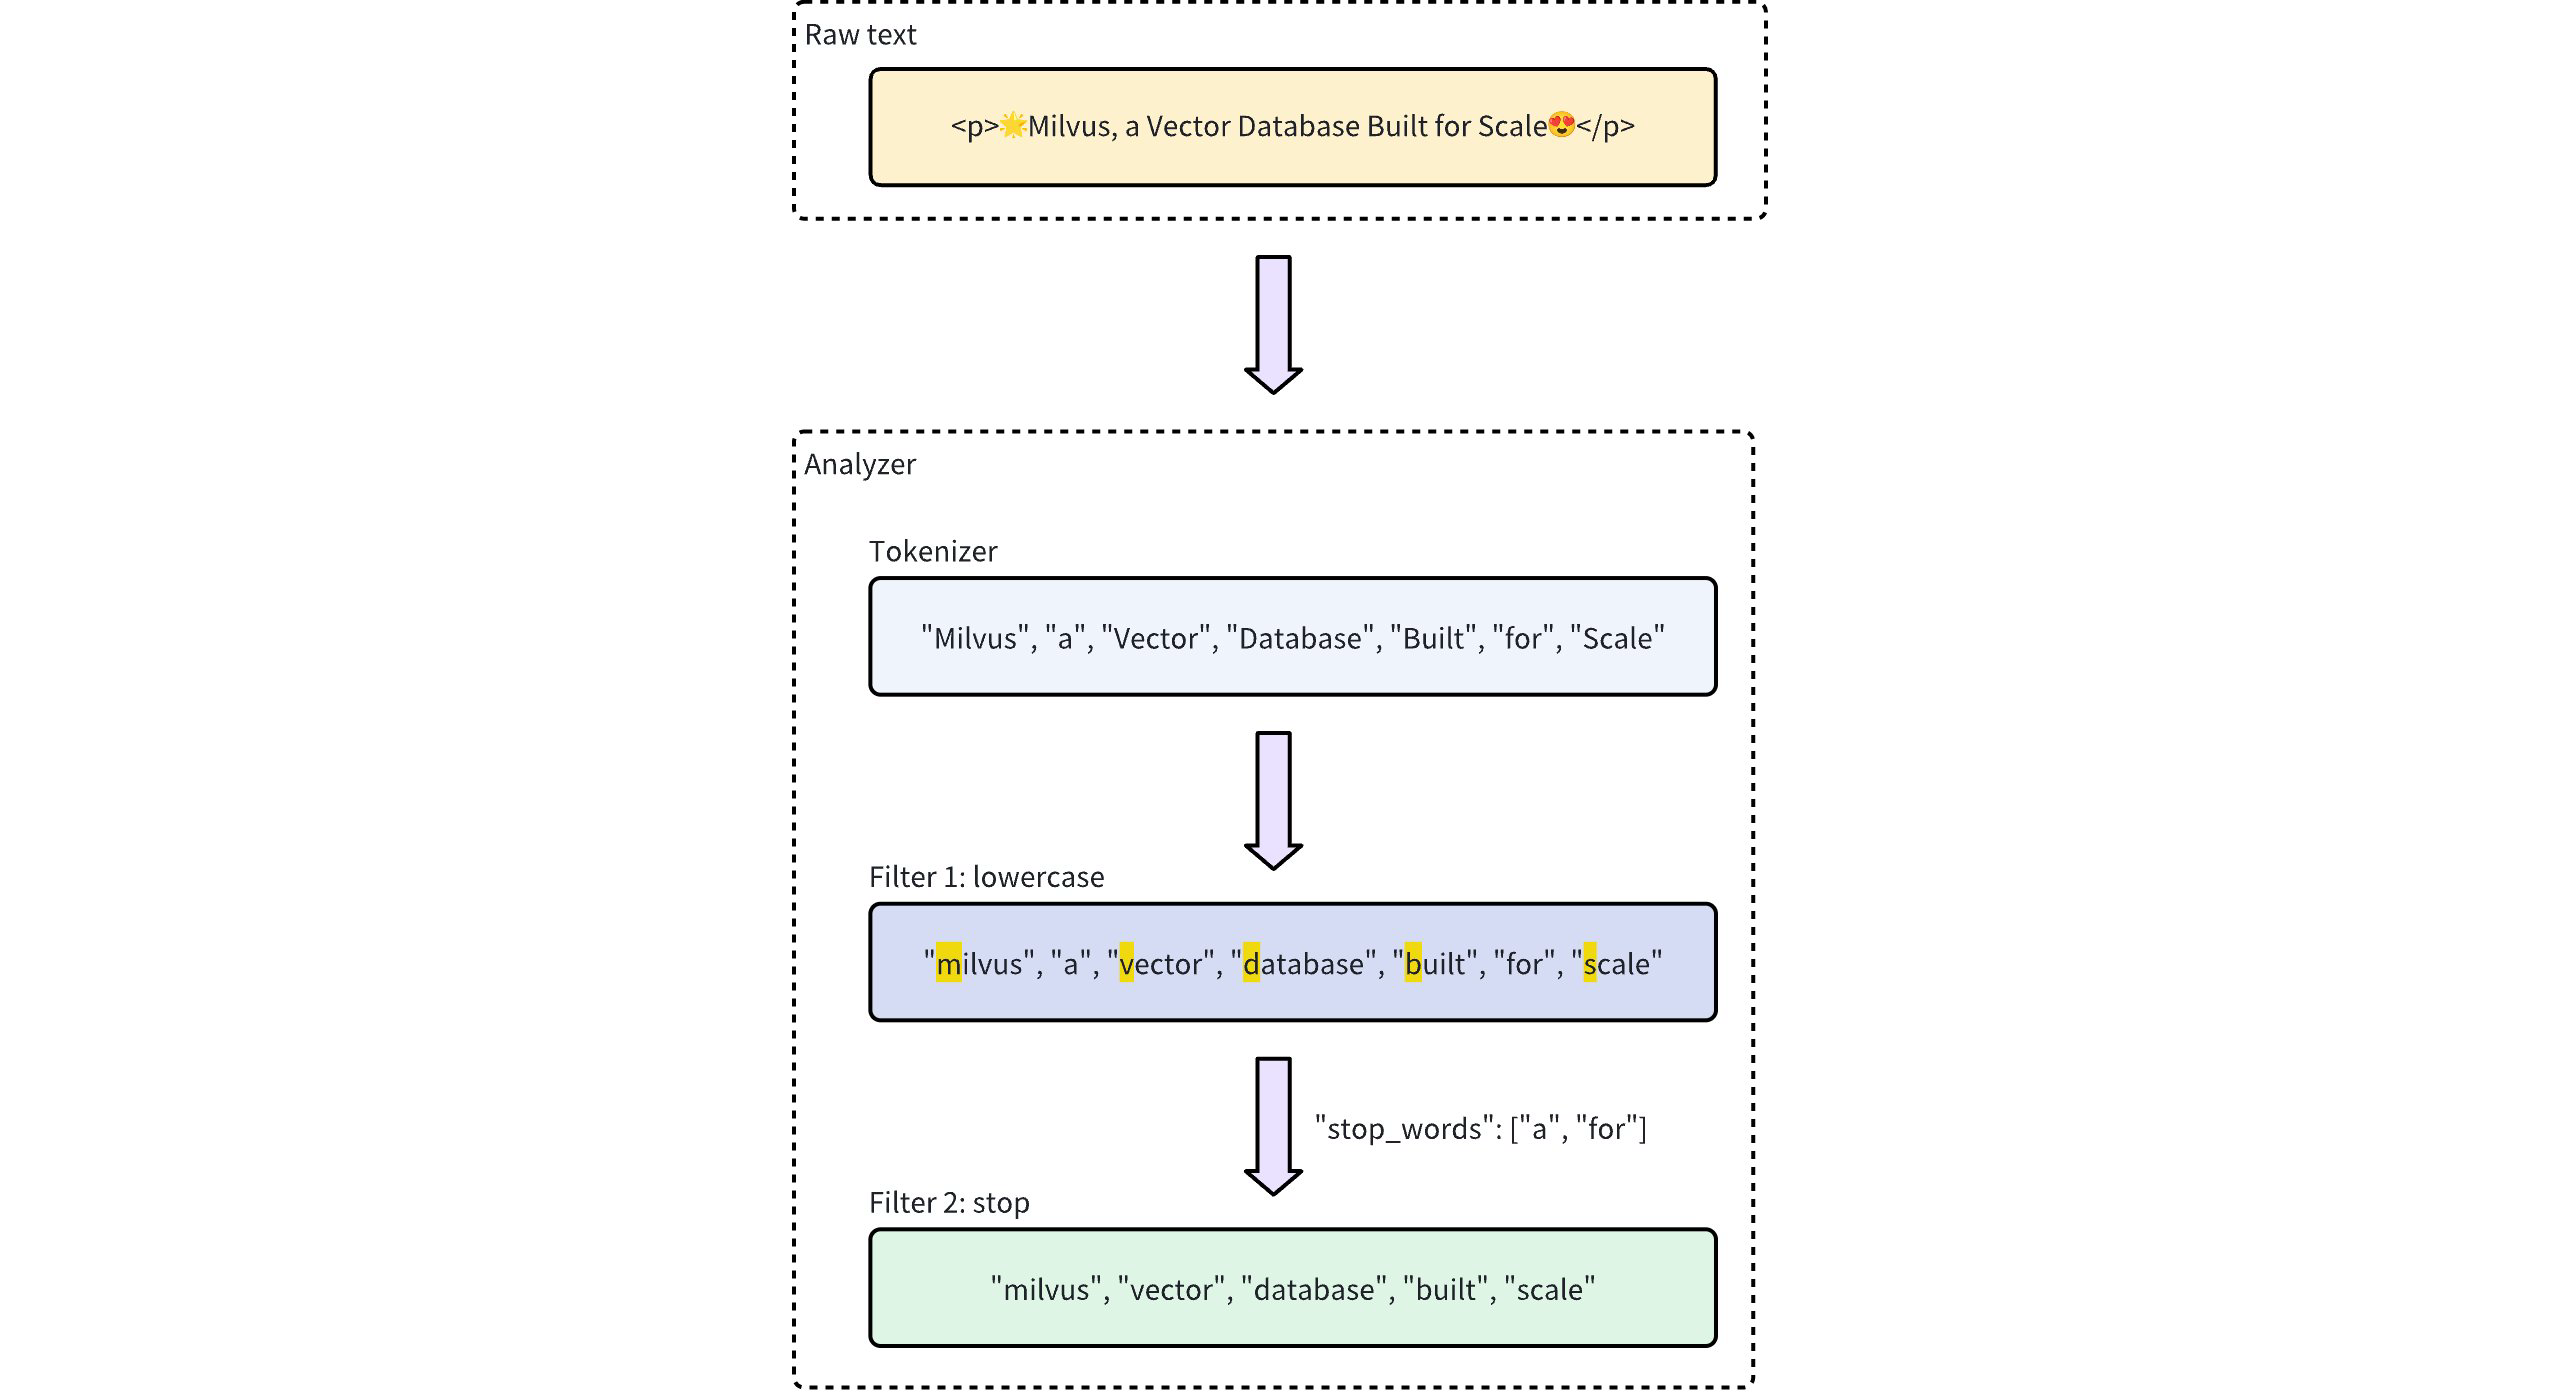 分析器处理工作流
分析器类型
Milvus 提供了两种类型的分析器,以满足不同的文本处理需求:
内置分析器:这些是预定义的配置,只需最少的设置即可处理常见的文本处理任务。内置分析器无需复杂配置,非常适合通用搜索场景。
自定义分析器:针对更高级的需求,自定义分析器允许您通过指定分词器和零个或多个过滤器来自定义配置。这种级别的定制化对于需要精确控制文本处理的特殊用例尤为有用。
内置分析器
Milvus 中的内置分析器已预先配置了特定的分词器和过滤器,因此您可以立即使用它们,而无需自行定义这些组件。每个内置分析器都充当一个模板,其中包含预设的分词器和过滤器,并提供可选参数以供自定义。
例如,要使用standard 内置分析器,只需将其名称standard 指定为type ,并可选地包含针对此分析器类型的额外配置,例如stop_words :
analyzer_params = {
    "type": "standard", # Uses the standard built-in analyzer
    "stop_words": ["a", "an", "for"] # Defines a list of common words (stop words) to exclude from tokenization
}
Map<String, Object> analyzerParams = new HashMap<>();
analyzerParams.put("type", "standard");
analyzerParams.put("stop_words", Arrays.asList("a", "an", "for"));
const analyzer_params = {
    "type": "standard", // Uses the standard built-in analyzer
    "stop_words": ["a", "an", "for"] // Defines a list of common words (stop words) to exclude from tokenization
};
analyzerParams := map[string]any{"type": "standard", "stop_words": []string{"a", "an", "for"}}
export analyzerParams='{
       "type": "standard",
       "stop_words": ["a", "an", "for"]
    }'
要检查分析器的执行结果,请使用run_analyzer 方法:
# Sample text to analyze
text = "An efficient system relies on a robust analyzer to correctly process text for various applications."

# Run analyzer
result = client.run_analyzer(
    text,
    analyzer_params
)
import io.milvus.v2.service.vector.request.RunAnalyzerReq;
import io.milvus.v2.service.vector.response.RunAnalyzerResp;

List<String> texts = new ArrayList<>();
texts.add("An efficient system relies on a robust analyzer to correctly process text for various applications.");

RunAnalyzerResp resp = client.runAnalyzer(RunAnalyzerReq.builder()
        .texts(texts)
        .analyzerParams(analyzerParams)
        .build());
List<RunAnalyzerResp.AnalyzerResult> results = resp.getResults();
// javascrip# Sample text to analyze
const text = "An efficient system relies on a robust analyzer to correctly process text for various applications."

// Run analyzer
const result = await client.run_analyzer({
    text,
    analyzer_params
});
import (
    "context"
    "encoding/json"
    "fmt"

    "github.com/milvus-io/milvus/client/v2/milvusclient"
)

bs, _ := json.Marshal(analyzerParams)
texts := []string{"An efficient system relies on a robust analyzer to correctly process text for various applications."}
option := milvusclient.NewRunAnalyzerOption(texts).
    WithAnalyzerParams(string(bs))

result, err := client.RunAnalyzer(ctx, option)
if err != nil {
    fmt.Println(err.Error())
    // handle error
}
# restful
输出结果如下:
['efficient', 'system', 'relies', 'on', 'robust', 'analyzer', 'to', 'correctly', 'process', 'text', 'various', 'applications']
这表明该分析器通过过滤停用词"a" 、"an" 和"for" ,正确地将输入文本分词,同时返回了剩余的有意义的词元。
上述standard 内置分析器的配置,相当于使用以下参数设置自定义分析器,其中显式定义了tokenizer 和filter 选项以实现类似功能:
analyzer_params = {
    "tokenizer": "standard",
    "filter": [
        "lowercase",
        {
            "type": "stop",
            "stop_words": ["a", "an", "for"]
        }
    ]
}
Map<String, Object> analyzerParams = new HashMap<>();
analyzerParams.put("tokenizer", "standard");
analyzerParams.put("filter",
        Arrays.asList("lowercase",
                new HashMap<String, Object>() {{
                    put("type", "stop");
                    put("stop_words", Arrays.asList("a", "an", "for"));
                }}));
const analyzer_params = {
    "tokenizer": "standard",
    "filter": [
        "lowercase",
        {
            "type": "stop",
            "stop_words": ["a", "an", "for"]
        }
    ]
};
analyzerParams = map[string]any{"tokenizer": "standard",
    "filter": []any{"lowercase", map[string]any{
        "type":       "stop",
        "stop_words": []string{"a", "an", "for"},
    }}}
export analyzerParams='{
       "type": "standard",
       "filter":  [
       "lowercase",
       {
            "type": "stop",
            "stop_words": ["a", "an", "for"]
       }
   ]
}'
Milvus 提供了以下内置分析器,每个分析器都针对特定的文本处理需求而设计:
standard: 适用于通用文本处理,执行标准分词和小写过滤。english: 针对英语文本进行了优化,支持英语停用词。chinese: 专用于处理中文文本,包括针对中文语言结构调整的分词处理。arabic: 专用于阿拉伯语文本处理,提供阿拉伯语规范化、小数位规范化、阿拉伯语词干提取以及阿拉伯语停用词过滤功能。thai: 专用于泰语文本处理,包含泰语词分割、小数位规范化及泰语停用词去除功能。
自定义分析器
对于更高级的文本处理,Milvus中的自定义分析器允许您通过指定分词器和过滤器来构建量身定制的文本处理管道。这种设置非常适合需要精确控制的特殊用例。
分词器
分词器是自定义分析器的必备组件,它通过将输入文本拆分为离散单元(即词素)来启动分析器处理流程。分词过程遵循特定规则,例如根据空格或标点符号进行分割,具体取决于分词器的类型。此过程可对每个单词或短语进行更精确且独立的处理。
例如,令牌化器会将文本“"Vector Database Built for Scale" ”转换为以下独立的令牌:
["Vector", "Database", "Built", "for", "Scale"]
指定分词器的示例:
analyzer_params = {
    "tokenizer": "whitespace",
}
Map<String, Object> analyzerParams = new HashMap<>();
analyzerParams.put("tokenizer", "whitespace");
const analyzer_params = {
    "tokenizer": "whitespace",
};
analyzerParams = map[string]any{"tokenizer": "whitespace"}
export analyzerParams='{
       "type": "whitespace"
    }'
过滤器
过滤器是可选组件,对分词器生成的词元进行处理,根据需要对其进行转换或优化。例如,对已分词的词元["Vector", "Database", "Built", "for", "Scale"] 应用lowercase 过滤器后,结果可能如下:
["vector", "database", "built", "for", "scale"]
自定义分析器中的过滤器可以是内置的,也可以是自定义的,具体取决于配置需求。
内置过滤器:由 Milvus 预先配置,只需极少的设置。您只需指定其名称,即可开箱即用。以下过滤器为内置过滤器,可直接使用:
lowercase: 将文本转换为小写,确保不区分大小写的匹配。详情请参阅“小写转换”。asciifolding: 将非 ASCII 字符转换为 ASCII 等效字符,简化多语言文本的处理。详情请参阅“ASCII 折叠”。alphanumonly: 仅保留字母数字字符,移除其他字符。详情请参阅“Alphanumonly”。cnalphanumonly: 移除包含汉字、英文字母或数字以外其他字符的词元。详情请参阅Cnalphanumonly。cncharonly: 移除包含任何非汉字的词元。详情请参阅Cncharonly。pinyin: 为中文词元添加拼音词元形式,从而支持基于拼音的中文文本匹配。详情请参阅“拼音”。
使用内置过滤器的示例:
analyzer_params = {
    "tokenizer": "standard", # Mandatory: Specifies tokenizer
    "filter": ["lowercase"], # Optional: Built-in filter that converts text to lowercase
}
Map<String, Object> analyzerParams = new HashMap<>(); analyzerParams.put("tokenizer", "standard"); analyzerParams.put("filter", Collections.singletonList("lowercase"));const analyzer_params = { "tokenizer": "standard", // Mandatory: Specifies tokenizer "filter": ["lowercase"], // Optional: Built-in filter that converts text to lowercase }analyzerParams = map[string]any{"tokenizer": "standard", "filter": []any{"lowercase"}}export analyzerParams='{ "type": "standard", "filter": ["lowercase"] }'自定义过滤器:自定义过滤器支持特殊配置。您可以通过选择有效的过滤器类型(
filter.type)并为每种过滤器类型添加特定设置来定义自定义过滤器。支持自定义的过滤器类型示例:stop: 通过设置停用词列表(例如"stop_words": ["of", "to"])来移除指定的常见词。详情请参阅“停用词”。length:根据长度标准排除词元,例如设置最大词元长度。详情请参阅“Length”。stemmer: 将单词还原为词干形式,以实现更灵活的匹配。详情请参阅“词干化(Stemmer)”。
配置自定义过滤器的示例:
analyzer_params = {
    "tokenizer": "standard", # Mandatory: Specifies tokenizer
    "filter": [
        {
            "type": "stop", # Specifies 'stop' as the filter type
            "stop_words": ["of", "to"], # Customizes stop words for this filter type
        }
    ]
}
Map<String, Object> analyzerParams = new HashMap<>(); analyzerParams.put("tokenizer", "standard"); analyzerParams.put("filter", Collections.singletonList(new HashMap<String, Object>() {{ put("type", "stop"); put("stop_words", Arrays.asList("a", "an", "for")); }}));const analyzer_params = { "tokenizer": "standard", // Mandatory: Specifies tokenizer "filter": [ { "type": "stop", // Specifies 'stop' as the filter type "stop_words": ["of", "to"], // Customizes stop words for this filter type } ] };analyzerParams = map[string]any{"tokenizer": "standard", "filter": []any{map[string]any{ "type": "stop", "stop_words": []string{"of", "to"}, }}}export analyzerParams='{ "type": "standard", "filter": [ { "type": "stop", "stop_words": ["a", "an", "for"] } ] }'
使用示例
在此示例中,您将创建一个包含以下内容的Collection Schema:
用于Embeddings向量的向量字段。
两个用于文本处理的
VARCHAR字段:其中一个字段使用内置分析器。
其他使用自定义分析器。
在将这些配置纳入您的 Collection 之前,您需要使用 `run_analyzer ` 方法验证每个分析器。
步骤 1:初始化 MilvusClient 并创建 Schema
首先,设置 Milvus 客户端并创建一个新 Schema。
from pymilvus import MilvusClient, DataType

# Set up a Milvus client
client = MilvusClient(uri="http://localhost:19530")

# Create a new schema
schema = client.create_schema(auto_id=True, enable_dynamic_field=False)
import io.milvus.v2.client.ConnectConfig;
import io.milvus.v2.client.MilvusClientV2;
import io.milvus.v2.common.DataType;
import io.milvus.v2.common.IndexParam;
import io.milvus.v2.service.collection.request.AddFieldReq;
import io.milvus.v2.service.collection.request.CreateCollectionReq;

// Set up a Milvus client
ConnectConfig config = ConnectConfig.builder()
        .uri("http://localhost:19530")
        .build();
MilvusClientV2 client = new MilvusClientV2(config);

// Create schema
CreateCollectionReq.CollectionSchema schema = CreateCollectionReq.CollectionSchema.builder()
        .enableDynamicField(false)
        .build();
import { MilvusClient, DataType } from "@zilliz/milvus2-sdk-node";

// Set up a Milvus client
const client = new MilvusClient("http://localhost:19530");
import (
    "context"
    "fmt"

    "github.com/milvus-io/milvus/client/v2/column"
    "github.com/milvus-io/milvus/client/v2/entity"
    "github.com/milvus-io/milvus/client/v2/index"
    "github.com/milvus-io/milvus/client/v2/milvusclient"
)

ctx, cancel := context.WithCancel(context.Background())
defer cancel()

cli, err := milvusclient.New(ctx, &milvusclient.ClientConfig{
    Address: "localhost:19530",
})
if err != nil {
    fmt.Println(err.Error())
    // handle err
}
defer client.Close(ctx)

schema := entity.NewSchema().WithAutoID(true).WithDynamicFieldEnabled(false)
# restful
步骤 2:定义并验证分析器配置
配置并验证内置分析器(
english):配置:为内置的英语分析器定义分析器参数。
验证:使用
run_analyzer检查该配置是否能产生预期的分词结果。
# Built-in analyzer configuration for English text processing
analyzer_params_built_in = {
    "type": "english"
}

# Verify built-in analyzer configuration
sample_text = "Milvus simplifies text analysis for search."
result = client.run_analyzer(sample_text, analyzer_params_built_in)
print("Built-in analyzer output:", result)

# Expected output:
# Built-in analyzer output: ['milvus', 'simplifi', 'text', 'analysi', 'search']
Map<String, Object> analyzerParamsBuiltin = new HashMap<>(); analyzerParamsBuiltin.put("type", "english"); List<String> texts = new ArrayList<>(); texts.add("Milvus simplifies text ana lysis for search."); RunAnalyzerResp resp = client.runAnalyzer(RunAnalyzerReq.builder() .texts(texts) .analyzerParams(analyzerParams) .build()); List<RunAnalyzerResp.AnalyzerResult> results = resp.getResults();// Use a built-in analyzer for VARCHAR field `title_en` const analyzerParamsBuiltIn = { type: "english", }; const sample_text = "Milvus simplifies text analysis for search."; const result = await client.run_analyzer({ text: sample_text, analyzer_params: analyzer_params_built_in });analyzerParams := map[string]any{"type": "english"} bs, _ := json.Marshal(analyzerParams) texts := []string{"Milvus simplifies text analysis for search."} option := milvusclient.NewRunAnalyzerOption(texts). WithAnalyzerParams(string(bs)) result, err := client.RunAnalyzer(ctx, option) if err != nil { fmt.Println(err.Error()) // handle error }# restful配置并验证自定义分析器:
配置:定义一个自定义分析器,该分析器使用标准分词器,并结合内置的小写转换过滤器以及针对词元长度和停用词的自定义过滤器。
验证:使用
run_analyzer确保自定义配置能按预期处理文本。
# Custom analyzer configuration with a standard tokenizer and custom filters
analyzer_params_custom = {
    "tokenizer": "standard",
    "filter": [
        "lowercase",  # Built-in filter: convert tokens to lowercase
        {
            "type": "length",  # Custom filter: restrict token length
            "max": 40
        },
        {
            "type": "stop",  # Custom filter: remove specified stop words
            "stop_words": ["of", "for"]
        }
    ]
}

# Verify custom analyzer configuration
sample_text = "Milvus provides flexible, customizable analyzers for robust text processing."
result = client.run_analyzer(sample_text, analyzer_params_custom)
print("Custom analyzer output:", result)

# Expected output:
# Custom analyzer output: ['milvus', 'provides', 'flexible', 'customizable', 'analyzers', 'robust', 'text', 'processing']
// Configure a custom analyzer Map<String, Object> analyzerParams = new HashMap<>(); analyzerParams.put("tokenizer", "standard"); analyzerParams.put("filter", Arrays.asList("lowercase", new HashMap<String, Object>() {{ put("type", "length"); put("max", 40); }}, new HashMap<String, Object>() {{ put("type", "stop"); put("stop_words", Arrays.asList("of", "for")); }} ) ); List<String> texts = new ArrayList<>(); texts.add("Milvus provides flexible, customizable analyzers for robust text processing."); RunAnalyzerResp resp = client.runAnalyzer(RunAnalyzerReq.builder() .texts(texts) .analyzerParams(analyzerParams) .build()); List<RunAnalyzerResp.AnalyzerResult> results = resp.getResults();// Configure a custom analyzer for VARCHAR field `title` const analyzerParamsCustom = { tokenizer: "standard", filter: [ "lowercase", { type: "length", max: 40, }, { type: "stop", stop_words: ["of", "to"], }, ], }; const sample_text = "Milvus provides flexible, customizable analyzers for robust text processing."; const result = await client.run_analyzer({ text: sample_text, analyzer_params: analyzer_params_built_in });analyzerParams = map[string]any{"tokenizer": "standard", "filter": []any{"lowercase", map[string]any{ "type": "length", "max": 40, map[string]any{ "type": "stop", "stop_words": []string{"of", "to"}, }}} bs, _ := json.Marshal(analyzerParams) texts := []string{"Milvus provides flexible, customizable analyzers for robust text processing."} option := milvusclient.NewRunAnalyzerOption(texts). WithAnalyzerParams(string(bs)) result, err := client.RunAnalyzer(ctx, option) if err != nil { fmt.Println(err.Error()) // handle error }# curl
步骤 3:向 Schema 中添加字段
现在您已验证了分析器的配置,请将其添加到Schema字段中:
# Add VARCHAR field 'title_en' using the built-in analyzer configuration
schema.add_field(
    field_name='title_en',
    datatype=DataType.VARCHAR,
    max_length=1000,
    enable_analyzer=True,
    analyzer_params=analyzer_params_built_in,
    enable_match=True,
)

# Add VARCHAR field 'title' using the custom analyzer configuration
schema.add_field(
    field_name='title',
    datatype=DataType.VARCHAR,
    max_length=1000,
    enable_analyzer=True,
    analyzer_params=analyzer_params_custom,
    enable_match=True,
)

# Add a vector field for embeddings
schema.add_field(field_name="embedding", datatype=DataType.FLOAT_VECTOR, dim=3)

# Add a primary key field
schema.add_field(field_name="id", datatype=DataType.INT64, is_primary=True)
schema.addField(AddFieldReq.builder()
        .fieldName("title")
        .dataType(DataType.VarChar)
        .maxLength(1000)
        .enableAnalyzer(true)
        .analyzerParams(analyzerParams)
        .enableMatch(true) // must enable this if you use TextMatch
        .build());

// Add vector field
schema.addField(AddFieldReq.builder()
        .fieldName("embedding")
        .dataType(DataType.FloatVector)
        .dimension(3)
        .build());
// Add primary field
schema.addField(AddFieldReq.builder()
        .fieldName("id")
        .dataType(DataType.Int64)
        .isPrimaryKey(true)
        .autoID(true)
        .build());
// Create schema
const schema = {
  auto_id: true,
  fields: [
    {
      name: "id",
      type: DataType.INT64,
      is_primary: true,
    },
    {
      name: "title_en",
      data_type: DataType.VARCHAR,
      max_length: 1000,
      enable_analyzer: true,
      analyzer_params: analyzerParamsBuiltIn,
      enable_match: true,
    },
    {
      name: "title",
      data_type: DataType.VARCHAR,
      max_length: 1000,
      enable_analyzer: true,
      analyzer_params: analyzerParamsCustom,
      enable_match: true,
    },
    {
      name: "embedding",
      data_type: DataType.FLOAT_VECTOR,
      dim: 4,
    },
  ],
};
schema.WithField(entity.NewField().
    WithName("id").
    WithDataType(entity.FieldTypeInt64).
    WithIsPrimaryKey(true).
    WithIsAutoID(true),
).WithField(entity.NewField().
    WithName("embedding").
    WithDataType(entity.FieldTypeFloatVector).
    WithDim(3),
).WithField(entity.NewField().
    WithName("title").
    WithDataType(entity.FieldTypeVarChar).
    WithMaxLength(1000).
    WithEnableAnalyzer(true).
    WithAnalyzerParams(analyzerParams).
    WithEnableMatch(true),
)
# restful
步骤 4:准备索引参数并创建 Collection
# Set up index parameters for the vector field
index_params = client.prepare_index_params()
index_params.add_index(field_name="embedding", metric_type="COSINE", index_type="AUTOINDEX")

# Create the collection with the defined schema and index parameters
client.create_collection(
    collection_name="my_collection",
    schema=schema,
    index_params=index_params
)
// Set up index params for vector field
List<IndexParam> indexes = new ArrayList<>();
indexes.add(IndexParam.builder()
        .fieldName("embedding")
        .indexType(IndexParam.IndexType.AUTOINDEX)
        .metricType(IndexParam.MetricType.COSINE)
        .build());

// Create collection with defined schema
CreateCollectionReq requestCreate = CreateCollectionReq.builder()
        .collectionName("my_collection")
        .collectionSchema(schema)
        .indexParams(indexes)
        .build();
client.createCollection(requestCreate);
// Set up index params for vector field
const indexParams = [
  {
    name: "embedding",
    metric_type: "COSINE",
    index_type: "AUTOINDEX",
  },
];

// Create collection with defined schema
await client.createCollection({
  collection_name: "my_collection",
  schema: schema,
  index_params: indexParams,
});

console.log("Collection created successfully!");
idx := index.NewAutoIndex(index.MetricType(entity.COSINE))
indexOption := milvusclient.NewCreateIndexOption("my_collection", "embedding", idx)

err = client.CreateCollection(ctx,
    milvusclient.NewCreateCollectionOption("my_collection", schema).
        WithIndexOptions(indexOption))
if err != nil {
    fmt.Println(err.Error())
    // handle error
}
# restful
下一步
配置好分析器后,您可以集成 Milvus 提供的文本检索功能。详情请参阅:
