Integrate Milvus with DSPy
![]()
What is DSPy
DSPy, introduced by the Stanford NLP Group, stands as a groundbreaking programmatic framework designed to optimize prompts and weights within language models, particularly valuable in scenarios where large language models (LLMs) are integrated across multiple stages of a pipeline. Unlike conventional prompting engineering techniques reliant on manual crafting and tweaking, DSPy adopts a learning-based approach. By assimilating query-answer examples, DSPy generates optimized prompts dynamically, tailored to specific tasks. This innovative methodology enables the seamless reassembly of entire pipelines, eliminating the need for continuous manual prompt adjustments. DSPy’s Pythonic syntax offers various composable and declarative modules, simplifying the instruction of LLMs.
Benefits of using DSPy
- Programming Approach: DSPy provides a systematic programming approach for LM pipeline development by abstracting pipelines as text transformation graphs instead of just prompting the LLMs. Its declarative modules enable structured design and optimization, replacing the trial-and-error method of traditional prompt templates.
- Performance Improvement: DSPy demonstrates significant performance gains over existing methods. Through case studies, it outperforms standard prompting and expert-created demonstrations, showcasing its versatility and effectiveness even when compiled to smaller LM models.
- Modularized Abstraction: DSPy effectively abstracts intricate aspects of LM pipeline development, such as decomposition, fine-tuning, and model selection. With DSPy, a concise program can seamlessly translate into instructions for various models, such as GPT-4, Llama2-13b, or T5-base, streamlining development and enhancing performance.
Modules
There are numerous components that contribute to constructing an LLM pipeline. Here, we’ll describe some key components to provide a high-level understanding of how DSPy operates.
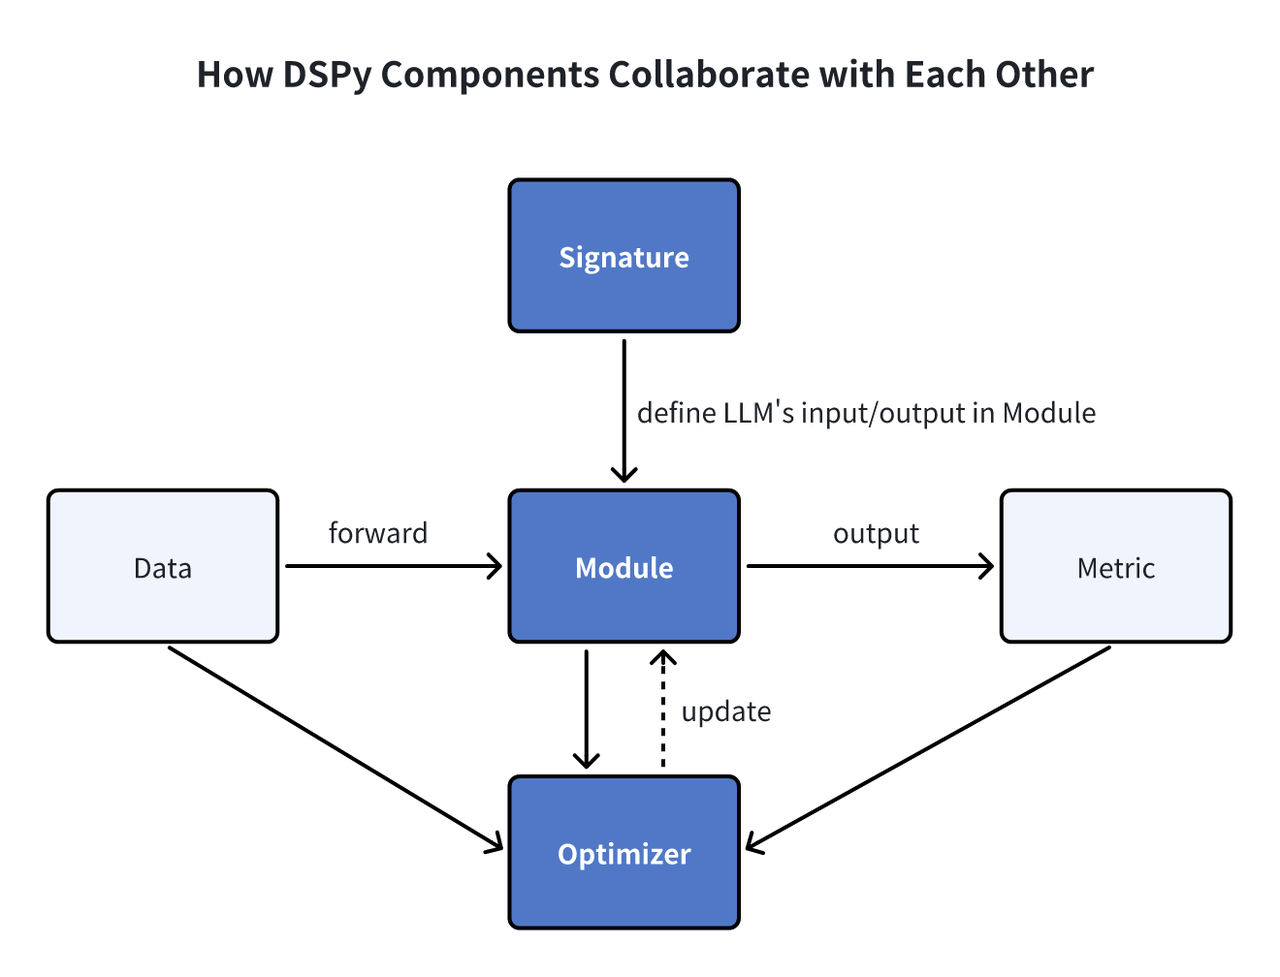 DSPy Modules
Signature: Signatures in DSPy serve as declarative specifications, outlining the input/output behavior of modules, guiding the language model in task execution. Module: DSPy modules serve as fundamental components for programs leveraging language models (LMs). They abstract various prompting techniques, such as chain of thought or ReAct, and are adaptable to handle any DSPy Signature. With learnable parameters and the ability to process inputs and produce outputs, these modules can be combined to form larger programs, drawing inspiration from NN modules in PyTorch but tailored for LM applications. Optimizer: Optimizers in DSPy fine-tune the parameters of DSPy programs, such as prompts and LLM weights, to maximize specified metrics like accuracy, enhancing program efficiency.
Why Milvus in DSPy
DSPy is a powerful programming framework that boosts RAG applications. Such application needs to retrieve useful information to enhance answer quality, which needs vector database. Milvus is a well-known open-source vector database to improve performance and scalability. With MilvusRM, a retriever module in DSPy, integrating Milvus becomes seamless. Now, developers can easily define and optimize RAG programs using DSPy, taking advantage of Milvus’ strong vector search capabilities. This collaboration makes RAG applications more efficient and scalable, combining DSPy’s programming capabilities with Milvus’ search features.
Examples
Now, let’s walk through a quick example to demonstrate how to leverage Milvus in DSPy for optimizing a RAG application.
Prerequisites
Before building the RAG app, install the DSPy and PyMilvus.
$ pip install "dspy-ai[milvus]"
$ pip install -U pymilvus
Loading the dataset
In this example, we use the HotPotQA, a collection of complex question-answer pairs, as our training dataset. We can load them through the HotPotQA class.
from dspy.datasets import HotPotQA

# Load the dataset.
dataset = HotPotQA(
    train_seed=1, train_size=20, eval_seed=2023, dev_size=50, test_size=0
)

# Tell DSPy that the 'question' field is the input. Any other fields are labels and/or metadata.
trainset = [x.with_inputs("question") for x in dataset.train]
devset = [x.with_inputs("question") for x in dataset.dev]
Ingest data into the Milvus vector database
Ingest the context information into the Milvus collection for vector retrieval. This collection should have an embedding field and a text field. We use OpenAI’s text-embedding-3-small model as the default query embedding function in this case.
import requests
import os

os.environ["OPENAI_API_KEY"] = "<YOUR_OPENAI_API_KEY>"
MILVUS_URI = "example.db"
MILVUS_TOKEN = ""

from pymilvus import MilvusClient, DataType, Collection
from dspy.retrieve.milvus_rm import openai_embedding_function

client = MilvusClient(uri=MILVUS_URI, token=MILVUS_TOKEN)

if "dspy_example" not in client.list_collections():
    client.create_collection(
        collection_name="dspy_example",
        overwrite=True,
        dimension=1536,
        primary_field_name="id",
        vector_field_name="embedding",
        id_type="int",
        metric_type="IP",
        max_length=65535,
        enable_dynamic=True,
    )
text = requests.get(
    "https://raw.githubusercontent.com/wxywb/dspy_dataset_sample/master/sample_data.txt"
).text

for idx, passage in enumerate(text.split("\n")):
    if len(passage) == 0:
        continue
    client.insert(
        collection_name="dspy_example",
        data=[
            {
                "id": idx,
                "embedding": openai_embedding_function(passage)[0],
                "text": passage,
            }
        ],
    )
Define MilvusRM.
Now, you need to define the MilvusRM.
from dspy.retrieve.milvus_rm import MilvusRM
import dspy

retriever_model = MilvusRM(
    collection_name="dspy_example",
    uri=MILVUS_URI,
    token=MILVUS_TOKEN,  # ignore this if no token is required for Milvus connection
    embedding_function=openai_embedding_function,
)
turbo = dspy.OpenAI(model="gpt-3.5-turbo")
dspy.settings.configure(lm=turbo)
Building signatures
Now that we have loaded the data, let’s start defining the signatures for the sub-tasks of our pipeline. We can identify our simple input question and output answer, but since we are building a RAG pipeline, we’ll retrieve contextual information from Milvus. So let’s define our signature as context, question --> answer.
class GenerateAnswer(dspy.Signature):
    """Answer questions with short factoid answers."""

    context = dspy.InputField(desc="may contain relevant facts")
    question = dspy.InputField()
    answer = dspy.OutputField(desc="often between 1 and 5 words")
We include short descriptions for the context and answer fields to define clearer guidelines on what the model will receive and should generate.
Building the pipeline
Now, let’s define the RAG pipeline.
class RAG(dspy.Module):
    def __init__(self, rm):
        super().__init__()
        self.retrieve = rm

        # This signature indicates the task imposed on the COT module.
        self.generate_answer = dspy.ChainOfThought(GenerateAnswer)

    def forward(self, question):
        # Use milvus_rm to retrieve context for the question.
        context = self.retrieve(question).passages
        # COT module takes "context, query" and output "answer".
        prediction = self.generate_answer(context=context, question=question)
        return dspy.Prediction(
            context=[item.long_text for item in context], answer=prediction.answer
        )
Executing the pipeline and getting the results
Now, we’ve built this RAG pipeline. Let’s try it out and get results.
rag = RAG(retriever_model)
print(rag("who write At My Window").answer)
Townes Van Zandt
We can evaluate the quantitative results on the dataset.
from dspy.evaluate.evaluate import Evaluate
from dspy.datasets import HotPotQA

evaluate_on_hotpotqa = Evaluate(
    devset=devset, num_threads=1, display_progress=False, display_table=5
)

metric = dspy.evaluate.answer_exact_match
score = evaluate_on_hotpotqa(rag, metric=metric)
print("rag:", score)
Optimizing the pipeline
After defining this program, the next step is compilation. This process updates the parameters within each module to enhance performance. The compilation process depends on three critical factors:
- Training Set: We’ll utilize the 20 question-answer examples from our training dataset for this demonstration.
- Validation Metric: We will establish a simple
validate_context_and_answermetric. This metric verifies the accuracy of the predicted answer and ensures that the retrieved context includes the answer. - Specific Optimizer (Teleprompter): DSPy’s compiler incorporates multiple teleprompters designed to optimize your programs effectively.
from dspy.teleprompt import BootstrapFewShot

# Validation logic: check that the predicted answer is correct.# Also check that the retrieved context does contain that answer.


def validate_context_and_answer(example, pred, trace=None):
    answer_EM = dspy.evaluate.answer_exact_match(example, pred)
    answer_PM = dspy.evaluate.answer_passage_match(example, pred)
    return answer_EM and answer_PM


# Set up a basic teleprompter, which will compile our RAG program.
teleprompter = BootstrapFewShot(metric=validate_context_and_answer)

# Compile!
compiled_rag = teleprompter.compile(rag, trainset=trainset)

# Now compiled_rag is optimized and ready to answer your new question!
# Now, let’s evaluate the compiled RAG program.
score = evaluate_on_hotpotqa(compiled_rag, metric=metric)
print(score)
print("compile_rag:", score)
The Ragas score has increased from its previous value of 50.0 to 52.0, indicating an enhancement in answer quality.
Summary
DSPy marks a leap in language model interactions through its programmable interface, which facilitates algorithmic and automated optimization of model prompts and weights. By leveraging DSPy for RAG implementation, adaptability to varying language models or datasets becomes a breeze, drastically reducing the need for tedious manual interventions.