Multimodal RAG with Milvus
![]()
If you want to experience the final effect of this tutorial, you can go directly to online demo.
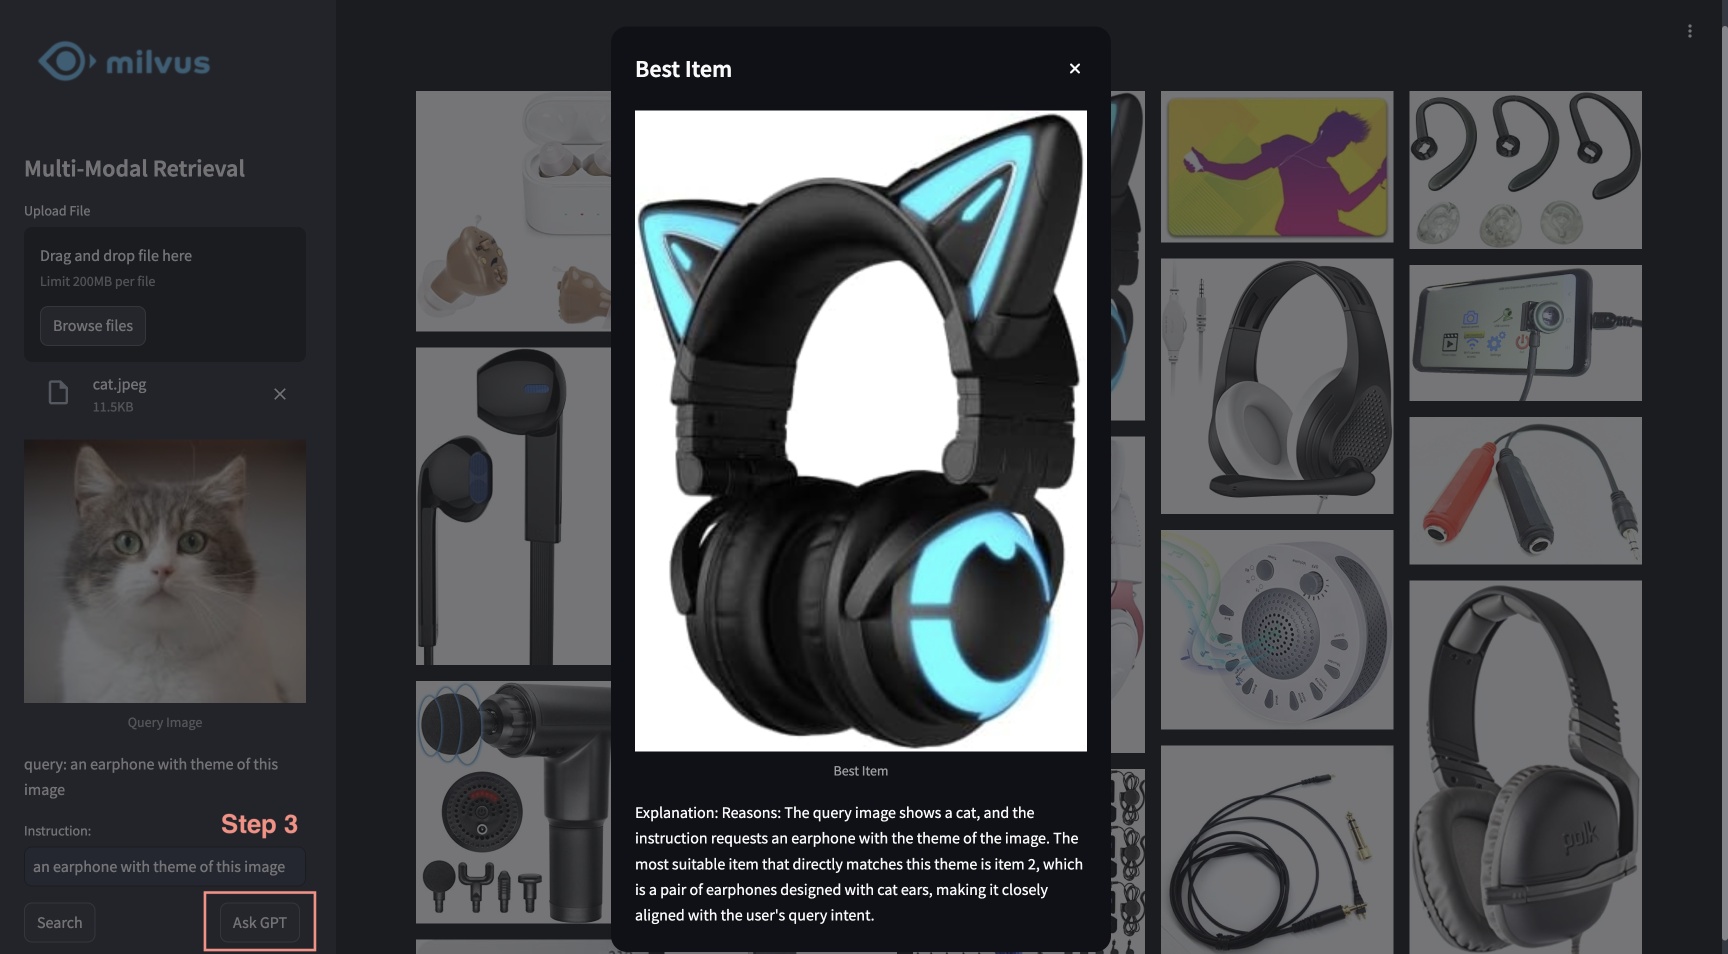
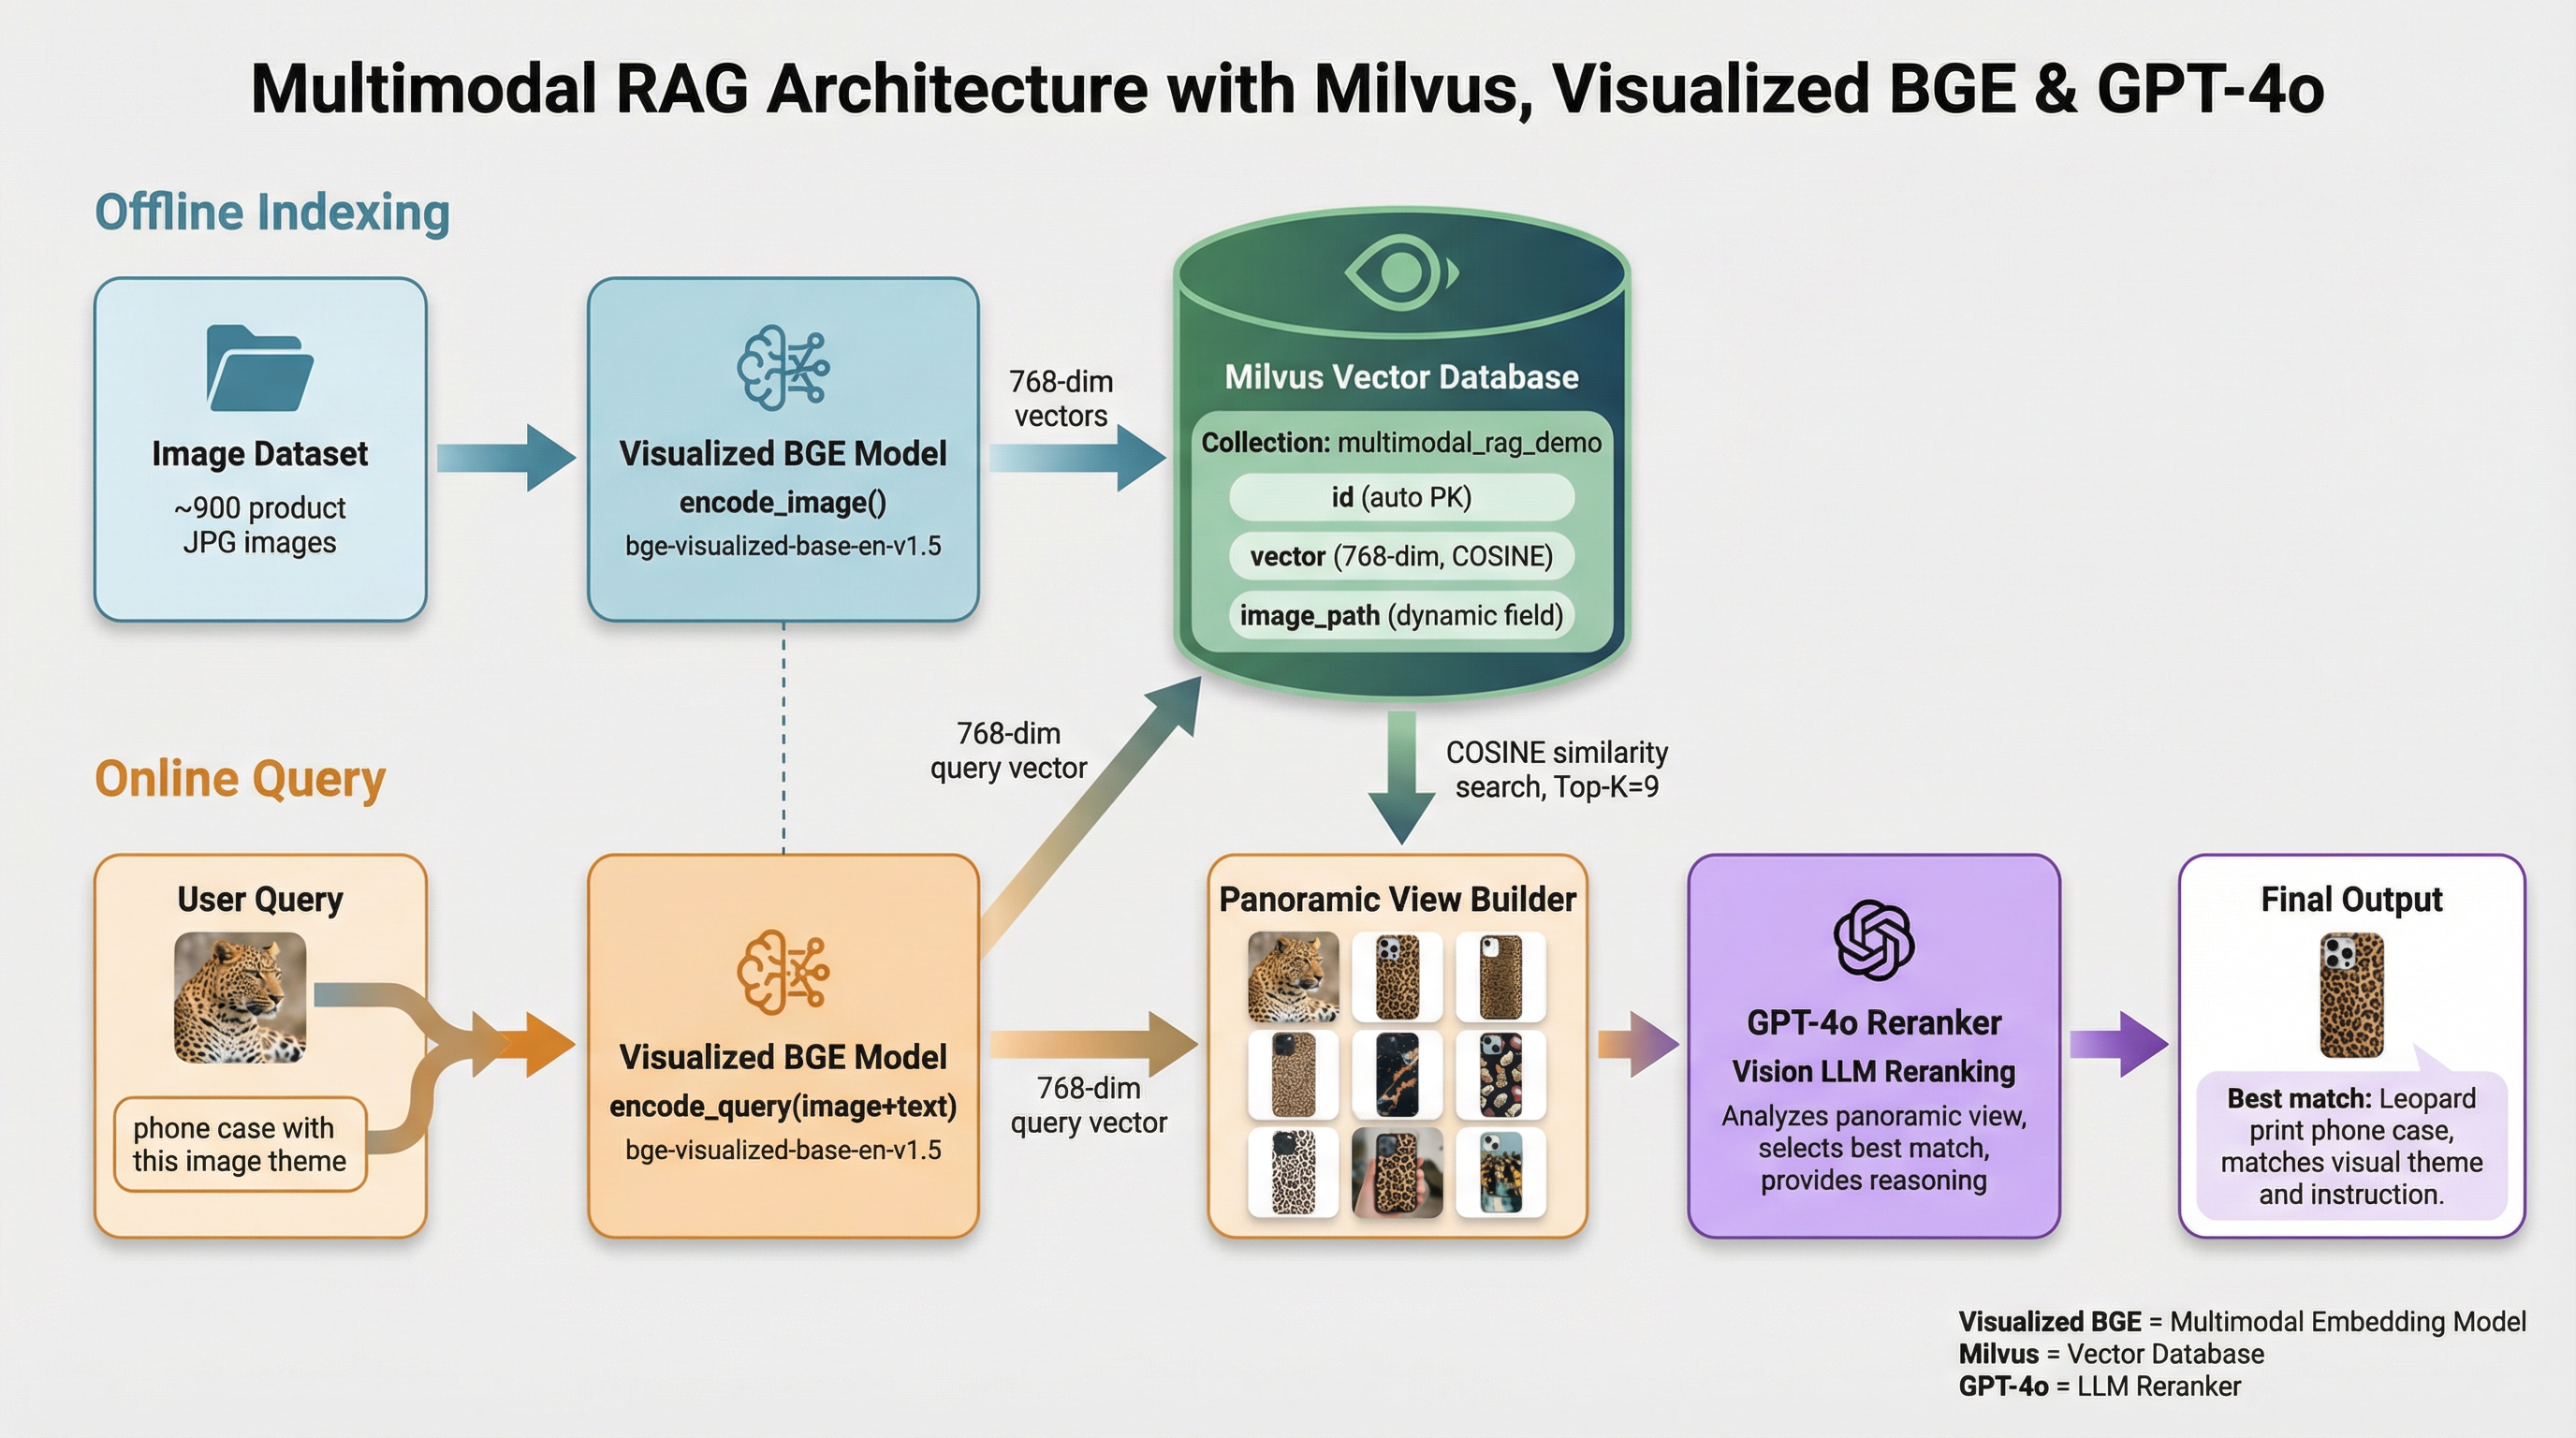
This tutorial showcases the multimodal RAG powered by Milvus, Visualized BGE model, and GPT-4o. With this system, users are able to upload an image and edit text instructions, which are processed by BGE’s composed retrieval model to search for candidate images. GPT-4o then acts as a reranker, selecting the most suitable image and providing the rationale behind the choice. This powerful combination enables a seamless and intuitive image search experience, leveraging Milvus for efficient retrieval, BGE model for precise image processing and matching, and GPT-4o for advanced reranking.
Preparation
Install Dependencies
$ pip install --upgrade pymilvus openai datasets opencv-python timm einops ftfy peft tqdm
$ git clone https://github.com/FlagOpen/FlagEmbedding.git
$ pip install -e FlagEmbedding
If you are using Google Colab, to enable dependencies just installed, you may need to restart the runtime (click on the “Runtime” menu at the top of the screen, and select “Restart session” from the dropdown menu).
Download Data
The following command will download the example data and extract to a local folder “./images_folder” including:
- images: A subset of Amazon Reviews 2023 as containing approximately 900 images from the categories "Appliance", "Cell_Phones_and_Accessories", and "Electronics".
- leopard.jpg: An example query image.
$ wget https://github.com/milvus-io/bootcamp/releases/download/data/amazon_reviews_2023_subset.tar.gz
$ tar -xzf amazon_reviews_2023_subset.tar.gz
Load Embedding Model
We will use the Visualized BGE model “bge-visualized-base-en-v1.5” to generate embeddings for both images and text.
1. Download weight
$ wget https://huggingface.co/BAAI/bge-visualized/resolve/main/Visualized_base_en_v1.5.pth
2. Build encoder
import torch
from visual_bge.modeling import Visualized_BGE


class Encoder:
    def __init__(self, model_name: str, model_path: str):
        self.model = Visualized_BGE(model_name_bge=model_name, model_weight=model_path)
        self.model.eval()

    def encode_query(self, image_path: str, text: str) -> list[float]:
        with torch.no_grad():
            query_emb = self.model.encode(image=image_path, text=text)
        return query_emb.tolist()[0]

    def encode_image(self, image_path: str) -> list[float]:
        with torch.no_grad():
            query_emb = self.model.encode(image=image_path)
        return query_emb.tolist()[0]


model_name = "BAAI/bge-base-en-v1.5"
model_path = "./Visualized_base_en_v1.5.pth"  # Change to your own value if using a different model path
encoder = Encoder(model_name, model_path)
Load Data
This section will load example images into the database with corresponding embeddings.
Generate embeddings
Load all jpeg images from the data directory and apply the encoder to convert images to embeddings.
import os
from tqdm import tqdm
from glob import glob


# Generate embeddings for the image dataset
data_dir = (
    "./images_folder"  # Change to your own value if using a different data directory
)
image_list = glob(
    os.path.join(data_dir, "images", "*.jpg")
)  # We will only use images ending with ".jpg"
image_dict = {}
for image_path in tqdm(image_list, desc="Generating image embeddings: "):
    try:
        image_dict[image_path] = encoder.encode_image(image_path)
    except Exception as e:
        print(f"Failed to generate embedding for {image_path}. Skipped.")
        continue
print("Number of encoded images:", len(image_dict))
Generating image embeddings: 100%|██████████| 900/900 [00:20<00:00, 44.08it/s]

Number of encoded images: 900
Insert into Milvus
Insert images with corresponding paths and embeddings into Milvus collection.
As for the argument of MilvusClient:
- Setting the
urias a local file, e.g../milvus_demo.db, is the most convenient method, as it automatically utilizes Milvus Lite to store all data in this file. - If you have large scale of data, you can set up a more performant Milvus server on docker or kubernetes. In this setup, please use the server uri, e.g.
http://localhost:19530, as youruri. - If you want to use Zilliz Cloud, the fully managed cloud service for Milvus, adjust the
uriandtoken, which correspond to the Public Endpoint and Api key in Zilliz Cloud.
from pymilvus import MilvusClient


dim = len(list(image_dict.values())[0])
collection_name = "multimodal_rag_demo"

# Connect to Milvus client given URI
milvus_client = MilvusClient(uri="./milvus_demo.db")

# Create Milvus Collection
# By default, vector field name is "vector"
milvus_client.create_collection(
    collection_name=collection_name,
    auto_id=True,
    dimension=dim,
    enable_dynamic_field=True,
)

# Insert data into collection
milvus_client.insert(
    collection_name=collection_name,
    data=[{"image_path": k, "vector": v} for k, v in image_dict.items()],
)
DEBUG:pymilvus.milvus_client.milvus_client:Created new connection using: 7f33daeed99a4d8e8a5e28d47673ecc8
DEBUG:pymilvus.milvus_client.milvus_client:Successfully created collection: multimodal_rag_demo
DEBUG:pymilvus.milvus_client.milvus_client:Successfully created an index on collection: multimodal_rag_demo


{'insert_count': 900,
 'ids': [451537887696781312, 451537887696781313, ..., 451537887696782211],
 'cost': 0}
Multimodal Search with Generative Reranker
In this section, we will firstly search for relevant images by a multimodal query and then use LLM service to rerank the results and find the best one with explanation.
Run search
Now we are ready to perform the advanced image search with query data composed of both image and text instruction.
query_image = os.path.join(
    data_dir, "leopard.jpg"
)  # Change to your own query image path
query_text = "phone case with this image theme"

# Generate query embedding given image and text instructions
query_vec = encoder.encode_query(image_path=query_image, text=query_text)

search_results = milvus_client.search(
    collection_name=collection_name,
    data=[query_vec],
    output_fields=["image_path"],
    limit=9,  # Max number of search results to return
    search_params={"metric_type": "COSINE", "params": {}},  # Search parameters
)[0]

retrieved_images = [hit.get("entity").get("image_path") for hit in search_results]
print(retrieved_images)
['./images_folder/images/518Gj1WQ-RL._AC_.jpg', './images_folder/images/41n00AOfWhL._AC_.jpg', './images_folder/images/51Wqge9HySL._AC_.jpg', './images_folder/images/51R2SZiywnL._AC_.jpg', './images_folder/images/516PebbMAcL._AC_.jpg', './images_folder/images/51RrgfYKUfL._AC_.jpg', './images_folder/images/515DzQVKKwL._AC_.jpg', './images_folder/images/51BsgVw6RhL._AC_.jpg', './images_folder/images/51INtcXu9FL._AC_.jpg']
Rerank with GPT-4o
We will use an LLM to rank images and generate an explanation for the best result based on the user query and retrieved results.
1. Create a panoramic view
import numpy as np
import cv2

img_height = 300
img_width = 300
row_count = 3


def create_panoramic_view(query_image_path: str, retrieved_images: list) -> np.ndarray:
    """
    creates a 5x5 panoramic view image from a list of images

    args:
        images: list of images to be combined

    returns:
        np.ndarray: the panoramic view image
    """
    panoramic_width = img_width * row_count
    panoramic_height = img_height * row_count
    panoramic_image = np.full(
        (panoramic_height, panoramic_width, 3), 255, dtype=np.uint8
    )

    # create and resize the query image with a blue border
    query_image_null = np.full((panoramic_height, img_width, 3), 255, dtype=np.uint8)
    query_image = Image.open(query_image_path).convert("RGB")
    query_array = np.array(query_image)[:, :, ::-1]
    resized_image = cv2.resize(query_array, (img_width, img_height))

    border_size = 10
    blue = (255, 0, 0)  # blue color in BGR
    bordered_query_image = cv2.copyMakeBorder(
        resized_image,
        border_size,
        border_size,
        border_size,
        border_size,
        cv2.BORDER_CONSTANT,
        value=blue,
    )

    query_image_null[img_height * 2 : img_height * 3, 0:img_width] = cv2.resize(
        bordered_query_image, (img_width, img_height)
    )

    # add text "query" below the query image
    text = "query"
    font_scale = 1
    font_thickness = 2
    text_org = (10, img_height * 3 + 30)
    cv2.putText(
        query_image_null,
        text,
        text_org,
        cv2.FONT_HERSHEY_SIMPLEX,
        font_scale,
        blue,
        font_thickness,
        cv2.LINE_AA,
    )

    # combine the rest of the images into the panoramic view
    retrieved_imgs = [
        np.array(Image.open(img).convert("RGB"))[:, :, ::-1] for img in retrieved_images
    ]
    for i, image in enumerate(retrieved_imgs):
        image = cv2.resize(image, (img_width - 4, img_height - 4))
        row = i // row_count
        col = i % row_count
        start_row = row * img_height
        start_col = col * img_width

        border_size = 2
        bordered_image = cv2.copyMakeBorder(
            image,
            border_size,
            border_size,
            border_size,
            border_size,
            cv2.BORDER_CONSTANT,
            value=(0, 0, 0),
        )
        panoramic_image[
            start_row : start_row + img_height, start_col : start_col + img_width
        ] = bordered_image

        # add red index numbers to each image
        text = str(i)
        org = (start_col + 50, start_row + 30)
        (font_width, font_height), baseline = cv2.getTextSize(
            text, cv2.FONT_HERSHEY_SIMPLEX, 1, 2
        )

        top_left = (org[0] - 48, start_row + 2)
        bottom_right = (org[0] - 48 + font_width + 5, org[1] + baseline + 5)

        cv2.rectangle(
            panoramic_image, top_left, bottom_right, (255, 255, 255), cv2.FILLED
        )
        cv2.putText(
            panoramic_image,
            text,
            (start_col + 10, start_row + 30),
            cv2.FONT_HERSHEY_SIMPLEX,
            1,
            (0, 0, 255),
            2,
            cv2.LINE_AA,
        )

    # combine the query image with the panoramic view
    panoramic_image = np.hstack([query_image_null, panoramic_image])
    return panoramic_image
Combine the query image and retrieved images with indices in a panoramic view.
from PIL import Image

combined_image_path = os.path.join(data_dir, "combined_image.jpg")
panoramic_image = create_panoramic_view(query_image, retrieved_images)
cv2.imwrite(combined_image_path, panoramic_image)

combined_image = Image.open(combined_image_path)
show_combined_image = combined_image.resize((300, 300))
show_combined_image.show()
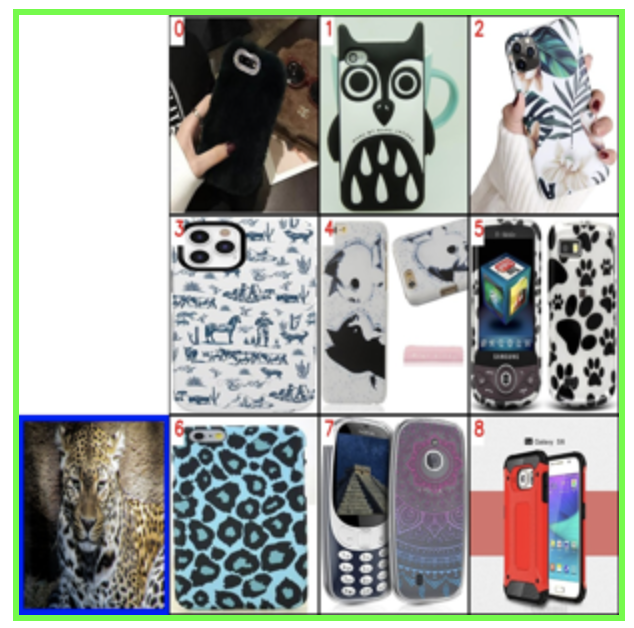 Create a panoramic view
2. Rerank and explain
We will send the combined image to multimodal LLM service together with proper prompts to rank the retrieved results with explanation. To enable GPT-4o as the LLM, you need to prepare your OpenAI API Key.
import requests
import base64

openai_api_key = "sk-***"  # Change to your OpenAI API Key


def generate_ranking_explanation(
    combined_image_path: str, caption: str, infos: dict = None
) -> tuple[list[int], str]:
    with open(combined_image_path, "rb") as image_file:
        base64_image = base64.b64encode(image_file.read()).decode("utf-8")

    information = (
        "You are responsible for ranking results for a Composed Image Retrieval. "
        "The user retrieves an image with an 'instruction' indicating their retrieval intent. "
        "For example, if the user queries a red car with the instruction 'change this car to blue,' a similar type of car in blue would be ranked higher in the results. "
        "Now you would receive instruction and query image with blue border. Every item has its red index number in its top left. Do not misunderstand it. "
        f"User instruction: {caption} \n\n"
    )

    # add additional information for each image
    if infos:
        for i, info in enumerate(infos["product"]):
            information += f"{i}. {info}\n"

    information += (
        "Provide a new ranked list of indices from most suitable to least suitable, followed by an explanation for the top 1 most suitable item only. "
        "The format of the response has to be 'Ranked list: []' with the indices in brackets as integers, followed by 'Reasons:' plus the explanation why this most fit user's query intent."
    )

    headers = {
        "Content-Type": "application/json",
        "Authorization": f"Bearer {openai_api_key}",
    }

    payload = {
        "model": "gpt-4o",
        "messages": [
            {
                "role": "user",
                "content": [
                    {"type": "text", "text": information},
                    {
                        "type": "image_url",
                        "image_url": {"url": f"data:image/jpeg;base64,{base64_image}"},
                    },
                ],
            }
        ],
        "max_tokens": 300,
    }

    response = requests.post(
        "https://api.openai.com/v1/chat/completions", headers=headers, json=payload
    )
    result = response.json()["choices"][0]["message"]["content"]

    # parse the ranked indices from the response
    start_idx = result.find("[")
    end_idx = result.find("]")
    ranked_indices_str = result[start_idx + 1 : end_idx].split(",")
    ranked_indices = [int(index.strip()) for index in ranked_indices_str]

    # extract explanation
    explanation = result[end_idx + 1 :].strip()

    return ranked_indices, explanation
Get the image indices after ranking and the reason for the best result:
ranked_indices, explanation = generate_ranking_explanation(
    combined_image_path, query_text
)
3. Display the best result with explanation
print(explanation)

best_index = ranked_indices[0]
best_img = Image.open(retrieved_images[best_index])
best_img = best_img.resize((150, 150))
best_img.show()
Reasons: The most suitable item for the user's query intent is index 6 because the instruction specifies a phone case with the theme of the image, which is a leopard. The phone case with index 6 has a thematic design resembling the leopard pattern, making it the closest match to the user's request for a phone case with the image theme.
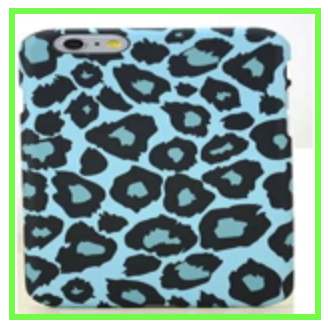 The best result
Quick Deploy
To learn about how to start an online demo with this tutorial, please refer to the example application.