

アナライザーの概要
テキスト処理において、アナライザーは生のテキストを構造化された検索可能な形式に変換する重要なコンポーネントです。各アナライザーは通常、トークナイザーとフィルターという 2 つの主要な要素で構成されています。これら 2 つが連携して、入力テキストをトークンに変換し、これらのトークンを精選して、効率的なインデックス作成と検索に備えます。
Milvusでは、アナライザーはコレクションの作成時に、コレクションスキーマにVARCHAR フィールドを追加する際に設定されます。アナライザーによって生成されたトークンは、キーワードマッチング用のインデックス構築に使用したり、全文検索用のスパース埋め込みに変換したりすることができます。詳細については、「全文検索」、「フレーズマッチ」、「テキストマッチ」を参照してください。
アナライザーの使用はパフォーマンスに影響を与える可能性があります:
全文検索:全文検索の場合、DataNodeおよび QueryNodeチャネルは、トークン化が完了するのを待たなければならないため、データの処理速度が遅くなります。その結果、新しく取り込まれたデータが検索可能になるまでに時間がかかります。
キーワードマッチング:キーワードマッチングの場合も、インデックスの構築にはトークン化が完了している必要があるため、インデックスの作成に時間がかかります。
アナライザーの構成
Milvus のアナライザーは、正確に 1 つのトークナイザーと、0 個以上のフィルターで構成されます。
トークナイザー:トークナイザーは、入力テキストを「トークン」と呼ばれる個別の単位に分割します。これらのトークンは、トークナイザーのタイプに応じて、単語やフレーズになる場合があります。
フィルター:フィルターをトークンに適用することで、トークンをさらに精緻化できます。例えば、トークンを小文字にしたり、一般的な単語を除外したりすることが可能です。
トークナイザーは UTF-8 形式のみをサポートしています。他の形式への対応は、今後のリリースで追加される予定です。
以下のワークフローは、アナライザーがテキストを処理する流れを示しています。
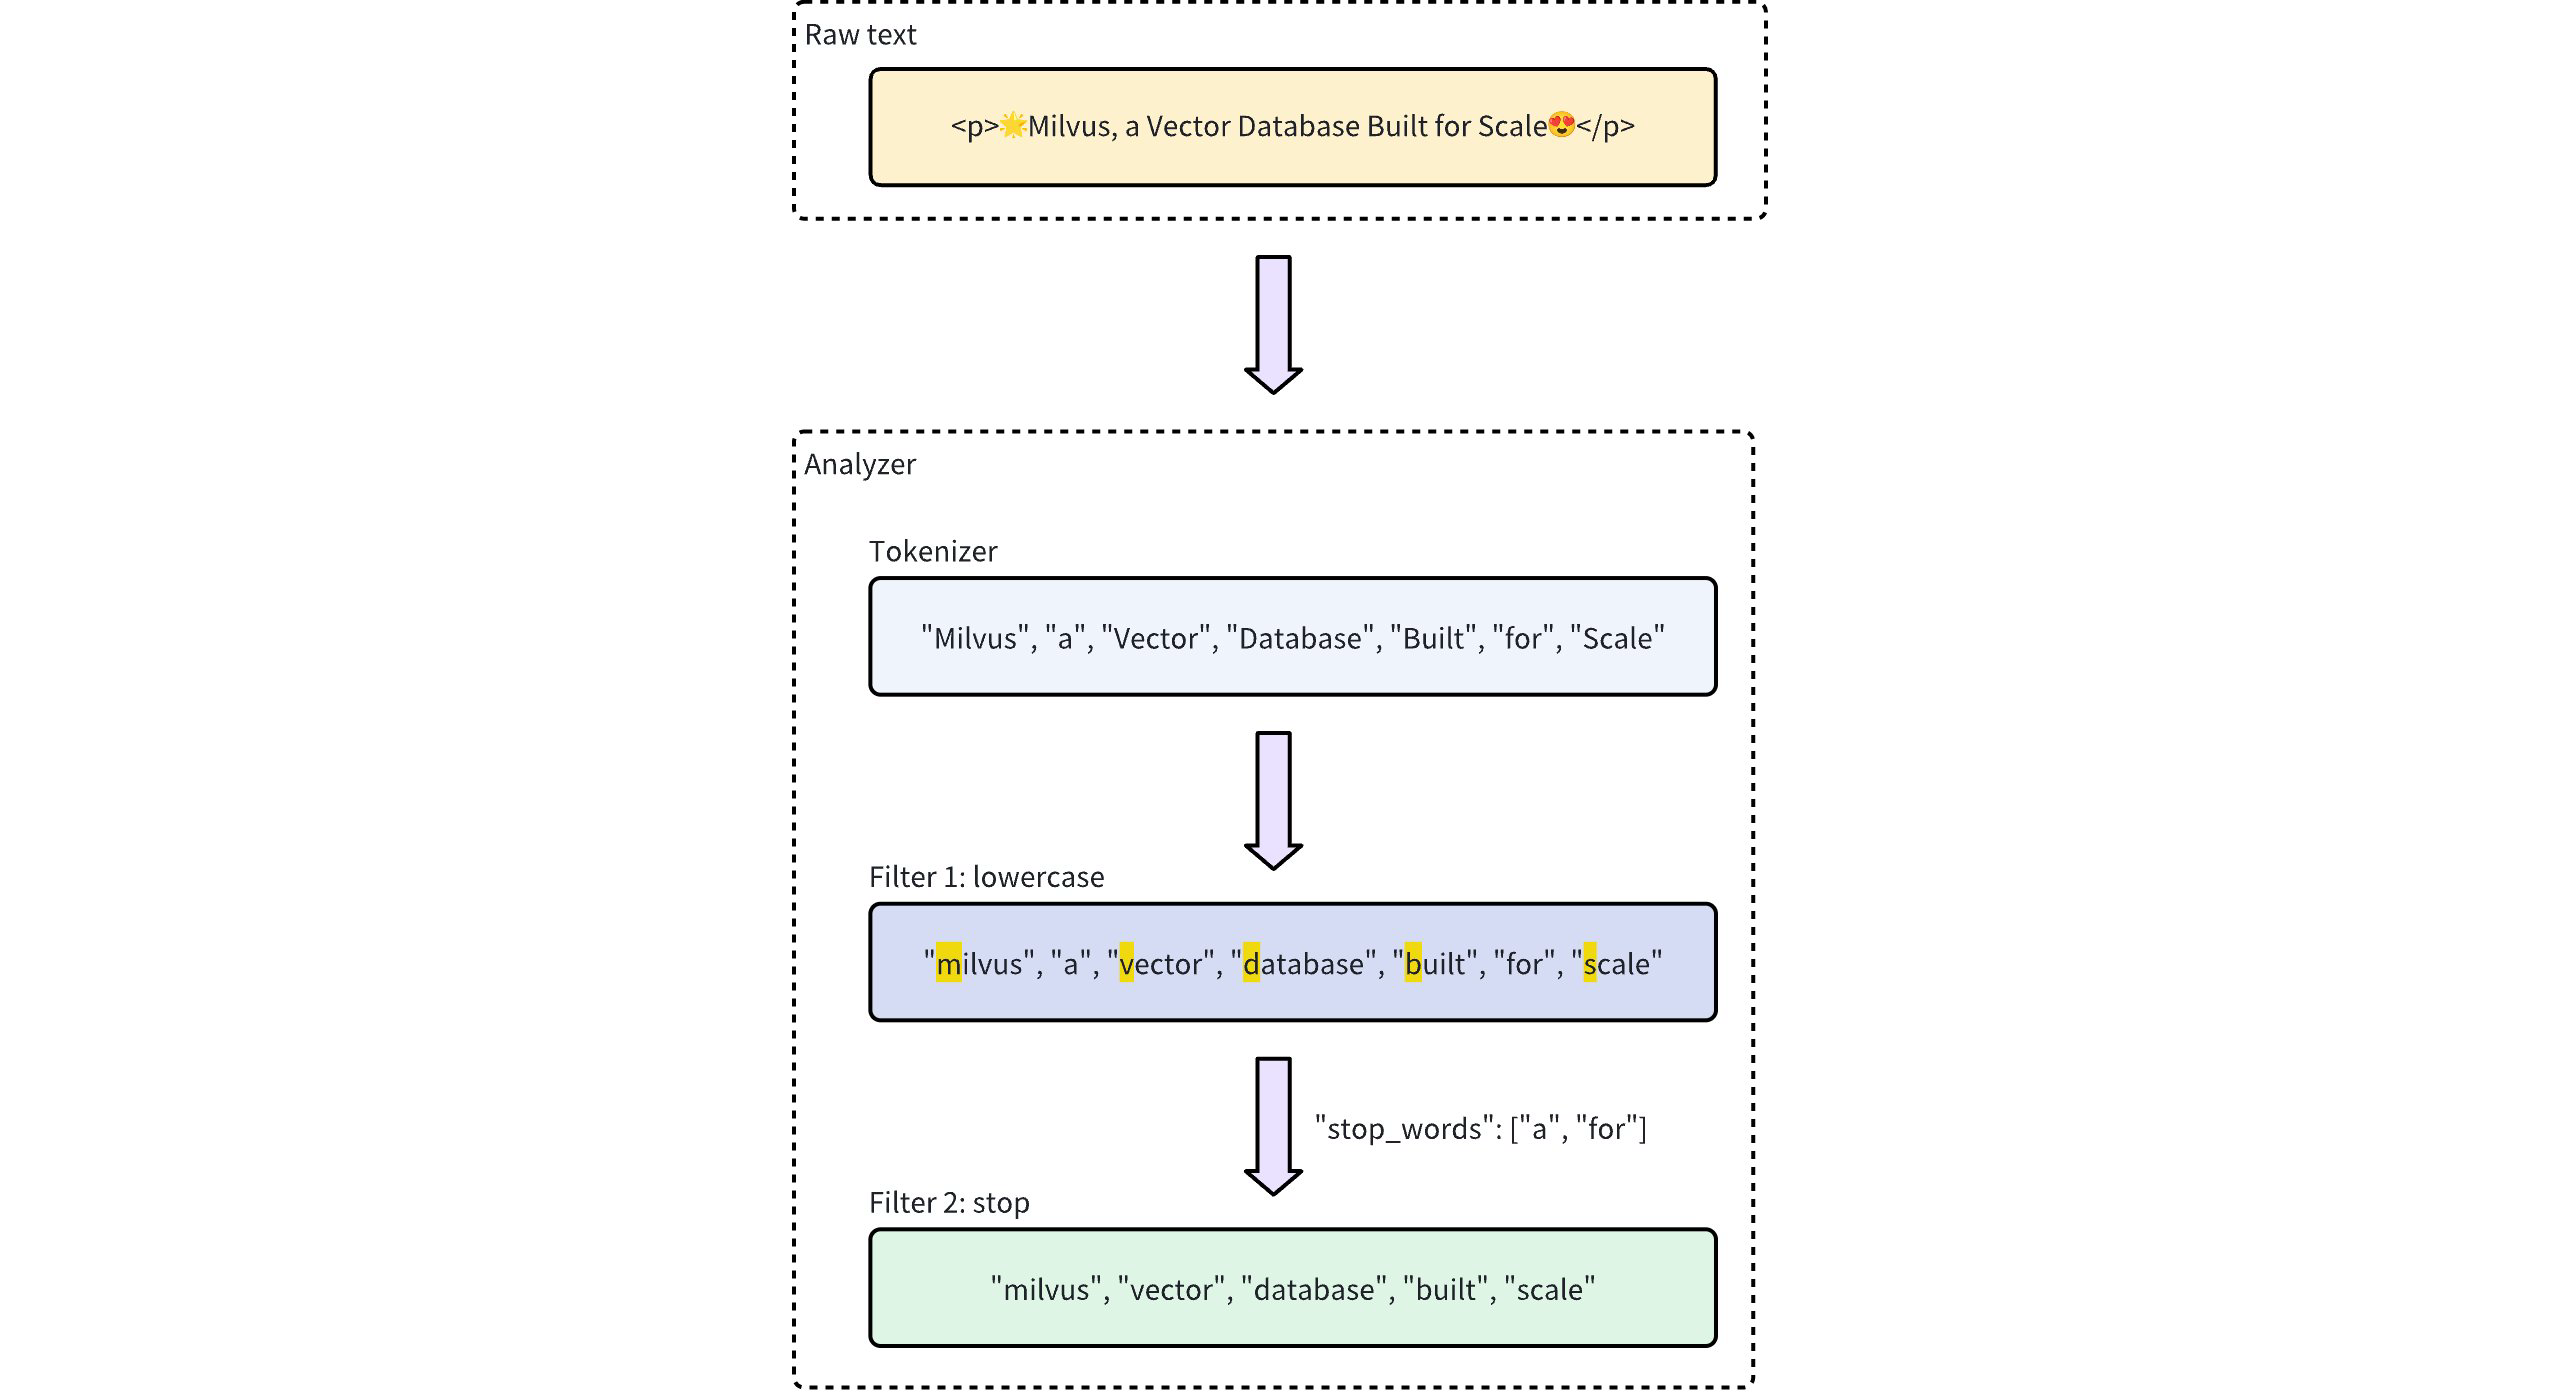 アナライザーの処理ワークフロー
アナライザーの種類
Milvus では、さまざまなテキスト処理のニーズに対応するため、2 種類のアナライザーを提供しています。
組み込みアナライザー:これらは、最小限の設定で一般的なテキスト処理タスクをカバーする事前定義済みの構成です。複雑な設定を必要としないため、汎用的な検索に最適です。
カスタムアナライザー:より高度な要件に対応するため、カスタムアナライザーでは、トークナイザーと0個以上のフィルターを指定することで、独自の設定を定義できます。このレベルのカスタマイズは、テキスト処理を精密に制御する必要がある特殊なユースケースで特に有用です。
- コレクション作成時にアナライザーの設定を省略した場合、Milvus はデフォルトですべてのテキスト処理に「
standard」アナライザーを使用します。詳細については、「標準アナライザー」を参照してください。 - 検索およびクエリのパフォーマンスを最適化するには、テキストデータの言語に適したアナライザーを選択してください。たとえば、「
standard」アナライザーは汎用性が高いものの、中国語、アラビア語、タイ語、日本語、韓国語など、独自の文法構造を持つ言語には最適ではない場合があります。そのような場合は、chinese、arabic、またはthai、あるいは専用のトークナイザーを備えたカスタムアナライザー(例:lindera、icu)やフィルターを備えたカスタムアナライザーを使用することを強く推奨します。これにより、正確なトークン化とより良い検索結果が得られます。
組み込みアナライザー
Milvusの組み込みアナライザーには、特定のトークナイザーとフィルターが事前に設定されているため、これらのコンポーネントを自分で定義することなく、すぐに使用できます。各組み込みアナライザーは、事前設定されたトークナイザーとフィルターを含むテンプレートとして機能し、カスタマイズ用のオプションパラメーターも備えています。
たとえば、standard という組み込みアナライザーを使用するには、type としてその名前standard を指定し、必要に応じてstop_words など、このアナライザータイプ固有の追加設定を含めるだけで済みます:
analyzer_params = {
    "type": "standard", # Uses the standard built-in analyzer
    "stop_words": ["a", "an", "for"] # Defines a list of common words (stop words) to exclude from tokenization
}
Map<String, Object> analyzerParams = new HashMap<>();
analyzerParams.put("type", "standard");
analyzerParams.put("stop_words", Arrays.asList("a", "an", "for"));
const analyzer_params = {
    "type": "standard", // Uses the standard built-in analyzer
    "stop_words": ["a", "an", "for"] // Defines a list of common words (stop words) to exclude from tokenization
};
analyzerParams := map[string]any{"type": "standard", "stop_words": []string{"a", "an", "for"}}
export analyzerParams='{
       "type": "standard",
       "stop_words": ["a", "an", "for"]
    }'
アナライザの実行結果を確認するには、run_analyzer メソッドを使用します:
# Sample text to analyze
text = "An efficient system relies on a robust analyzer to correctly process text for various applications."

# Run analyzer
result = client.run_analyzer(
    text,
    analyzer_params
)
import io.milvus.v2.service.vector.request.RunAnalyzerReq;
import io.milvus.v2.service.vector.response.RunAnalyzerResp;

List<String> texts = new ArrayList<>();
texts.add("An efficient system relies on a robust analyzer to correctly process text for various applications.");

RunAnalyzerResp resp = client.runAnalyzer(RunAnalyzerReq.builder()
        .texts(texts)
        .analyzerParams(analyzerParams)
        .build());
List<RunAnalyzerResp.AnalyzerResult> results = resp.getResults();
// javascrip# Sample text to analyze
const text = "An efficient system relies on a robust analyzer to correctly process text for various applications."

// Run analyzer
const result = await client.run_analyzer({
    text,
    analyzer_params
});
import (
    "context"
    "encoding/json"
    "fmt"

    "github.com/milvus-io/milvus/client/v2/milvusclient"
)

bs, _ := json.Marshal(analyzerParams)
texts := []string{"An efficient system relies on a robust analyzer to correctly process text for various applications."}
option := milvusclient.NewRunAnalyzerOption(texts).
    WithAnalyzerParams(string(bs))

result, err := client.RunAnalyzer(ctx, option)
if err != nil {
    fmt.Println(err.Error())
    // handle error
}
# restful
出力は次のようになります:
['efficient', 'system', 'relies', 'on', 'robust', 'analyzer', 'to', 'correctly', 'process', 'text', 'various', 'applications']
これは、アナライザーがストップワードである"a" 、"an" 、"for" を除外しつつ、残りの意味のあるトークンを返すことで、入力テキストを適切にトークン化していることを示しています。
上記のstandard 組み込みアナライザの設定は、以下のパラメータでカスタムアナライザを設定することと同等です。ここでは、同様の機能を実現するために、tokenizer およびfilter オプションが明示的に定義されています:
analyzer_params = {
    "tokenizer": "standard",
    "filter": [
        "lowercase",
        {
            "type": "stop",
            "stop_words": ["a", "an", "for"]
        }
    ]
}
Map<String, Object> analyzerParams = new HashMap<>();
analyzerParams.put("tokenizer", "standard");
analyzerParams.put("filter",
        Arrays.asList("lowercase",
                new HashMap<String, Object>() {{
                    put("type", "stop");
                    put("stop_words", Arrays.asList("a", "an", "for"));
                }}));
const analyzer_params = {
    "tokenizer": "standard",
    "filter": [
        "lowercase",
        {
            "type": "stop",
            "stop_words": ["a", "an", "for"]
        }
    ]
};
analyzerParams = map[string]any{"tokenizer": "standard",
    "filter": []any{"lowercase", map[string]any{
        "type":       "stop",
        "stop_words": []string{"a", "an", "for"},
    }}}
export analyzerParams='{
       "type": "standard",
       "filter":  [
       "lowercase",
       {
            "type": "stop",
            "stop_words": ["a", "an", "for"]
       }
   ]
}'
Milvus には、特定のテキスト処理ニーズに合わせて設計された以下の組み込みアナライザが用意されています:
standard: 汎用的なテキスト処理に適しており、標準的なトークン化と小文字フィルタリングを適用します。english: 英語のテキストに最適化されており、英語のストップワードに対応しています。chinese: 中国語テキストの処理に特化しており、中国語の文法構造に合わせたトークン化が含まれます。arabic: アラビア語テキストに特化しており、アラビア語の正規化、小数点の正規化、アラビア語のステミング、およびアラビア語のストップワード除去機能を備えています。thai: タイ語テキストに特化しており、タイ語の単語分割、小数点の正規化、およびタイ語のストップワード除去機能を備えています。
カスタムアナライザー
より高度なテキスト処理を行う場合、Milvusのカスタムアナライザーを使用すると、トークナイザーとフィルターの両方を指定することで、カスタマイズされたテキスト処理パイプラインを構築できます。この設定は、精密な制御が求められる特殊なユースケースに最適です。
トークナイザー
トークナイザーはカスタムアナライザーに必須のコンポーネントであり、入力テキストを個別の単位(トークン)に分割することで、アナライザーパイプラインを開始します。トークナイゼーションは、トークナイザーの種類に応じて、空白や句読点による分割など、特定のルールに従って行われます。このプロセスにより、各単語やフレーズをより正確かつ個別に処理することが可能になります。
たとえば、トークナイザーはテキスト「"Vector Database Built for Scale" 」を次のように個別のトークンに変換します:
["Vector", "Database", "Built", "for", "Scale"]
トークナイザーの指定例:
analyzer_params = {
    "tokenizer": "whitespace",
}
Map<String, Object> analyzerParams = new HashMap<>();
analyzerParams.put("tokenizer", "whitespace");
const analyzer_params = {
    "tokenizer": "whitespace",
};
analyzerParams = map[string]any{"tokenizer": "whitespace"}
export analyzerParams='{
       "type": "whitespace"
    }'
フィルター
フィルターは、トークナイザーによって生成されたトークンを処理し、必要に応じて変換または精緻化するオプションのコンポーネントです。例えば、トークナイズされた用語「["Vector", "Database", "Built", "for", "Scale"] 」に「lowercase 」フィルターを適用すると、結果は次のようになる可能性があります:
["vector", "database", "built", "for", "scale"]
カスタムアナライザー内のフィルターは、設定の要件に応じて、組み込みフィルターまたはカスタムフィルターのいずれかを使用できます。
組み込みフィルター:Milvus によってあらかじめ設定されており、最小限の設定で済みます。これらのフィルターは、名前を指定するだけでそのまま使用できます。以下に挙げるフィルターは、そのまま使用できる組み込みフィルターです:
lowercase: テキストを小文字に変換し、大文字と小文字を区別しないマッチングを保証します。詳細については、「Lowercase」を参照してください。asciifolding: 非ASCII文字をASCII相当の文字に変換し、多言語テキストの処理を簡素化します。詳細については、「ASCII folding」を参照してください。alphanumonly: 英数字以外の文字を削除し、英数字のみを残します。詳細については、「Alphanumonly」を参照してください。cnalphanumonly: 漢字、英字、数字以外の文字を含むトークンを削除します。詳細については、「Cnalphanumonly」を参照してください。cncharonly: 中国語以外の文字を含むトークンを削除します。詳細については、「Cncharonly」を参照してください。pinyin: 中国語のトークンにピンイン形式を追加し、中国語テキストのピンインに基づくマッチングを可能にします。詳細については、「Pinyin」を参照してください。
組み込みフィルターの使用例:
analyzer_params = {
    "tokenizer": "standard", # Mandatory: Specifies tokenizer
    "filter": ["lowercase"], # Optional: Built-in filter that converts text to lowercase
}
Map<String, Object> analyzerParams = new HashMap<>(); analyzerParams.put("tokenizer", "standard"); analyzerParams.put("filter", Collections.singletonList("lowercase"));const analyzer_params = { "tokenizer": "standard", // Mandatory: Specifies tokenizer "filter": ["lowercase"], // Optional: Built-in filter that converts text to lowercase }analyzerParams = map[string]any{"tokenizer": "standard", "filter": []any{"lowercase"}}export analyzerParams='{ "type": "standard", "filter": ["lowercase"] }'カスタムフィルター: カスタムフィルターを使用すると、特殊な設定が可能です。有効なフィルタータイプ(
filter.type)を選択し、各フィルタータイプに固有の設定を追加することで、カスタムフィルターを定義できます。カスタマイズが可能なフィルタータイプの例:stop: ストップワードのリストを設定することで、指定された一般的な単語を除外します(例:"stop_words": ["of", "to"])。詳細については、「ストップワード」を参照してください。length: トークンの最大長を設定するなど、長さの基準に基づいてトークンを除外します。詳細については、「Length」を参照してください。stemmer: より柔軟なマッチングを行うために、単語を語幹に還元します。詳細については、「Stemmer」を参照してください。
カスタムフィルタの設定例:
analyzer_params = {
    "tokenizer": "standard", # Mandatory: Specifies tokenizer
    "filter": [
        {
            "type": "stop", # Specifies 'stop' as the filter type
            "stop_words": ["of", "to"], # Customizes stop words for this filter type
        }
    ]
}
Map<String, Object> analyzerParams = new HashMap<>(); analyzerParams.put("tokenizer", "standard"); analyzerParams.put("filter", Collections.singletonList(new HashMap<String, Object>() {{ put("type", "stop"); put("stop_words", Arrays.asList("a", "an", "for")); }}));const analyzer_params = { "tokenizer": "standard", // Mandatory: Specifies tokenizer "filter": [ { "type": "stop", // Specifies 'stop' as the filter type "stop_words": ["of", "to"], // Customizes stop words for this filter type } ] };analyzerParams = map[string]any{"tokenizer": "standard", "filter": []any{map[string]any{ "type": "stop", "stop_words": []string{"of", "to"}, }}}export analyzerParams='{ "type": "standard", "filter": [ { "type": "stop", "stop_words": ["a", "an", "for"] } ] }'
使用例
この例では、以下を含むコレクションスキーマを作成します:
埋め込み用のベクトルフィールド。
テキスト処理用の
VARCHARフィールドが2つ:1つのフィールドは組み込みのアナライザーを使用します。
もう1つはカスタムアナライザを使用します。
これらの設定をコレクションに組み込む前に、run_analyzer メソッドを使用して各アナライザーを検証します。
ステップ 1: MilvusClient を初期化し、スキーマを作成する
まず、Milvusクライアントを設定し、新しいスキーマを作成します。
from pymilvus import MilvusClient, DataType

# Set up a Milvus client
client = MilvusClient(uri="http://localhost:19530")

# Create a new schema
schema = client.create_schema(auto_id=True, enable_dynamic_field=False)
import io.milvus.v2.client.ConnectConfig;
import io.milvus.v2.client.MilvusClientV2;
import io.milvus.v2.common.DataType;
import io.milvus.v2.common.IndexParam;
import io.milvus.v2.service.collection.request.AddFieldReq;
import io.milvus.v2.service.collection.request.CreateCollectionReq;

// Set up a Milvus client
ConnectConfig config = ConnectConfig.builder()
        .uri("http://localhost:19530")
        .build();
MilvusClientV2 client = new MilvusClientV2(config);

// Create schema
CreateCollectionReq.CollectionSchema schema = CreateCollectionReq.CollectionSchema.builder()
        .enableDynamicField(false)
        .build();
import { MilvusClient, DataType } from "@zilliz/milvus2-sdk-node";

// Set up a Milvus client
const client = new MilvusClient("http://localhost:19530");
import (
    "context"
    "fmt"

    "github.com/milvus-io/milvus/client/v2/column"
    "github.com/milvus-io/milvus/client/v2/entity"
    "github.com/milvus-io/milvus/client/v2/index"
    "github.com/milvus-io/milvus/client/v2/milvusclient"
)

ctx, cancel := context.WithCancel(context.Background())
defer cancel()

cli, err := milvusclient.New(ctx, &milvusclient.ClientConfig{
    Address: "localhost:19530",
})
if err != nil {
    fmt.Println(err.Error())
    // handle err
}
defer client.Close(ctx)

schema := entity.NewSchema().WithAutoID(true).WithDynamicFieldEnabled(false)
# restful
ステップ 2: アナライザー設定の定義と検証
組み込みアナライザー(
english)を設定し、検証します:設定:組み込みの英語アナライザーのパラメータを定義します。
検証:
run_analyzerを使用して、設定によって期待通りのトークン化が行われることを確認します。
# Built-in analyzer configuration for English text processing
analyzer_params_built_in = {
    "type": "english"
}

# Verify built-in analyzer configuration
sample_text = "Milvus simplifies text analysis for search."
result = client.run_analyzer(sample_text, analyzer_params_built_in)
print("Built-in analyzer output:", result)

# Expected output:
# Built-in analyzer output: ['milvus', 'simplifi', 'text', 'analysi', 'search']
Map<String, Object> analyzerParamsBuiltin = new HashMap<>(); analyzerParamsBuiltin.put("type", "english"); List<String> texts = new ArrayList<>(); texts.add("Milvus simplifies text ana lysis for search."); RunAnalyzerResp resp = client.runAnalyzer(RunAnalyzerReq.builder() .texts(texts) .analyzerParams(analyzerParams) .build()); List<RunAnalyzerResp.AnalyzerResult> results = resp.getResults();// Use a built-in analyzer for VARCHAR field `title_en` const analyzerParamsBuiltIn = { type: "english", }; const sample_text = "Milvus simplifies text analysis for search."; const result = await client.run_analyzer({ text: sample_text, analyzer_params: analyzer_params_built_in });analyzerParams := map[string]any{"type": "english"} bs, _ := json.Marshal(analyzerParams) texts := []string{"Milvus simplifies text analysis for search."} option := milvusclient.NewRunAnalyzerOption(texts). WithAnalyzerParams(string(bs)) result, err := client.RunAnalyzer(ctx, option) if err != nil { fmt.Println(err.Error()) // handle error }# restfulカスタムアナライザの設定と検証:
設定:標準のトークナイザーに加え、組み込みの小文字変換フィルター、およびトークン長とストップワード用のカスタムフィルターを使用するカスタムアナライザーを定義します。
検証:
run_analyzerを使用して、カスタム設定がテキストを意図したとおりに処理することを確認します。
# Custom analyzer configuration with a standard tokenizer and custom filters
analyzer_params_custom = {
    "tokenizer": "standard",
    "filter": [
        "lowercase",  # Built-in filter: convert tokens to lowercase
        {
            "type": "length",  # Custom filter: restrict token length
            "max": 40
        },
        {
            "type": "stop",  # Custom filter: remove specified stop words
            "stop_words": ["of", "for"]
        }
    ]
}

# Verify custom analyzer configuration
sample_text = "Milvus provides flexible, customizable analyzers for robust text processing."
result = client.run_analyzer(sample_text, analyzer_params_custom)
print("Custom analyzer output:", result)

# Expected output:
# Custom analyzer output: ['milvus', 'provides', 'flexible', 'customizable', 'analyzers', 'robust', 'text', 'processing']
// Configure a custom analyzer Map<String, Object> analyzerParams = new HashMap<>(); analyzerParams.put("tokenizer", "standard"); analyzerParams.put("filter", Arrays.asList("lowercase", new HashMap<String, Object>() {{ put("type", "length"); put("max", 40); }}, new HashMap<String, Object>() {{ put("type", "stop"); put("stop_words", Arrays.asList("of", "for")); }} ) ); List<String> texts = new ArrayList<>(); texts.add("Milvus provides flexible, customizable analyzers for robust text processing."); RunAnalyzerResp resp = client.runAnalyzer(RunAnalyzerReq.builder() .texts(texts) .analyzerParams(analyzerParams) .build()); List<RunAnalyzerResp.AnalyzerResult> results = resp.getResults();// Configure a custom analyzer for VARCHAR field `title` const analyzerParamsCustom = { tokenizer: "standard", filter: [ "lowercase", { type: "length", max: 40, }, { type: "stop", stop_words: ["of", "to"], }, ], }; const sample_text = "Milvus provides flexible, customizable analyzers for robust text processing."; const result = await client.run_analyzer({ text: sample_text, analyzer_params: analyzer_params_built_in });analyzerParams = map[string]any{"tokenizer": "standard", "filter": []any{"lowercase", map[string]any{ "type": "length", "max": 40, map[string]any{ "type": "stop", "stop_words": []string{"of", "to"}, }}} bs, _ := json.Marshal(analyzerParams) texts := []string{"Milvus provides flexible, customizable analyzers for robust text processing."} option := milvusclient.NewRunAnalyzerOption(texts). WithAnalyzerParams(string(bs)) result, err := client.RunAnalyzer(ctx, option) if err != nil { fmt.Println(err.Error()) // handle error }# curl
ステップ 3: スキーマにフィールドを追加する
アナライザの設定を確認したので、それらをスキーマのフィールドに追加します:
# Add VARCHAR field 'title_en' using the built-in analyzer configuration
schema.add_field(
    field_name='title_en',
    datatype=DataType.VARCHAR,
    max_length=1000,
    enable_analyzer=True,
    analyzer_params=analyzer_params_built_in,
    enable_match=True,
)

# Add VARCHAR field 'title' using the custom analyzer configuration
schema.add_field(
    field_name='title',
    datatype=DataType.VARCHAR,
    max_length=1000,
    enable_analyzer=True,
    analyzer_params=analyzer_params_custom,
    enable_match=True,
)

# Add a vector field for embeddings
schema.add_field(field_name="embedding", datatype=DataType.FLOAT_VECTOR, dim=3)

# Add a primary key field
schema.add_field(field_name="id", datatype=DataType.INT64, is_primary=True)
schema.addField(AddFieldReq.builder()
        .fieldName("title")
        .dataType(DataType.VarChar)
        .maxLength(1000)
        .enableAnalyzer(true)
        .analyzerParams(analyzerParams)
        .enableMatch(true) // must enable this if you use TextMatch
        .build());

// Add vector field
schema.addField(AddFieldReq.builder()
        .fieldName("embedding")
        .dataType(DataType.FloatVector)
        .dimension(3)
        .build());
// Add primary field
schema.addField(AddFieldReq.builder()
        .fieldName("id")
        .dataType(DataType.Int64)
        .isPrimaryKey(true)
        .autoID(true)
        .build());
// Create schema
const schema = {
  auto_id: true,
  fields: [
    {
      name: "id",
      type: DataType.INT64,
      is_primary: true,
    },
    {
      name: "title_en",
      data_type: DataType.VARCHAR,
      max_length: 1000,
      enable_analyzer: true,
      analyzer_params: analyzerParamsBuiltIn,
      enable_match: true,
    },
    {
      name: "title",
      data_type: DataType.VARCHAR,
      max_length: 1000,
      enable_analyzer: true,
      analyzer_params: analyzerParamsCustom,
      enable_match: true,
    },
    {
      name: "embedding",
      data_type: DataType.FLOAT_VECTOR,
      dim: 4,
    },
  ],
};
schema.WithField(entity.NewField().
    WithName("id").
    WithDataType(entity.FieldTypeInt64).
    WithIsPrimaryKey(true).
    WithIsAutoID(true),
).WithField(entity.NewField().
    WithName("embedding").
    WithDataType(entity.FieldTypeFloatVector).
    WithDim(3),
).WithField(entity.NewField().
    WithName("title").
    WithDataType(entity.FieldTypeVarChar).
    WithMaxLength(1000).
    WithEnableAnalyzer(true).
    WithAnalyzerParams(analyzerParams).
    WithEnableMatch(true),
)
# restful
ステップ 4: インデックスパラメータを準備し、コレクションを作成する
# Set up index parameters for the vector field
index_params = client.prepare_index_params()
index_params.add_index(field_name="embedding", metric_type="COSINE", index_type="AUTOINDEX")

# Create the collection with the defined schema and index parameters
client.create_collection(
    collection_name="my_collection",
    schema=schema,
    index_params=index_params
)
// Set up index params for vector field
List<IndexParam> indexes = new ArrayList<>();
indexes.add(IndexParam.builder()
        .fieldName("embedding")
        .indexType(IndexParam.IndexType.AUTOINDEX)
        .metricType(IndexParam.MetricType.COSINE)
        .build());

// Create collection with defined schema
CreateCollectionReq requestCreate = CreateCollectionReq.builder()
        .collectionName("my_collection")
        .collectionSchema(schema)
        .indexParams(indexes)
        .build();
client.createCollection(requestCreate);
// Set up index params for vector field
const indexParams = [
  {
    name: "embedding",
    metric_type: "COSINE",
    index_type: "AUTOINDEX",
  },
];

// Create collection with defined schema
await client.createCollection({
  collection_name: "my_collection",
  schema: schema,
  index_params: indexParams,
});

console.log("Collection created successfully!");
idx := index.NewAutoIndex(index.MetricType(entity.COSINE))
indexOption := milvusclient.NewCreateIndexOption("my_collection", "embedding", idx)

err = client.CreateCollection(ctx,
    milvusclient.NewCreateCollectionOption("my_collection", schema).
        WithIndexOptions(indexOption))
if err != nil {
    fmt.Println(err.Error())
    // handle error
}
# restful
次の手順
アナライザーの設定が完了したら、Milvusが提供するテキスト検索機能と連携できます。詳細については:
