

RAG multimodal con Milvus


Si quieres ver el resultado final de este tutorial, puedes ir directamente a la demostración en línea.
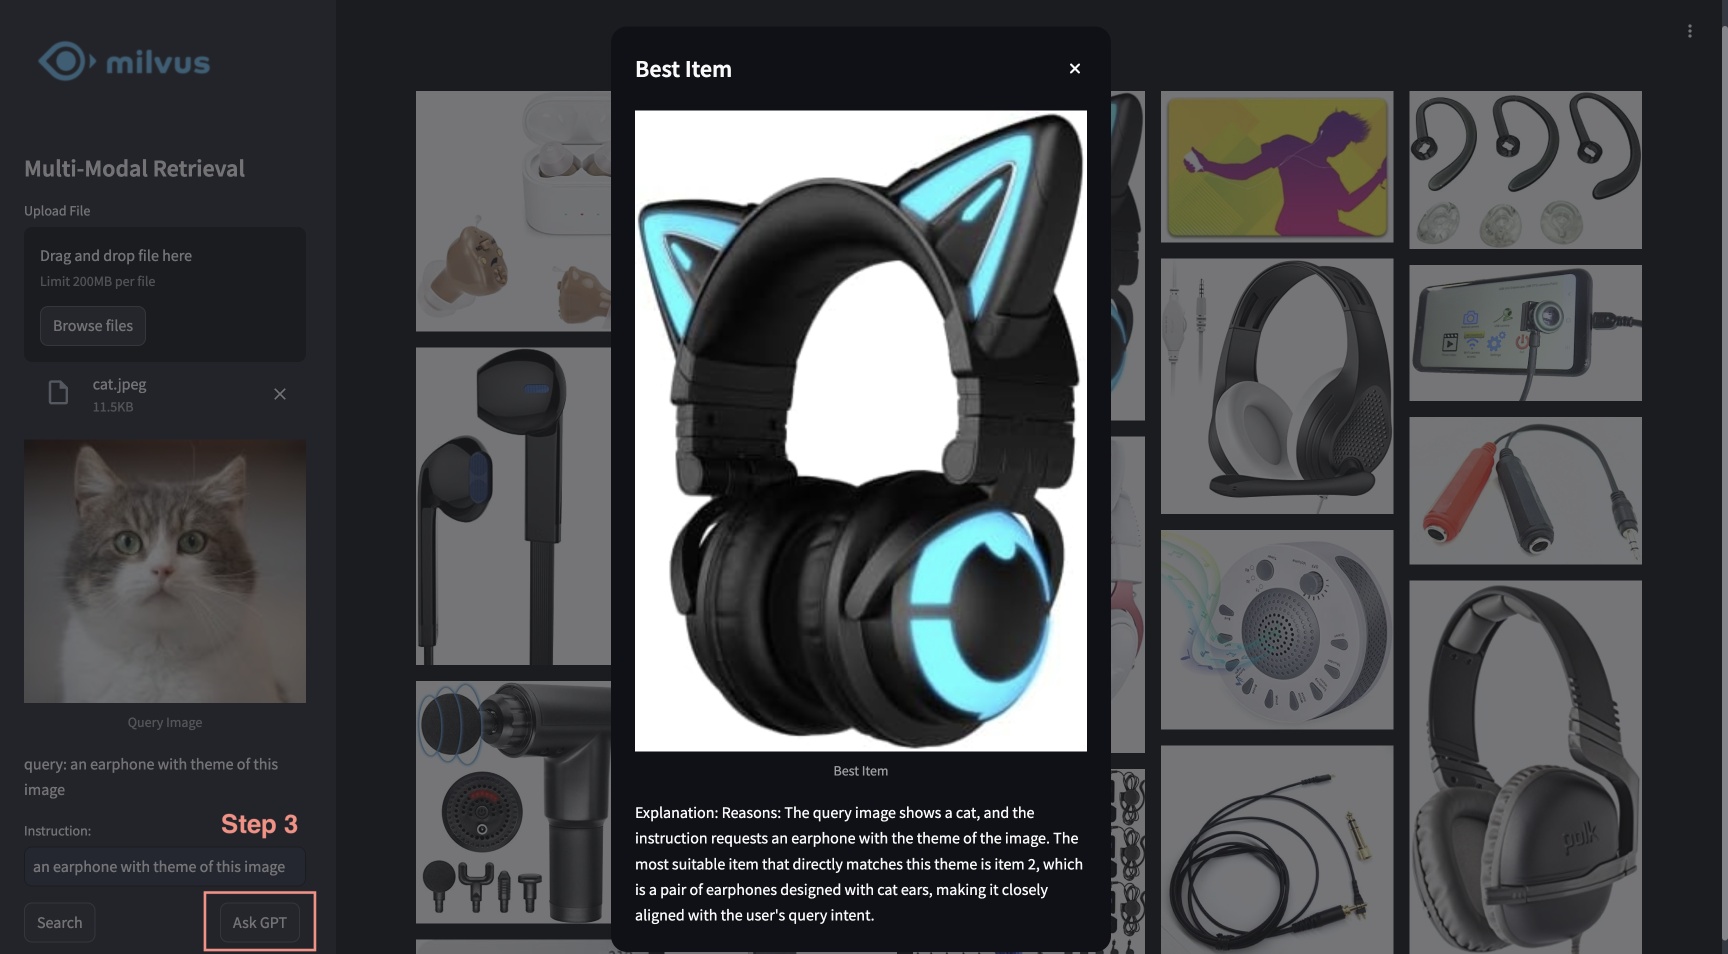
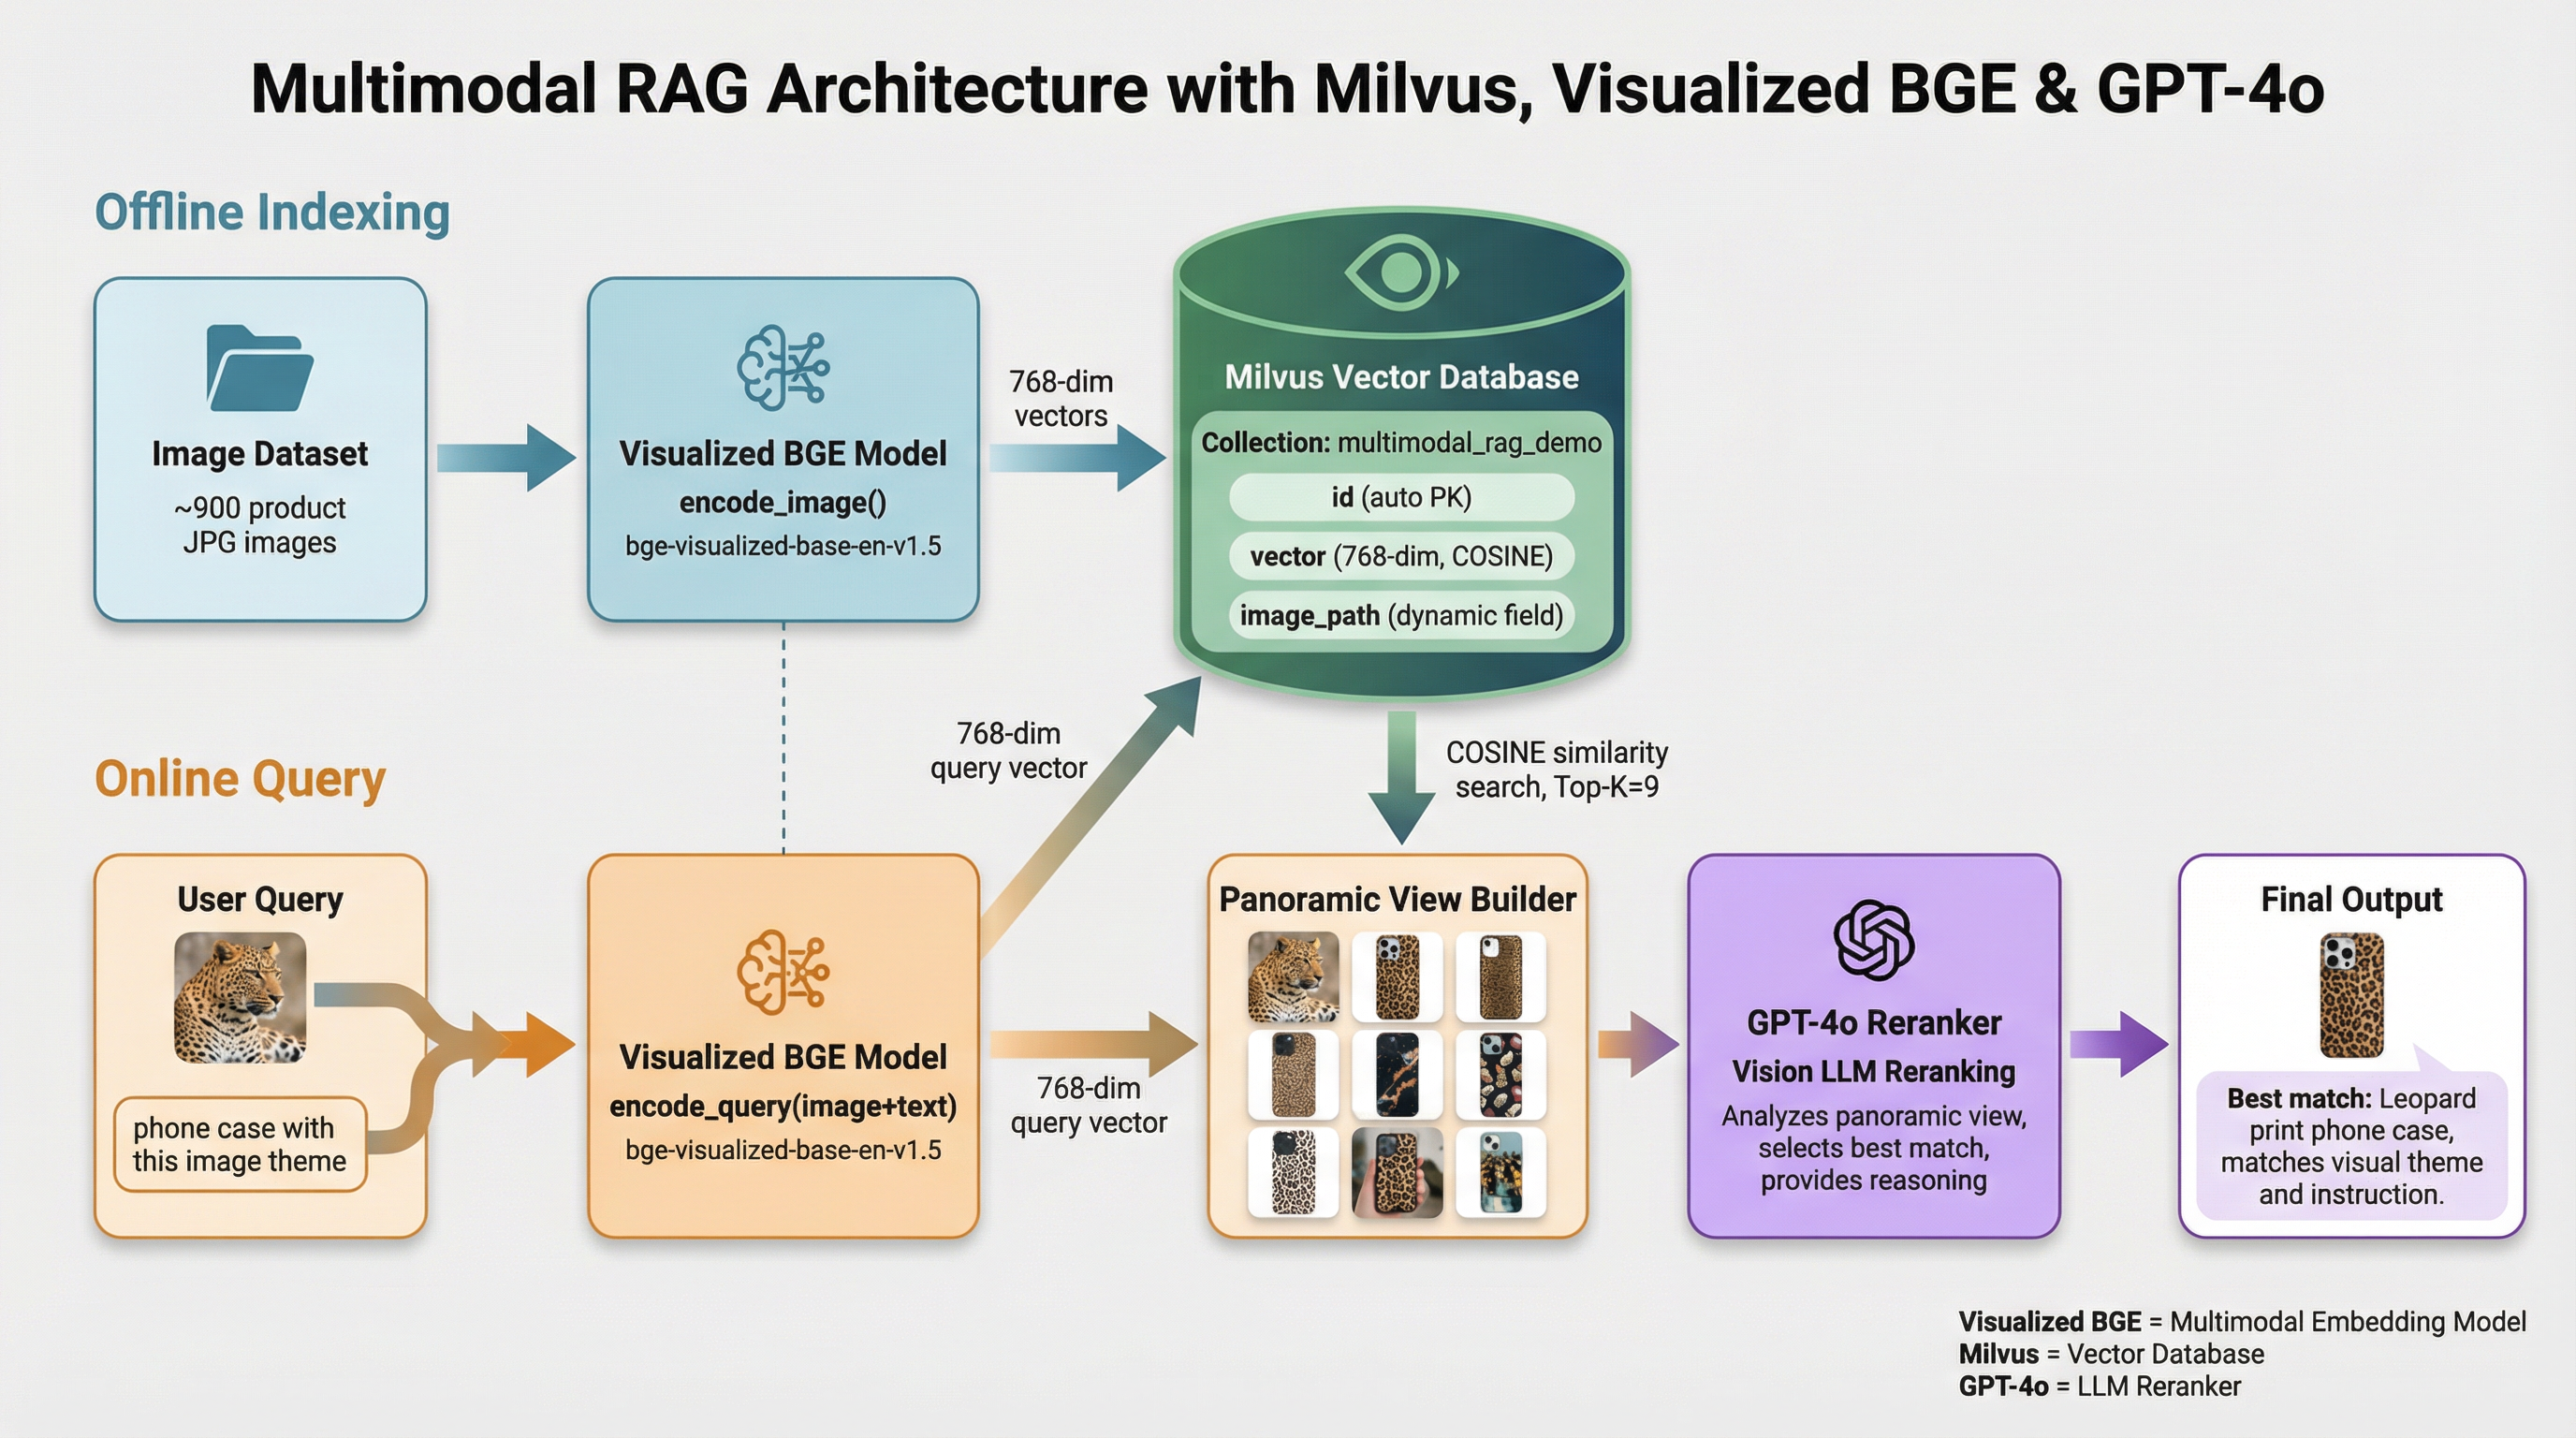
Este tutorial muestra el RAG multimodal impulsado por Milvus, el modelo BGE visualizado y GPT-4o. Con este sistema, los usuarios pueden subir una imagen y editar instrucciones de texto, que son procesadas por el modelo de recuperación compuesta de BGE para buscar imágenes candidatas. A continuación, GPT-4o actúa como reordenador, seleccionando la imagen más adecuada y explicando el razonamiento que hay detrás de esa elección. Esta potente combinación permite una experiencia de búsqueda de imágenes fluida e intuitiva, aprovechando Milvus para una recuperación eficiente, el modelo BGE para un procesamiento y emparejamiento precisos de las imágenes, y GPT-4o para una reordenación avanzada.
Preparación
Instalación de dependencias
$ pip install --upgrade pymilvus openai datasets opencv-python timm einops ftfy peft tqdm
$ git clone https://github.com/FlagOpen/FlagEmbedding.git
$ pip install -e FlagEmbedding
Si utilizas Google Colab, para que las dependencias que acabas de instalar estén activas, es posible que tengas que reiniciar el entorno de ejecución (haz clic en el menú «Runtime» en la parte superior de la pantalla y selecciona «Restart session» en el menú desplegable).
Descarga de datos
El siguiente comando descargará los datos de ejemplo y los extraerá a una carpeta local «./images_folder», que incluye:
- imágenes: un subconjunto de Amazon Reviews 2023 que contiene aproximadamente 900 imágenes de las categorías «Electrodomésticos», «Teléfonos móviles y accesorios» y «Electrónica».
- leopard.jpg: una imagen de ejemplo para la consulta.
$ wget https://github.com/milvus-io/bootcamp/releases/download/data/amazon_reviews_2023_subset.tar.gz
$ tar -xzf amazon_reviews_2023_subset.tar.gz
Cargar el modelo de incrustación
Utilizaremos el modelo BGE visualizado «bge-visualized-base-en-v1.5» para generar representaciones tanto para imágenes como para texto.
1. Descargar los pesos
$ wget https://huggingface.co/BAAI/bge-visualized/resolve/main/Visualized_base_en_v1.5.pth
2. Crear el codificador
import torch
from visual_bge.modeling import Visualized_BGE


class Encoder:
    def __init__(self, model_name: str, model_path: str):
        self.model = Visualized_BGE(model_name_bge=model_name, model_weight=model_path)
        self.model.eval()

    def encode_query(self, image_path: str, text: str) -> list[float]:
        with torch.no_grad():
            query_emb = self.model.encode(image=image_path, text=text)
        return query_emb.tolist()[0]

    def encode_image(self, image_path: str) -> list[float]:
        with torch.no_grad():
            query_emb = self.model.encode(image=image_path)
        return query_emb.tolist()[0]


model_name = "BAAI/bge-base-en-v1.5"
model_path = "./Visualized_base_en_v1.5.pth"  # Change to your own value if using a different model path
encoder = Encoder(model_name, model_path)
Cargar datos
En esta sección se cargarán imágenes de ejemplo en la base de datos con sus correspondientes representaciones.
Generar representaciones
Cargar todas las imágenes JPEG del directorio de datos y aplicar el codificador para convertir las imágenes en representaciones.
import os
from tqdm import tqdm
from glob import glob


# Generate embeddings for the image dataset
data_dir = (
    "./images_folder"  # Change to your own value if using a different data directory
)
image_list = glob(
    os.path.join(data_dir, "images", "*.jpg")
)  # We will only use images ending with ".jpg"
image_dict = {}
for image_path in tqdm(image_list, desc="Generating image embeddings: "):
    try:
        image_dict[image_path] = encoder.encode_image(image_path)
    except Exception as e:
        print(f"Failed to generate embedding for {image_path}. Skipped.")
        continue
print("Number of encoded images:", len(image_dict))
Generating image embeddings: 100%|██████████| 900/900 [00:20<00:00, 44.08it/s]

Number of encoded images: 900
Insertar en Milvus
Insertar las imágenes con sus rutas y representaciones correspondientes en la colección de Milvus.
En cuanto al argumento de « MilvusClient »:
- Configurar `
uri` como un archivo local, por ejemplo, `./milvus_demo.db`, es el método más práctico, ya que utiliza automáticamente Milvus Lite para almacenar todos los datos en este archivo. - Si dispones de una gran cantidad de datos, puedes configurar un servidor Milvus de mayor rendimiento en Docker o Kubernetes. En esta configuración, utiliza la URI del servidor, por ejemplo,
http://localhost:19530, como tuuri. - Si desea utilizar Zilliz Cloud, el servicio en la nube totalmente gestionado para Milvus, modifique los valores de
uriytoken, que se corresponden con el punto de acceso público y la clave API de Zilliz Cloud.
from pymilvus import MilvusClient


dim = len(list(image_dict.values())[0])
collection_name = "multimodal_rag_demo"

# Connect to Milvus client given URI
milvus_client = MilvusClient(uri="./milvus_demo.db")

# Create Milvus Collection
# By default, vector field name is "vector"
milvus_client.create_collection(
    collection_name=collection_name,
    auto_id=True,
    dimension=dim,
    enable_dynamic_field=True,
)

# Insert data into collection
milvus_client.insert(
    collection_name=collection_name,
    data=[{"image_path": k, "vector": v} for k, v in image_dict.items()],
)
DEBUG:pymilvus.milvus_client.milvus_client:Created new connection using: 7f33daeed99a4d8e8a5e28d47673ecc8
DEBUG:pymilvus.milvus_client.milvus_client:Successfully created collection: multimodal_rag_demo
DEBUG:pymilvus.milvus_client.milvus_client:Successfully created an index on collection: multimodal_rag_demo


{'insert_count': 900,
 'ids': [451537887696781312, 451537887696781313, ..., 451537887696782211],
 'cost': 0}
Búsqueda multimodal con reordenador generativo
En esta sección, primero buscaremos imágenes relevantes mediante una consulta multimodal y, a continuación, utilizaremos el servicio LLM para reordenar los resultados y encontrar el mejor de ellos con una explicación.
Ejecutar la búsqueda
Ahora estamos listos para realizar la búsqueda avanzada de imágenes con datos de consulta compuestos tanto por una imagen como por instrucciones de texto.
query_image = os.path.join(
    data_dir, "leopard.jpg"
)  # Change to your own query image path
query_text = "phone case with this image theme"

# Generate query embedding given image and text instructions
query_vec = encoder.encode_query(image_path=query_image, text=query_text)

search_results = milvus_client.search(
    collection_name=collection_name,
    data=[query_vec],
    output_fields=["image_path"],
    limit=9,  # Max number of search results to return
    search_params={"metric_type": "COSINE", "params": {}},  # Search parameters
)[0]

retrieved_images = [hit.get("entity").get("image_path") for hit in search_results]
print(retrieved_images)
['./images_folder/images/518Gj1WQ-RL._AC_.jpg', './images_folder/images/41n00AOfWhL._AC_.jpg', './images_folder/images/51Wqge9HySL._AC_.jpg', './images_folder/images/51R2SZiywnL._AC_.jpg', './images_folder/images/516PebbMAcL._AC_.jpg', './images_folder/images/51RrgfYKUfL._AC_.jpg', './images_folder/images/515DzQVKKwL._AC_.jpg', './images_folder/images/51BsgVw6RhL._AC_.jpg', './images_folder/images/51INtcXu9FL._AC_.jpg']
Reordenación con GPT-4o
Utilizaremos un LLM para clasificar las imágenes y generar una explicación del mejor resultado basándonos en la consulta del usuario y en los resultados obtenidos.
1. Crear una vista panorámica
import numpy as np
import cv2

img_height = 300
img_width = 300
row_count = 3


def create_panoramic_view(query_image_path: str, retrieved_images: list) -> np.ndarray:
    """
    creates a 5x5 panoramic view image from a list of images

    args:
        images: list of images to be combined

    returns:
        np.ndarray: the panoramic view image
    """
    panoramic_width = img_width * row_count
    panoramic_height = img_height * row_count
    panoramic_image = np.full(
        (panoramic_height, panoramic_width, 3), 255, dtype=np.uint8
    )

    # create and resize the query image with a blue border
    query_image_null = np.full((panoramic_height, img_width, 3), 255, dtype=np.uint8)
    query_image = Image.open(query_image_path).convert("RGB")
    query_array = np.array(query_image)[:, :, ::-1]
    resized_image = cv2.resize(query_array, (img_width, img_height))

    border_size = 10
    blue = (255, 0, 0)  # blue color in BGR
    bordered_query_image = cv2.copyMakeBorder(
        resized_image,
        border_size,
        border_size,
        border_size,
        border_size,
        cv2.BORDER_CONSTANT,
        value=blue,
    )

    query_image_null[img_height * 2 : img_height * 3, 0:img_width] = cv2.resize(
        bordered_query_image, (img_width, img_height)
    )

    # add text "query" below the query image
    text = "query"
    font_scale = 1
    font_thickness = 2
    text_org = (10, img_height * 3 + 30)
    cv2.putText(
        query_image_null,
        text,
        text_org,
        cv2.FONT_HERSHEY_SIMPLEX,
        font_scale,
        blue,
        font_thickness,
        cv2.LINE_AA,
    )

    # combine the rest of the images into the panoramic view
    retrieved_imgs = [
        np.array(Image.open(img).convert("RGB"))[:, :, ::-1] for img in retrieved_images
    ]
    for i, image in enumerate(retrieved_imgs):
        image = cv2.resize(image, (img_width - 4, img_height - 4))
        row = i // row_count
        col = i % row_count
        start_row = row * img_height
        start_col = col * img_width

        border_size = 2
        bordered_image = cv2.copyMakeBorder(
            image,
            border_size,
            border_size,
            border_size,
            border_size,
            cv2.BORDER_CONSTANT,
            value=(0, 0, 0),
        )
        panoramic_image[
            start_row : start_row + img_height, start_col : start_col + img_width
        ] = bordered_image

        # add red index numbers to each image
        text = str(i)
        org = (start_col + 50, start_row + 30)
        (font_width, font_height), baseline = cv2.getTextSize(
            text, cv2.FONT_HERSHEY_SIMPLEX, 1, 2
        )

        top_left = (org[0] - 48, start_row + 2)
        bottom_right = (org[0] - 48 + font_width + 5, org[1] + baseline + 5)

        cv2.rectangle(
            panoramic_image, top_left, bottom_right, (255, 255, 255), cv2.FILLED
        )
        cv2.putText(
            panoramic_image,
            text,
            (start_col + 10, start_row + 30),
            cv2.FONT_HERSHEY_SIMPLEX,
            1,
            (0, 0, 255),
            2,
            cv2.LINE_AA,
        )

    # combine the query image with the panoramic view
    panoramic_image = np.hstack([query_image_null, panoramic_image])
    return panoramic_image
Combinar la imagen de la consulta y las imágenes recuperadas con índices en una vista panorámica.
from PIL import Image

combined_image_path = os.path.join(data_dir, "combined_image.jpg")
panoramic_image = create_panoramic_view(query_image, retrieved_images)
cv2.imwrite(combined_image_path, panoramic_image)

combined_image = Image.open(combined_image_path)
show_combined_image = combined_image.resize((300, 300))
show_combined_image.show()
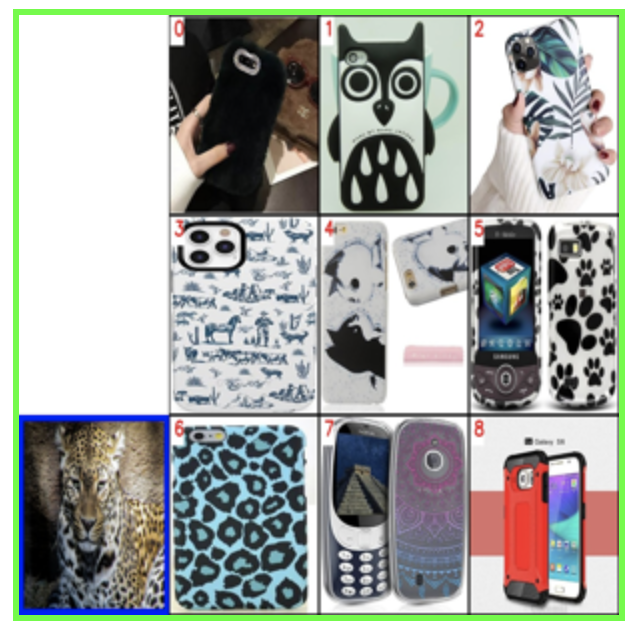 Crear una vista panorámica
2. Reordenar y explicar
Enviaremos la imagen combinada al servicio LLM multimodal junto con las indicaciones adecuadas para clasificar los resultados obtenidos con una explicación. Para habilitar GPT-4o como LLM, debes preparar tu clave API de OpenAI.
import requests
import base64

openai_api_key = "sk-***"  # Change to your OpenAI API Key


def generate_ranking_explanation(
    combined_image_path: str, caption: str, infos: dict = None
) -> tuple[list[int], str]:
    with open(combined_image_path, "rb") as image_file:
        base64_image = base64.b64encode(image_file.read()).decode("utf-8")

    information = (
        "You are responsible for ranking results for a Composed Image Retrieval. "
        "The user retrieves an image with an 'instruction' indicating their retrieval intent. "
        "For example, if the user queries a red car with the instruction 'change this car to blue,' a similar type of car in blue would be ranked higher in the results. "
        "Now you would receive instruction and query image with blue border. Every item has its red index number in its top left. Do not misunderstand it. "
        f"User instruction: {caption} \n\n"
    )

    # add additional information for each image
    if infos:
        for i, info in enumerate(infos["product"]):
            information += f"{i}. {info}\n"

    information += (
        "Provide a new ranked list of indices from most suitable to least suitable, followed by an explanation for the top 1 most suitable item only. "
        "The format of the response has to be 'Ranked list: []' with the indices in brackets as integers, followed by 'Reasons:' plus the explanation why this most fit user's query intent."
    )

    headers = {
        "Content-Type": "application/json",
        "Authorization": f"Bearer {openai_api_key}",
    }

    payload = {
        "model": "gpt-4o",
        "messages": [
            {
                "role": "user",
                "content": [
                    {"type": "text", "text": information},
                    {
                        "type": "image_url",
                        "image_url": {"url": f"data:image/jpeg;base64,{base64_image}"},
                    },
                ],
            }
        ],
        "max_tokens": 300,
    }

    response = requests.post(
        "https://api.openai.com/v1/chat/completions", headers=headers, json=payload
    )
    result = response.json()["choices"][0]["message"]["content"]

    # parse the ranked indices from the response
    start_idx = result.find("[")
    end_idx = result.find("]")
    ranked_indices_str = result[start_idx + 1 : end_idx].split(",")
    ranked_indices = [int(index.strip()) for index in ranked_indices_str]

    # extract explanation
    explanation = result[end_idx + 1 :].strip()

    return ranked_indices, explanation
Obtener los índices de las imágenes tras la clasificación y el motivo del mejor resultado:
ranked_indices, explanation = generate_ranking_explanation(
    combined_image_path, query_text
)
3. Mostrar el mejor resultado con una explicación
print(explanation)

best_index = ranked_indices[0]
best_img = Image.open(retrieved_images[best_index])
best_img = best_img.resize((150, 150))
best_img.show()
Reasons: The most suitable item for the user's query intent is index 6 because the instruction specifies a phone case with the theme of the image, which is a leopard. The phone case with index 6 has a thematic design resembling the leopard pattern, making it the closest match to the user's request for a phone case with the image theme.
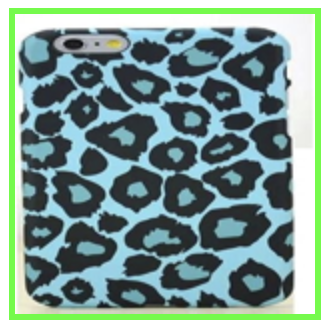 El mejor resultado
Implementación rápida
Para saber cómo iniciar una demostración en línea con este tutorial, consulta la aplicación de ejemplo.
