البحث عن الصور باستخدام PyTorch و Milvus
يقدّم هذا الدليل مثالاً على دمج PyTorch وMilvus لإجراء بحث عن الصور باستخدام التضمينات. PyTorch هو إطار عمل قوي مفتوح المصدر للتعلم العميق يستخدم على نطاق واسع لبناء ونشر نماذج التعلم الآلي. في هذا المثال، سنستفيد في هذا المثال من مكتبة Torchvision ونموذج ResNet50 المدرّب مسبقًا لتوليد متجهات (تضمينات) الميّزات التي تمثّل محتوى الصورة. سيتم تخزين هذه التضمينات في قاعدة بيانات Milvus، وهي قاعدة بيانات متجهات عالية الأداء، لتمكين البحث الفعال عن التشابه. مجموعة البيانات المستخدمة هي مجموعة بيانات مصنف الانطباعيين من Kaggle. من خلال الجمع بين إمكانات التعلّم العميق في PyTorch ووظيفة البحث القابلة للتطوير في Milvus، يوضح هذا المثال كيفية بناء نظام استرجاع صور قوي وفعال.
لنبدأ!
تثبيت المتطلبات
بالنسبة لهذا المثال، سنستخدم pymilvus للاتصال لاستخدام Milvus، torch لتشغيل نموذج التضمين، torchvision للنموذج الفعلي والمعالجة المسبقة، gdown لتنزيل مجموعة بيانات المثال و tqdm لتحميل الأشرطة.
pip install pymilvus torch gdown torchvision tqdm
الحصول على البيانات
سنستخدم gdown للاستيلاء على الملف المضغوط من Google Drive ثم فك ضغطه باستخدام مكتبة zipfile المدمجة.
import gdown
import zipfile

url = 'https://drive.google.com/uc?id=1OYDHLEy992qu5C4C8HV5uDIkOWRTAR1_'
output = './paintings.zip'
gdown.download(url, output)

with zipfile.ZipFile("./paintings.zip","r") as zip_ref:
    zip_ref.extractall("./paintings")
يبلغ حجم مجموعة البيانات 2.35 جيجابايت، ويعتمد الوقت المستغرق في تنزيلها على حالة الشبكة لديك.
الوسيطات العامة
هذه بعض الوسيطات العالمية الرئيسية التي سنستخدمها لتسهيل التتبع والتحديث.
# Milvus Setup Arguments
COLLECTION_NAME = 'image_search'  # Collection name
DIMENSION = 2048  # Embedding vector size in this example
MILVUS_HOST = "localhost"
MILVUS_PORT = "19530"

# Inference Arguments
BATCH_SIZE = 128
TOP_K = 3
إعداد ميلفوس
في هذه المرحلة، سنبدأ في إعداد ميلفوس. الخطوات كالتالي:
اتصل بمثيل ميلفوس باستخدام URI المقدم.
from pymilvus import connections

# Connect to the instance
connections.connect(host=MILVUS_HOST, port=MILVUS_PORT)
إذا كانت المجموعة موجودة بالفعل، فقم بإسقاطها.
from pymilvus import utility

# Remove any previous collections with the same name
if utility.has_collection(COLLECTION_NAME):
    utility.drop_collection(COLLECTION_NAME)
قم بإنشاء المجموعة التي تحتوي على المعرف، ومسار ملف الصورة، والتضمين الخاص بها.
from pymilvus import FieldSchema, CollectionSchema, DataType, Collection

# Create collection which includes the id, filepath of the image, and image embedding
fields = [
    FieldSchema(name='id', dtype=DataType.INT64, is_primary=True, auto_id=True),
    FieldSchema(name='filepath', dtype=DataType.VARCHAR, max_length=200),  # VARCHARS need a maximum length, so for this example they are set to 200 characters
    FieldSchema(name='image_embedding', dtype=DataType.FLOAT_VECTOR, dim=DIMENSION)
]
schema = CollectionSchema(fields=fields)
collection = Collection(name=COLLECTION_NAME, schema=schema)
إنشاء فهرس على المجموعة التي تم إنشاؤها حديثًا وتحميلها في الذاكرة.
# Create an AutoIndex index for collection
index_params = {
'metric_type':'L2',
'index_type':"IVF_FLAT",
'params':{'nlist': 16384}
}
collection.create_index(field_name="image_embedding", index_params=index_params)
collection.load()
بمجرد الانتهاء من هذه الخطوات، تصبح المجموعة جاهزة للإدراج والبحث فيها. ستتم فهرسة أي بيانات مضافة تلقائيًا وستكون متاحة للبحث فيها على الفور. إذا كانت البيانات حديثة جدًا، فقد يكون البحث أبطأ حيث سيتم استخدام البحث بالقوة الغاشمة على البيانات التي لا تزال قيد الفهرسة.
إدراج البيانات
في هذا المثال، سنستخدم في هذا المثال نموذج ResNet50 المقدم من torch ومحور النموذج الخاص به. وللحصول على التضمينات، سنقوم بإزالة طبقة التصنيف النهائية، مما يؤدي إلى أن يعطينا النموذج تضمينات ذات 2048 بُعدًا. تستخدم جميع نماذج الرؤية الموجودة على torch نفس المعالجة المسبقة التي قمنا بتضمينها هنا.
في هذه الخطوات القليلة التالية سنقوم بـ
تحميل البيانات.
import glob

# Get the filepaths of the images
paths = glob.glob('./paintings/paintings/**/*.jpg', recursive=True)
len(paths)
المعالجة المسبقة للبيانات على دفعات.
import torch

# Load the embedding model with the last layer removed
model = torch.hub.load('pytorch/vision:v0.10.0', 'resnet50', pretrained=True)
model = torch.nn.Sequential(*(list(model.children())[:-1]))
model.eval()
تضمين البيانات.
from torchvision import transforms

# Preprocessing for images
preprocess = transforms.Compose([
    transforms.Resize(256),
    transforms.CenterCrop(224),
    transforms.ToTensor(),
    transforms.Normalize(mean=[0.485, 0.456, 0.406], std=[0.229, 0.224, 0.225]),
])
إدراج البيانات.
from PIL import Image from tqdm import tqdm # Embed function that embeds the batch and inserts it def embed(data): with torch.no_grad(): output = model(torch.stack(data[0])).squeeze() collection.insert([data[1], output.tolist()]) data_batch = [[],[]] # Read the images into batches for embedding and insertion for path in tqdm(paths): im = Image.open(path).convert('RGB') data_batch[0].append(preprocess(im)) data_batch[1].append(path) if len(data_batch[0]) % BATCH_SIZE == 0: embed(data_batch) data_batch = [[],[]] # Embed and insert the remainder if len(data_batch[0]) != 0: embed(data_batch) # Call a flush to index any unsealed segments. collection.flush()- تستغرق هذه الخطوة وقتاً طويلاً نسبياً لأن التضمين يستغرق وقتاً طويلاً. خذ رشفة من القهوة واسترخِ.
- قد لا يعمل PyTorch بشكل جيد مع Python 3.9 والإصدارات السابقة. ضع في اعتبارك استخدام Python 3.10 والإصدارات الأحدث بدلاً من ذلك.
إجراء البحث
مع إدراج جميع البيانات في ميلفوس، يمكننا البدء في إجراء عمليات البحث. في هذا المثال، سنقوم بالبحث عن مثالين من الصور. نظرًا لأننا نجري بحثًا دفعيًا، يتم تقاسم وقت البحث عبر صور الدُفعة.
import glob

# Get the filepaths of the search images
search_paths = glob.glob('./paintings/test_paintings/**/*.jpg', recursive=True)
len(search_paths)
import time
from matplotlib import pyplot as plt

# Embed the search images
def embed(data):
    with torch.no_grad():
        ret = model(torch.stack(data))
        # If more than one image, use squeeze
        if len(ret) > 1:
            return ret.squeeze().tolist()
        # Squeeze would remove batch for single image, so using flatten
        else:
            return torch.flatten(ret, start_dim=1).tolist()

data_batch = [[],[]]

for path in search_paths:
    im = Image.open(path).convert('RGB')
    data_batch[0].append(preprocess(im))
    data_batch[1].append(path)

embeds = embed(data_batch[0])
start = time.time()
res = collection.search(embeds, anns_field='image_embedding', param={'nprobe': 128}, limit=TOP_K, output_fields=['filepath'])
finish = time.time()
# Show the image results
f, axarr = plt.subplots(len(data_batch[1]), TOP_K + 1, figsize=(20, 10), squeeze=False)

for hits_i, hits in enumerate(res):
    axarr[hits_i][0].imshow(Image.open(data_batch[1][hits_i]))
    axarr[hits_i][0].set_axis_off()
    axarr[hits_i][0].set_title('Search Time: ' + str(finish - start))
    for hit_i, hit in enumerate(hits):
        axarr[hits_i][hit_i + 1].imshow(Image.open(hit.entity.get('filepath')))
        axarr[hits_i][hit_i + 1].set_axis_off()
        axarr[hits_i][hit_i + 1].set_title('Distance: ' + str(hit.distance))

# Save the search result in a separate image file alongside your script.
plt.savefig('search_result.png')
يجب أن تكون صورة نتيجة البحث مشابهة لما يلي:
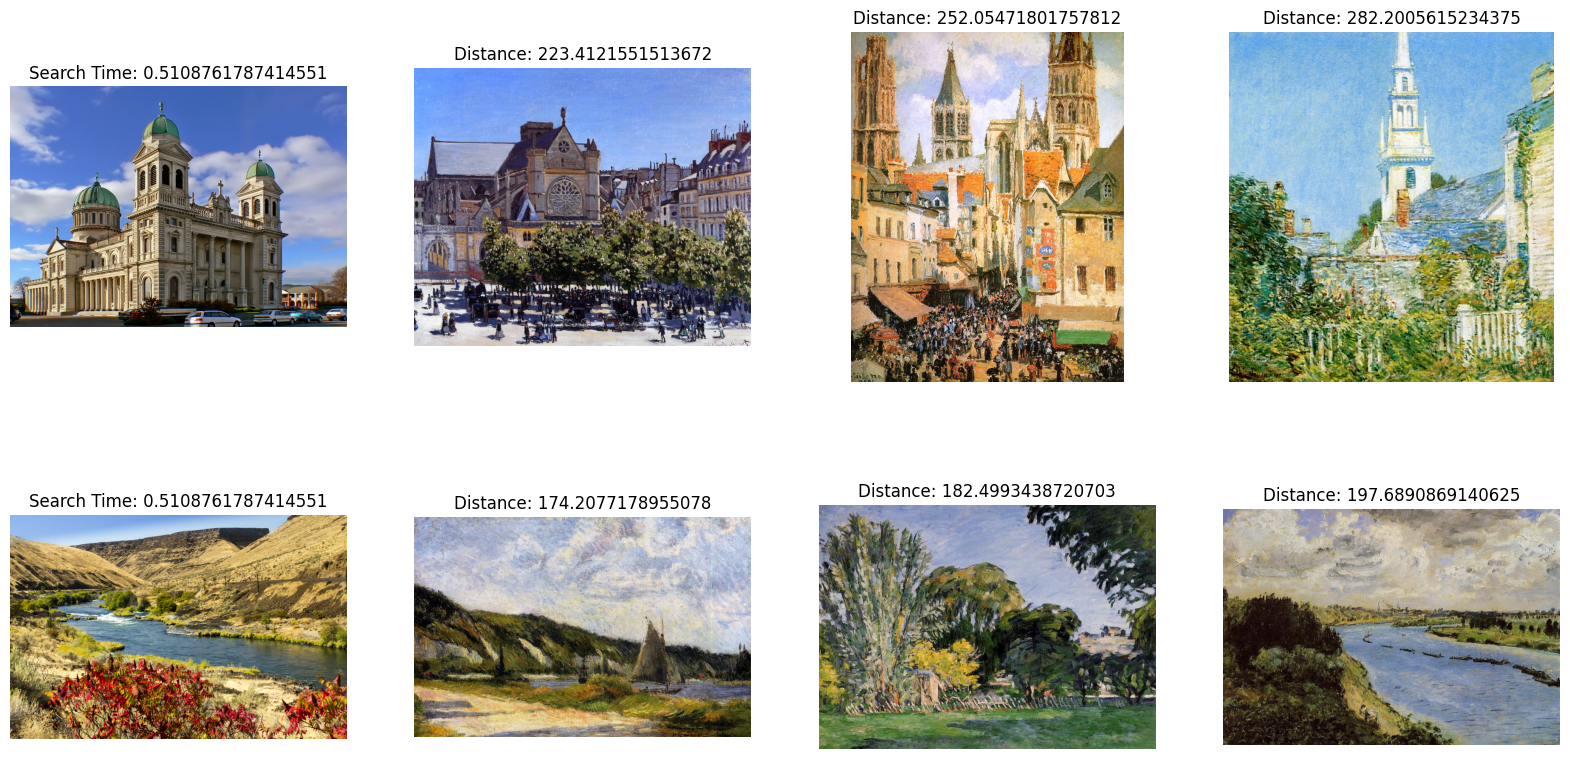 مخرجات البحث عن الصور