How to Use the Milvus Backup Tool: A Step-by-Step Guide
Milvus is an open-source, high-performance, and highly scalable vector database that can store, index, and search billion-scale unstructured data through high-dimensional vector embeddings. It is perfect for building modern AI applications such as retrieval augmented generation (RAG), semantic search, multimodal search, and recommendation systems. Milvus runs efficiently across various environments, from laptops to large-scale distributed systems. It is available as open-source software and a cloud service.
Milvus Backup is a tool for backing up and restoring Milvus data. It provides both CLI and API to accommodate different application scenarios. This guide will walk you through the process of using Milvus Backup, ensuring that you can confidently handle your backup needs.
Preparation
Before starting the backup or restore process, you need to set up your environment:
1. Download the latest binary from the Milvus-backup repository releases. Select the appropriate version for your operating system:
For macOS:
milvus-backup_Darwin_arm64.tar.gzormilvus-backup_Darwin_x86_64.tar.gzFor Linux:
milvus-backup_Linux_arm64.tar.gzormilvus-backup_Linux_x86_64.tar.gz
2. Download the configuration file from GitHub.
3. Extract the tar file to your preferred directory and place the backup.yaml in the configs/ directory within the same extracted folder. Ensure your directory structure appears as follows:
├── configs
│   └── backup.yaml
├── milvus-backup
└── README.md
Command Overview
Navigate to your terminal and familiarize yourself with the tool’s commands:
1. General Help: Type milvus-backup help to view the available commands and flags.
milvus-backup is a backup&restore tool for milvus.

Usage:
 milvus-backup [flags]
 milvus-backup [command]

Available Commands:
 check       check if the connects is right.
 create      create subcommand create a backup.
 delete      delete subcommand delete backup by name.
 get         get subcommand get backup by name.
 help        Help about any command
 list        list subcommand shows all backup in the cluster.
 restore     restore subcommand restore a backup.
 server      server subcommand start milvus-backup RESTAPI server.

Flags:
     --config string   config YAML file of milvus (default "backup.yaml")
 -h, --help            help for milvus-backup

Use "milvus-backup [command] --help" for more information about a command.
2. Creating a Backup: Get specific help for creating a backup by typing milvus-backup create --help.
Usage:
 milvus-backup create [flags]

Flags:
 -n, --name string                   backup name, if unset will generate a name automatically
 -c, --colls string                  collectionNames to backup, use ',' to connect multiple collections
 -d, --databases string              databases to backup
 -a, --database_collections string   databases and collections to backup, json format: {"db1":["c1", "c2"],"db2":[]}
 -f, --force                         force backup, will skip flush, should make sure data has been stored into disk when using it
     --meta_only                     only backup collection meta instead of data
 -h, --help                          help for create
3. Restoring a Backup: To understand how to restore a backup, use milvus-backup restore --help.
Usage:
 milvus-backup restore [flags]

Flags:
 -n, --name string                   backup name to restore
 -c, --collections string            collectionNames to restore
 -s, --suffix string                 add a suffix to collection name to restore
 -r, --rename string                 rename collections to new names, format: db1.collection1:db2.collection1_new,db1.collection2:db2.collection2_new
 -d, --databases string              databases to restore, if not set, restore all databases
 -a, --database_collections string   databases and collections to restore, json format: {"db1":["c1", "c2"],"db2":[]}
     --meta_only                     if true, restore meta only
     --restore_index                 if true, restore index
     --use_auto_index                if true, replace vector index with autoindex
     --drop_exist_collection         if true, drop existing target collection before create
     --drop_exist_index              if true, drop existing index of target collection before create
     --skip_create_collection        if true, will skip collection, use when collection exist, restore index or data
 -h, --help                          help for restore
Backup/Restore Use Cases
There are several use cases in which the milvus-backup tool can be applied effectively, depending on your specific needs and configurations:
Within a Single Milvus Instance: Copy a collection to a new one within the same Milvus service.
Between Milvus Instances in a Single S3 with One Bucket: Transfer a collection between Milvus instances with different root paths but using the same S3 bucket.
Between Milvus Instances Across Different S3 Buckets: Transfer a collection between different S3 buckets within the same S3 service.
Across Different S3 Services: Copy a collection between Milvus instances that are using different S3 services.
Let’s explore each use case in details.
Use Case 1: Backup and Restore Within One Milvus Instance
Backup and restore a collection within the same Milvus instance. Assume a collection named “coll” is backed up and restored as “coll_bak” using the same S3 bucket.
Configuration:
Milvus uses the
bucket_Afor storage.MinIO Configuration:
minio:
 address: localhost # Address of MinIO/S3
 port: 9000 # Port of MinIO/S3
 accessKeyID: minioadmin # accessKeyID of MinIO/S3
 secretAccessKey: minioadmin # MinIO/S3 encryption string
 useSSL: false # Access to MinIO/S3 with SSL
 ssl:
   tlsCACert: /path/to/public.crt # path to your CACert file, ignore when it is empty
 bucketName: bucket_A # Bucket name in MinIO/S3
 rootPath: files # The root path where the message is stored in MinIO/S3
Backup Workflow
1. Configure backup.yaml to point Milvus and MinIO to the correct locations.
# Related configuration of minio, which is responsible for data persistence for Milvus.
minio:
 # cloudProvider: "minio" # deprecated use storageType instead
 storageType: "minio" # support storage type: local, minio, s3, aws, gcp, ali(aliyun), azure, tc(tencent)
 address: localhost # Address of MinIO/S3
 port: 9000   # Port of MinIO/S3
 accessKeyID: minioadmin  # accessKeyID of MinIO/S3
 secretAccessKey: minioadmin # MinIO/S3 encryption string
 useSSL: false # Access to MinIO/S3 with SSL
 useIAM: false
 iamEndpoint: ""
 bucketName: "bucket_A" # Milvus Bucket name in MinIO/S3, make it the same as your milvus instance
 rootPath: "files" # Milvus storage root path in MinIO/S3, make it the same as your milvus instance

 # only for azure
 backupAccessKeyID: minioadmin  # accessKeyID of MinIO/S3
 backupSecretAccessKey: minioadmin # MinIO/S3 encryption string
  backupBucketName: "bucket_A" # Bucket name to store backup data. Backup data will store to backupBucketName/backupRootPath
 backupRootPath: "backup" # Rootpath to store backup data. Backup data will store to backupBucketName/backupRootPath
2. Create a backup using the command.
./milvus-backup create -c coll -n my_backup
This command places the backup in bucket_A/backup/my_backup.
3. Restore the backup to a new collection.
./milvus-backup restore -c coll -n my_backup -s _bak
This restores “coll” as “coll_bak” within the same Milvus instance.
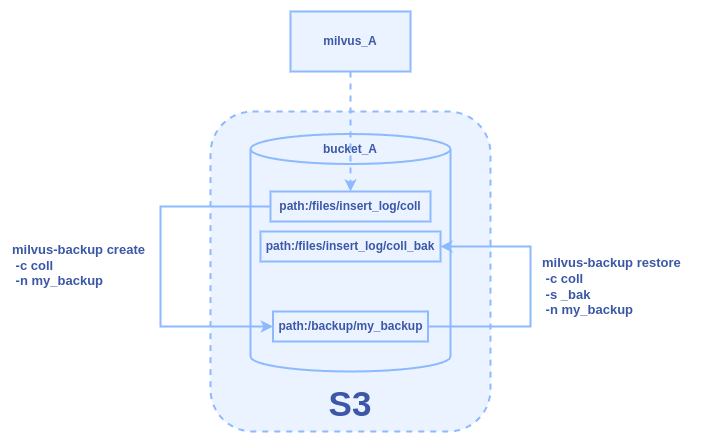 Figure: The Backup and Restore Workflow Within One Milvus Instance
Figure: The Backup and Restore Workflow Within One Milvus Instance
Use Case 2: Backup and Restore Between Two Milvus Instances Sharing One S3 Bucket
Back up a collection from one Milvus instance and restore it to another using the same S3 bucket but with different root paths. Assuming there is a collection named “coll” in the milvus_A, we back up and restore it to a new collection named “coll_bak” to milvus_B. The two Milvus instances share the same bucket “bucket_A” as storage, but they have different root paths.
Configuration
Milvus A uses
files_Aas the root path.Milvus B uses
files_Bas the root path.MinIO Configuration for Milvus A:
minio:
 address: localhost # Address of MinIO/S3
 port: 9000 # Port of MinIO/S3
 accessKeyID: minioadmin # accessKeyID of MinIO/S3
 secretAccessKey: minioadmin # MinIO/S3 encryption string
 useSSL: false # Access to MinIO/S3 with SSL
 ssl:
   tlsCACert: /path/to/public.crt # path to your CACert file, ignore when it is empty
 bucketName: bucket_A # Bucket name in MinIO/S3
 rootPath: files_A # The root path where the message is stored in MinIO/S3
- MinIO Configuration for Milvus B:
minio:
 address: localhost # Address of MinIO/S3
 port: 9000 # Port of MinIO/S3
 accessKeyID: minioadmin # accessKeyID of MinIO/S3
 secretAccessKey: minioadmin # MinIO/S3 encryption string
 useSSL: false # Access to MinIO/S3 with SSL
 ssl:
   tlsCACert: /path/to/public.crt # path to your CACert file, ignore when it is empty
 bucketName: bucket_A # Bucket name in MinIO/S3
 rootPath: files_B # The root path where the message is stored in MinIO/S3
Backup Workflow
1. Backup Configuration for Milvus A
# milvus proxy address, compatible to milvus.yaml
milvus:
 address: milvus_A
 port: 19530
 authorizationEnabled: false
 # tls mode values [0, 1, 2]
 # 0 is close, 1 is one-way authentication, 2 is two-way authentication.
 tlsMode: 0
 user: "root"
 password: "Milvus"
 # Related configuration of minio, which is responsible for data persistence for Milvus.
minio:
 # cloudProvider: "minio" # deprecated use storageType instead
 storageType: "minio" # support storage type: local, minio, s3, aws, gcp, ali(aliyun), azure, tc(tencent)
 address: milvus_A # Address of MinIO/S3
 port: 9000   # Port of MinIO/S3
 accessKeyID: minioadmin  # accessKeyID of MinIO/S3
 secretAccessKey: minioadmin # MinIO/S3 encryption string
 useSSL: false # Access to MinIO/S3 with SSL
 useIAM: false
 iamEndpoint: ""
 bucketName: "bucket_A" # Milvus Bucket name in MinIO/S3, make it the same as your milvus instance
 rootPath: "files_A" # Milvus storage root path in MinIO/S3, make it the same as your milvus instance

 # only for azure
 backupAccessKeyID: minioadmin  # accessKeyID of MinIO/S3
 backupSecretAccessKey: minioadmin # MinIO/S3 encryption string
 backupBucketName: "bucket_A" # Bucket name to store backup data. Backup data will store to backupBucketName/backupRootPath
 backupRootPath: "backup" # Rootpath to store backup data. Backup data will store to backupBucketName/backupRootPath
2. Execute the backup command:
./milvus-backup create -c coll -n my_backup
3. Restore Configuration for Milvus B
Modify backup.yaml to point to Milvus B and adjust the MinIO root path:
# milvus proxy address, compatible to milvus.yaml
milvus:
 address: milvus_B
 port: 19530
 authorizationEnabled: false
 # tls mode values [0, 1, 2]
 # 0 is close, 1 is one-way authentication, 2 is two-way authentication.
 tlsMode: 0
 user: "root"
 password: "Milvus"
 # Related configuration of minio, which is responsible for data persistence for Milvus.
minio:
 # cloudProvider: "minio" # deprecated use storageType instead
 storageType: "minio" # support storage type: local, minio, s3, aws, gcp, ali(aliyun), azure, tc(tencent)
  address: milvus_B # Address of MinIO/S3
 port: 9000   # Port of MinIO/S3
 accessKeyID: minioadmin  # accessKeyID of MinIO/S3
 secretAccessKey: minioadmin # MinIO/S3 encryption string
 useSSL: false # Access to MinIO/S3 with SSL
 useIAM: false
 iamEndpoint: ""
 bucketName: "bucket_A" # Milvus Bucket name in MinIO/S3, make it the same as your milvus instance
 rootPath: "files_B" # Milvus storage root path in MinIO/S3, make it the same as your milvus instance

 # only for azure
 backupAccessKeyID: minioadmin  # accessKeyID of MinIO/S3
 backupSecretAccessKey: minioadmin # MinIO/S3 encryption string
 backupBucketName: "bucket_A" # Bucket name to store backup data. Backup data will store to backupBucketName/backupRootPath
 backupRootPath: "backup" # Rootpath to store backup data. Backup data will store to backupBucketName/backupRootPath
4. Execute the restore command:
./milvus-backup restore -c coll -n my_backup -s _bak
 Figure: The Backup and Restore Workflow Between Two Milvus Instances Sharing One S3 Bucket
Use Case 3: Backup and Restore Between Two Milvus Instances in One S3, Different Buckets
Backup a collection from a Milvus instance (Milvus_A) and restore it to another Milvus instance (Milvus_B) within the same S3 service but using different buckets.
Configuration:
Milvus uses the
bucket_Afor storage.MinIO Configuration for Milvus A:
minio:
 address: localhost # Address of MinIO/S3
 port: 9000 # Port of MinIO/S3
 accessKeyID: minioadmin # accessKeyID of MinIO/S3
 secretAccessKey: minioadmin # MinIO/S3 encryption string
 useSSL: false # Access to MinIO/S3 with SSL
 ssl:
   tlsCACert: /path/to/public.crt # path to your CACert file, ignore when it is empty
 bucketName: bucket_A # Bucket name in MinIO/S3
 rootPath: files # The root path where the message is stored in MinIO/S3
- MinIO Configuration for Milvus B:
minio:
 address: localhost # Address of MinIO/S3
 port: 9000 # Port of MinIO/S3
 accessKeyID: minioadmin # accessKeyID of MinIO/S3
 secretAccessKey: minioadmin # MinIO/S3 encryption string
 useSSL: false # Access to MinIO/S3 with SSL
 ssl:
   tlsCACert: /path/to/public.crt # path to your CACert file, ignore when it is empty
 bucketName: bucket_B # Bucket name in MinIO/S3
 rootPath: files # The root path where the message is stored in MinIO/S3
Backup and Restore Workflow
1. Backup Configuration for Milvus A
# milvus proxy address, compatible to milvus.yaml
milvus:
 address: milvus_A
 port: 19530
 authorizationEnabled: false
 # tls mode values [0, 1, 2]
 # 0 is close, 1 is one-way authentication, 2 is two-way authentication.
 tlsMode: 0
 user: "root"
 password: "Milvus"
 # Related configuration of minio, which is responsible for data persistence for Milvus.
minio:
 # cloudProvider: "minio" # deprecated use storageType instead
 storageType: "minio" # support storage type: local, minio, s3, aws, gcp, ali(aliyun), azure, tc(tencent)
 address: localhost # Address of MinIO/S3
 port: 9000   # Port of MinIO/S3
 accessKeyID: minioadmin  # accessKeyID of MinIO/S3
 secretAccessKey: minioadmin # MinIO/S3 encryption string
 useSSL: false # Access to MinIO/S3 with SSL
 useIAM: false
 iamEndpoint: ""
 bucketName: "bucket_A" # Milvus Bucket name in MinIO/S3, make it the same as your milvus instance
 rootPath: "files" # Milvus storage root path in MinIO/S3, make it the same as your milvus instance

 # only for azure
 backupAccessKeyID: minioadmin  # accessKeyID of MinIO/S3
 backupSecretAccessKey: minioadmin # MinIO/S3 encryption string
 backupBucketName: "bucket_B" # Bucket name to store backup data. Backup data will store to backupBucketName/backupRootPath
 backupRootPath: "backup" # Rootpath to store backup data. Backup data will store to backupBucketName/backupRootPath
2. Execute the backup command:
./milvus-backup create -c coll -n my_backup
3. Restore Configuration for Milvus B
# milvus proxy address, compatible to milvus.yaml
milvus:
 address: milvus_B
 port: 19530
 authorizationEnabled: false
 # tls mode values [0, 1, 2]
 # 0 is close, 1 is one-way authentication, 2 is two-way authentication.
 tlsMode: 0
 user: "root"
 password: "Milvus"
 # Related configuration of minio, which is responsible for data persistence for Milvus.
minio:
 # cloudProvider: "minio" # deprecated use storageType instead
 storageType: "minio" # support storage type: local, minio, s3, aws, gcp, ali(aliyun), azure, tc(tencent)
  address: localhost # Address of MinIO/S3
 port: 9000   # Port of MinIO/S3
 accessKeyID: minioadmin  # accessKeyID of MinIO/S3
 secretAccessKey: minioadmin # MinIO/S3 encryption string
 useSSL: false # Access to MinIO/S3 with SSL
 useIAM: false
 iamEndpoint: ""
 bucketName: "bucket_B" # Milvus Bucket name in MinIO/S3, make it the same as your milvus instance
 rootPath: "files" # Milvus storage root path in MinIO/S3, make it the same as your milvus instance

 # only for azure
 backupAccessKeyID: minioadmin  # accessKeyID of MinIO/S3
 backupSecretAccessKey: minioadmin # MinIO/S3 encryption string
  backupBucketName: "bucket_B" # Bucket name to store backup data. Backup data will store to backupBucketName/backupRootPath
 backupRootPath: "backup" # Rootpath to store backup data. Backup data will store to backupBucketName/backupRootPath
4. Execute the restore command:
./milvus-backup restore -c coll -n my_backup -s _bak
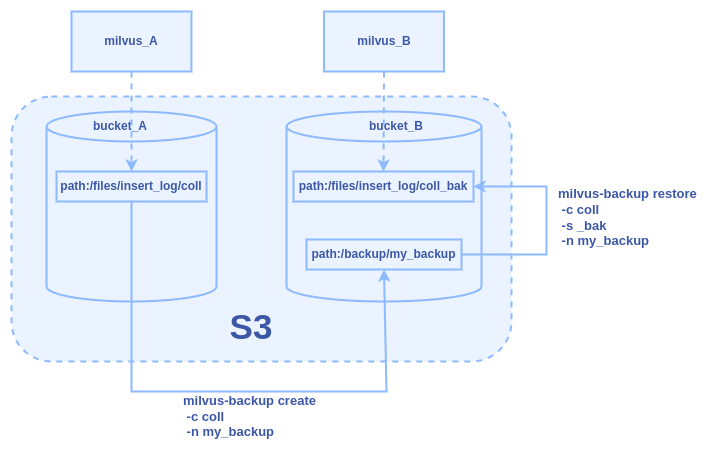 Figure: The Backup and Restore Workflow Between Two Milvus Instances in One S3, Different Buckets
Figure: The Backup and Restore Workflow Between Two Milvus Instances in One S3, Different Buckets
Use Case 4: Backup and Restore Between Two Milvus Instances Across Different S3 Services
To facilitate the backup of a collection named “coll” from Milvus_A using one S3 service (MinIO_A) and restore it into Milvus_B using a different S3 service (MinIO_B), with each instance utilizing different storage buckets.
Configuration
- MinIO Configuration for Milvus A:
minio:
 address: minio_A # Address of MinIO/S3
 port: 9000 # Port of MinIO/S3
 accessKeyID: minioadmin # accessKeyID of MinIO/S3
 secretAccessKey: minioadmin # MinIO/S3 encryption string
 useSSL: false # Access to MinIO/S3 with SSL
 ssl:
   tlsCACert: /path/to/public.crt # path to your CACert file, ignore when it is empty
 bucketName: bucket_A # Bucket name in MinIO/S3
 rootPath: files # The root path where the message is stored in MinIO/S3
- MinIO Configuration for Milvus B
 minio:
 address: minio_B # Address of MinIO/S3
 port: 9000 # Port of MinIO/S3
 accessKeyID: minioadmin # accessKeyID of MinIO/S3
 secretAccessKey: minioadmin # MinIO/S3 encryption string
 useSSL: false # Access to MinIO/S3 with SSL
 ssl:
   tlsCACert: /path/to/public.crt # path to your CACert file, ignore when it is empty
 bucketName: bucket_B # Bucket name in MinIO/S3
 rootPath: files # The root path where the message is stored in MinIO/S3
Backup and Restore Workflow
1. Backup Configuration for Milvus A
# milvus proxy address, compatible to milvus.yaml
milvus:
 address: milvus_A
 port: 19530
 authorizationEnabled: false
 # tls mode values [0, 1, 2]
 # 0 is close, 1 is one-way authentication, 2 is two-way authentication.
 tlsMode: 0
 user: "root"
 password: "Milvus"
 # Related configuration of minio, which is responsible for data persistence for Milvus.
minio:
 # cloudProvider: "minio" # deprecated use storageType instead
 storageType: "minio" # support storage type: local, minio, s3, aws, gcp, ali(aliyun), azure, tc(tencent)
 address: minio_A # Address of MinIO/S3
 port: 9000   # Port of MinIO/S3
 accessKeyID: minioadmin  # accessKeyID of MinIO/S3
 secretAccessKey: minioadmin # MinIO/S3 encryption string
 useSSL: false # Access to MinIO/S3 with SSL
 useIAM: false
 iamEndpoint: ""
 bucketName: "bucket_A" # Milvus Bucket name in MinIO/S3, make it the same as your milvus instance
 rootPath: "files" # Milvus storage root path in MinIO/S3, make it the same as your milvus instance

 # only for azure
 backupAccessKeyID: minioadmin  # accessKeyID of MinIO/S3
 backupSecretAccessKey: minioadmin # MinIO/S3 encryption string
 backupBucketName: "bucket_A" # Bucket name to store backup data. Backup data will store to backupBucketName/backupRootPath
 backupRootPath: "backup" # Rootpath to store backup data. Backup data will store to backupBucketName/backupRootPath
2. Execute the backup command:
./milvus-backup create -c coll -n my_backup
3. Transfer the Backup
Manually copy the backup from minio_A:bucket_A/backup/my_backup to minio_B:bucket_B/backup/my_backup using an S3 compatible tool or SDK.
4. Restore Configuration for Milvus B
# milvus proxy address, compatible to milvus.yaml
milvus:
 address: milvus_B
 port: 19530
 authorizationEnabled: false
 # tls mode values [0, 1, 2]
 # 0 is close, 1 is one-way authentication, 2 is two-way authentication.
 tlsMode: 0
 user: "root"
 password: "Milvus"
 # Related configuration of minio, which is responsible for data persistence for Milvus.
minio:
 # cloudProvider: "minio" # deprecated use storageType instead
 storageType: "minio" # support storage type: local, minio, s3, aws, gcp, ali(aliyun), azure, tc(tencent)
 address: minio_B # Address of MinIO/S3
 port: 9000   # Port of MinIO/S3
 accessKeyID: minioadmin  # accessKeyID of MinIO/S3
 secretAccessKey: minioadmin # MinIO/S3 encryption string
 useSSL: false # Access to MinIO/S3 with SSL
 useIAM: false
 iamEndpoint: ""
 bucketName: "bucket_B" # Milvus Bucket name in MinIO/S3, make it the same as your milvus instance
 rootPath: "files" # Milvus storage root path in MinIO/S3, make it the same as your milvus instance

 # only for azure
 backupAccessKeyID: minioadmin  # accessKeyID of MinIO/S3
 backupSecretAccessKey: minioadmin # MinIO/S3 encryption string
 backupBucketName: "bucket_B" # Bucket name to store backup data. Backup data will store to backupBucketName/backupRootPath
 backupRootPath: "backup" # Rootpath to store backup data. Backup data will store to backupBucketName/backupRootPath
5. Execute the restore command:
./milvus-backup restore -c coll -n my_backup -s _bak
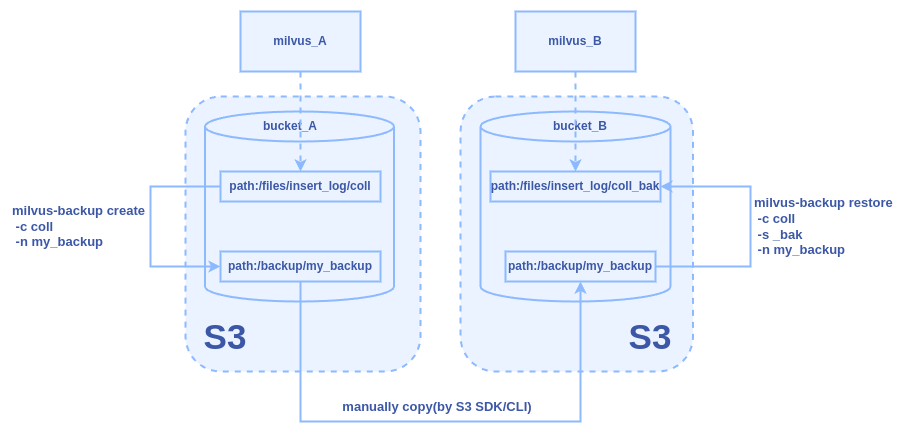 Figure: The Backup and Restore Workflow Between Two Milvus Instances Across Different S3 Services
Figure: The Backup and Restore Workflow Between Two Milvus Instances Across Different S3 Services
Configuration File Explanation
Edit the configs/backup.yaml file to tailor the backup settings to your environment. Here’s a breakdown of the configuration options:
Logging: Configure logging levels and output preferences.
# Configures the system log output.
log:
 level: info # Only supports debug, info, warn, error, panic, or fatal. Default 'info'.
 console: true # whether print log to console
 file:
   rootPath: "logs/backup.log"
Milvus Connection: Set the connection details for your Milvus instance.
# milvus proxy address, compatible to milvus.yaml
milvus:
 address: localhost
 port: 19530
 authorizationEnabled: false
 # tls mode values [0, 1, 2]
 # 0 is close, 1 is one-way authentication, 2 is two-way authentication.
 tlsMode: 0
 user: "root"
 password: "Milvus"
MinIO Configuration: Define how backups interact with MinIO or other S3-compatible storage.
# Related configuration of minio, which is responsible for data persistence for Milvus.
minio:
 # cloudProvider: "minio" # deprecated use storageType instead
 storageType: "minio" # support storage type: local, minio, s3, aws, gcp, ali(aliyun), azure, tc(tencent)
 address: localhost # Address of MinIO/S3
 port: 9000   # Port of MinIO/S3
 accessKeyID: minioadmin  # accessKeyID of MinIO/S3
 secretAccessKey: minioadmin # MinIO/S3 encryption string
 useSSL: false # Access to MinIO/S3 with SSL
 useIAM: false
 iamEndpoint: ""
 bucketName: "a-bucket" # Milvus Bucket name in MinIO/S3, make it the same as your milvus instance
 rootPath: "files" # Milvus storage root path in MinIO/S3, make it the same as your milvus instance

 # only for azure
 backupAccessKeyID: minioadmin  # accessKeyID of MinIO/S3
 backupSecretAccessKey: minioadmin # MinIO/S3 encryption string
 backupBucketName: "a-bucket" # Bucket name to store backup data. Backup data will store to backupBucketName/backupRootPath
 backupRootPath: "backup" # Rootpath to store backup data. Backup data will store to backupBucketName/backupRootPath
Conclusion
The Milvus Backup tool provides a robust solution for backing up and restoring collections within and across Milvus instances. Whether you’re managing backups within a single instance, between instances in the same S3 service, or across different S3 services, milvus-backup handles it all with flexibility and precision.
Key Takeaways
Versatility: Milvus-backup supports multiple scenarios, from simple intra-instance backups to complex cross-service restorations.
Configuration Flexibility: By configuring the
backup.yamlfile appropriately, users can customize the backup and restore processes to fit specific needs, accommodating different storage setups and network configurations.Security and Control: Direct manipulation of S3 buckets and paths allows for control over data storage and security, ensuring backups are both safe and accessible only to authorized users.
Effective data management is crucial for leveraging Milvus’s full potential in your applications. By mastering the Milvus backup tool, you can ensure data durability and availability, even in complex distributed environments. This guide empowers users to implement robust backup strategies, promoting best practices and efficient data handling techniques.
Whether you’re a developer, a data engineer, or an IT professional, understanding and utilizing the Milvus-backup tool can significantly contribute to your project’s success by providing reliable and efficient data management solutions.
- Preparation
- Command Overview
- Backup/Restore Use Cases
- Use Case 1: Backup and Restore Within One Milvus Instance
- Configuration:
- Backup Workflow
- Use Case 2: Backup and Restore Between Two Milvus Instances Sharing One S3 Bucket
- Configuration
- Backup Workflow
- Use Case 3: Backup and Restore Between Two Milvus Instances in One S3, Different Buckets
- Configuration:
- Backup and Restore Workflow
- Use Case 4: Backup and Restore Between Two Milvus Instances Across Different S3 Services
- Configuration
- Backup and Restore Workflow
- Configuration File Explanation
- Conclusion
- Key Takeaways
On This Page
Try Managed Milvus for Free
Zilliz Cloud is hassle-free, powered by Milvus and 10x faster.
Get StartedLike the article? Spread the word