Stop Your AI Assistant from Writing Outdated Code with Milvus SDK Code Helper
Introduction
Vibe Coding is transforming how we write software. Tools like Cursor and Windsurf are making development feel effortless and intuitive—ask for a function and get a snippet, need a quick API call, and it’s generated before you finish typing. The promise is smooth, seamless development where your AI assistant anticipates your needs and delivers exactly what you want.
But there’s a critical flaw breaking this beautiful flow: AI assistants frequently generate outdated code that breaks in production.
Consider this example: I asked Cursor to generate Milvus connection code, and it produced this:
connections.connect("default", host="localhost", port="19530")
This used to work perfectly, but the current pymilvus SDK recommends using MilvusClient for all connections and operations. The old method is no longer considered best practice, yet AI assistants continue to suggest it because their training data is often months or years out of date.
Despite all the progress in Vibe Coding tools, developers still spend significant time bridging the “last mile” between generated code and production-ready solutions. The vibe is there, but the accuracy isn’t.
What is the Milvus SDK Code Helper?
The Milvus SDK Code Helper is a developer-focused solution that solves the “last mile” problem in Vibe Coding—bridging the gap between AI-assisted coding and production-ready Milvus applications.
At its core, it’s a Model Context Protocol (MCP) server that connects your AI-powered IDE directly to the latest official Milvus documentation. Combined with Retrieval-Augmented Generation (RAG), it ensures the code your assistant generates is always accurate, up-to-date, and aligned with the Milvus best practices.
Instead of outdated snippets or guesswork, you get context-aware, standards-compliant code suggestions—right inside your development workflow.
Key Benefits:
⚡ Configure once, boost efficiency forever: Set it up once and enjoy consistently updated code generation
🎯 Always current: Access to the latest official Milvus SDK documentation
📈 Improved code quality: Generate code that follows current best practices
🌊 Restored flow: Keep your Vibe Coding experience smooth and uninterrupted
Three Tools in One
pymilvus-code-generator→ Quickly write Python code for common Milvus tasks (e.g., creating collections, inserting data, running vector searches).orm-client-code-converter→ Modernize legacy Python code by replacing outdated ORM patterns with the latestMilvusClientsyntax.language-translator→ Seamlessly convert Milvus SDK code between languages (e.g., Python ↔ TypeScript).
Check the resources below for more details:
Before You Begin
Before diving into the setup process, let’s examine the dramatic difference the Code Helper makes in practice. The comparison below shows how the same request for creating a Milvus collection produces completely different results:
| MCP Code Helper Enabled: | MCP Code Helper Disabled: |
|---|---|
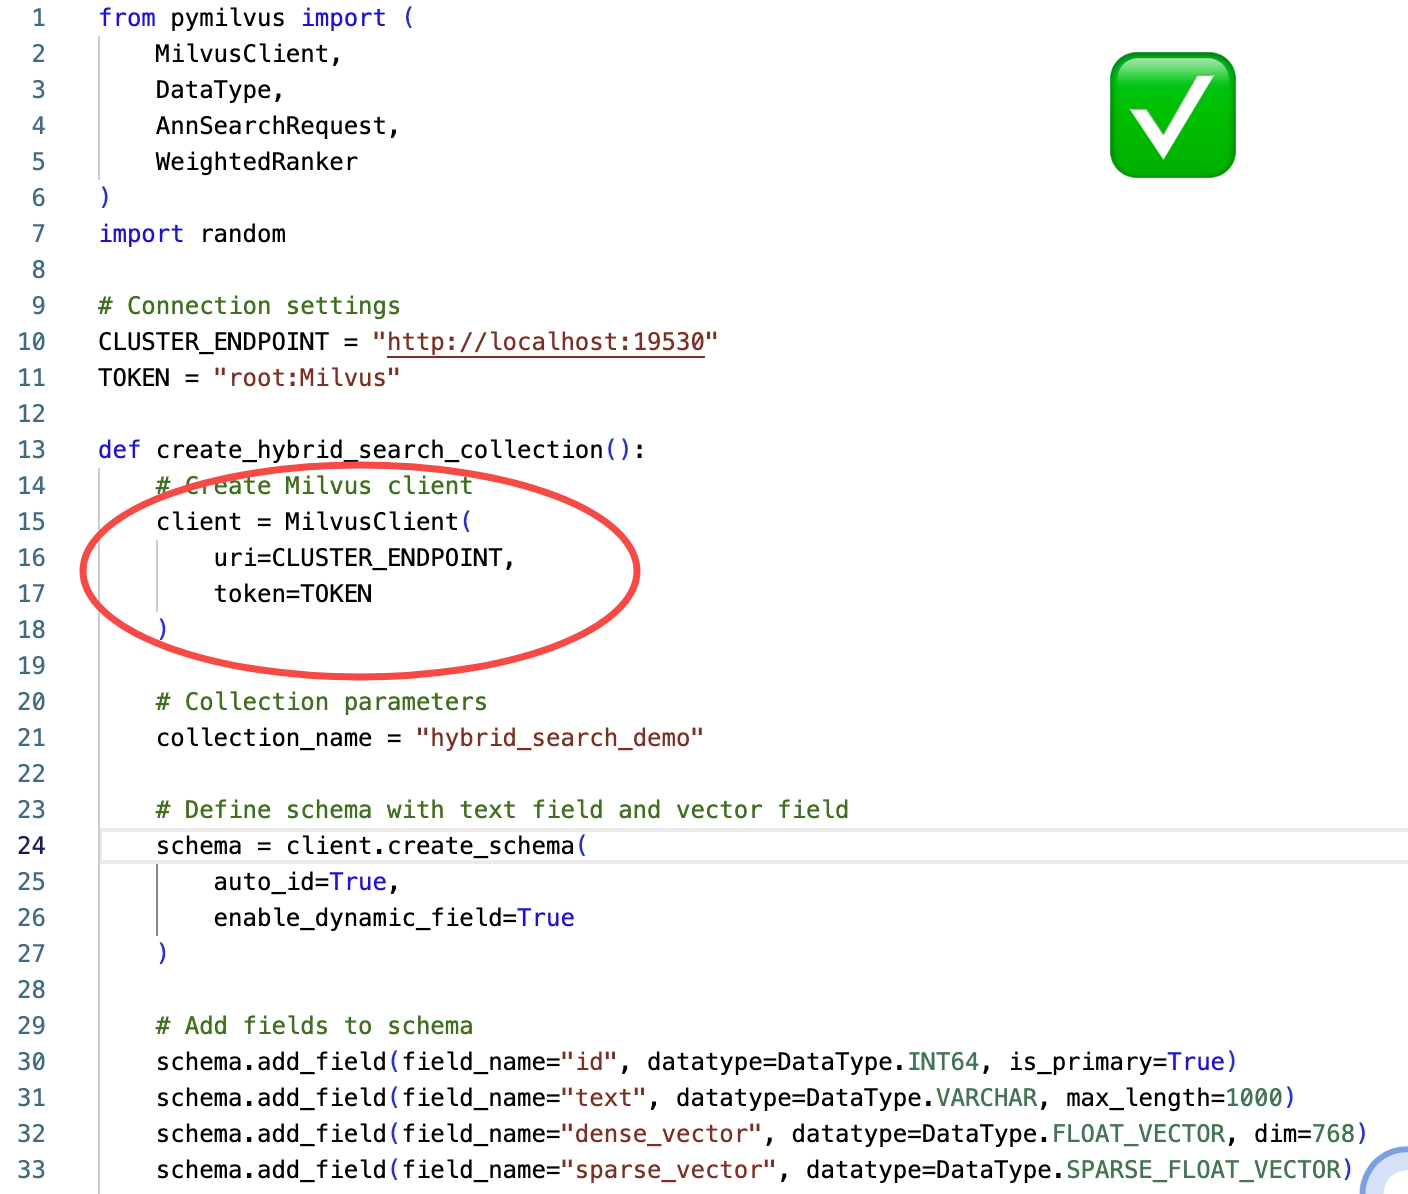
|
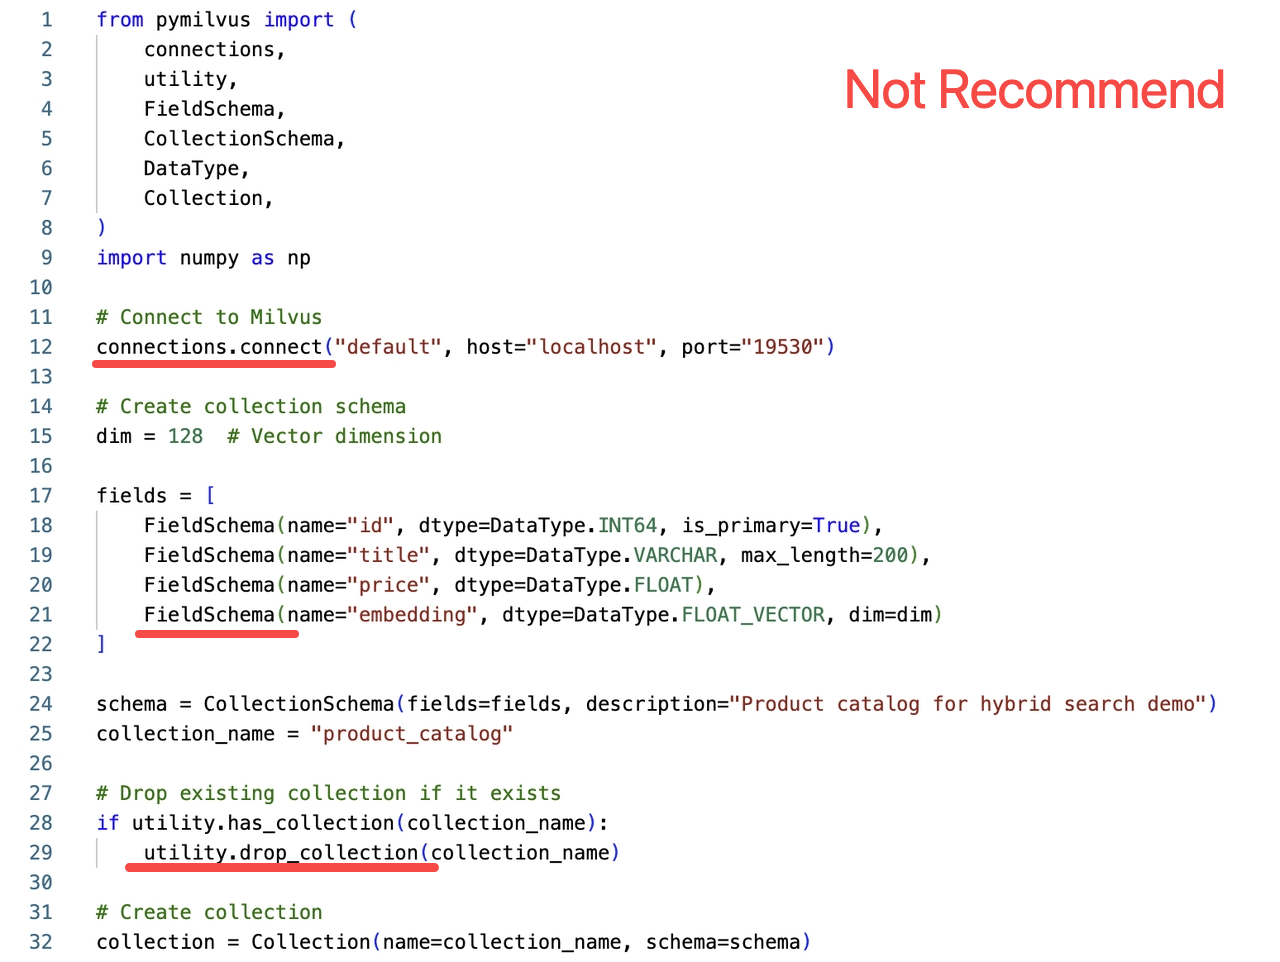
|
This perfectly illustrates the core problem: without the Code Helper, even the most advanced AI assistants generate code using outdated ORM SDK patterns that are no longer recommended. The Code Helper ensures you get the most current, efficient, and officially endorsed implementation every time.
The Difference in Practice:
Modern approach: Clean, maintainable code using current best practices
Deprecated approach: Code that works but follows outdated patterns
Production impact: Current code is more efficient, easier to maintain, and future-proof
This guide will walk you through setting up the Milvus SDK Code Helper across multiple AI IDEs and development environments. The setup process is straightforward and typically takes just a few minutes per IDE.
Setting Up the Milvus SDK Code Helper
The following sections provide detailed setup instructions for each supported IDE and development environment. Choose the section that corresponds to your preferred development setup.
Cursor IDE Setup
Cursor offers seamless integration with MCP servers through its built-in configuration system.
Step 1: Access MCP Settings
Navigate to: Settings → Cursor Settings → Tools & Integrations → Add new global MCP server
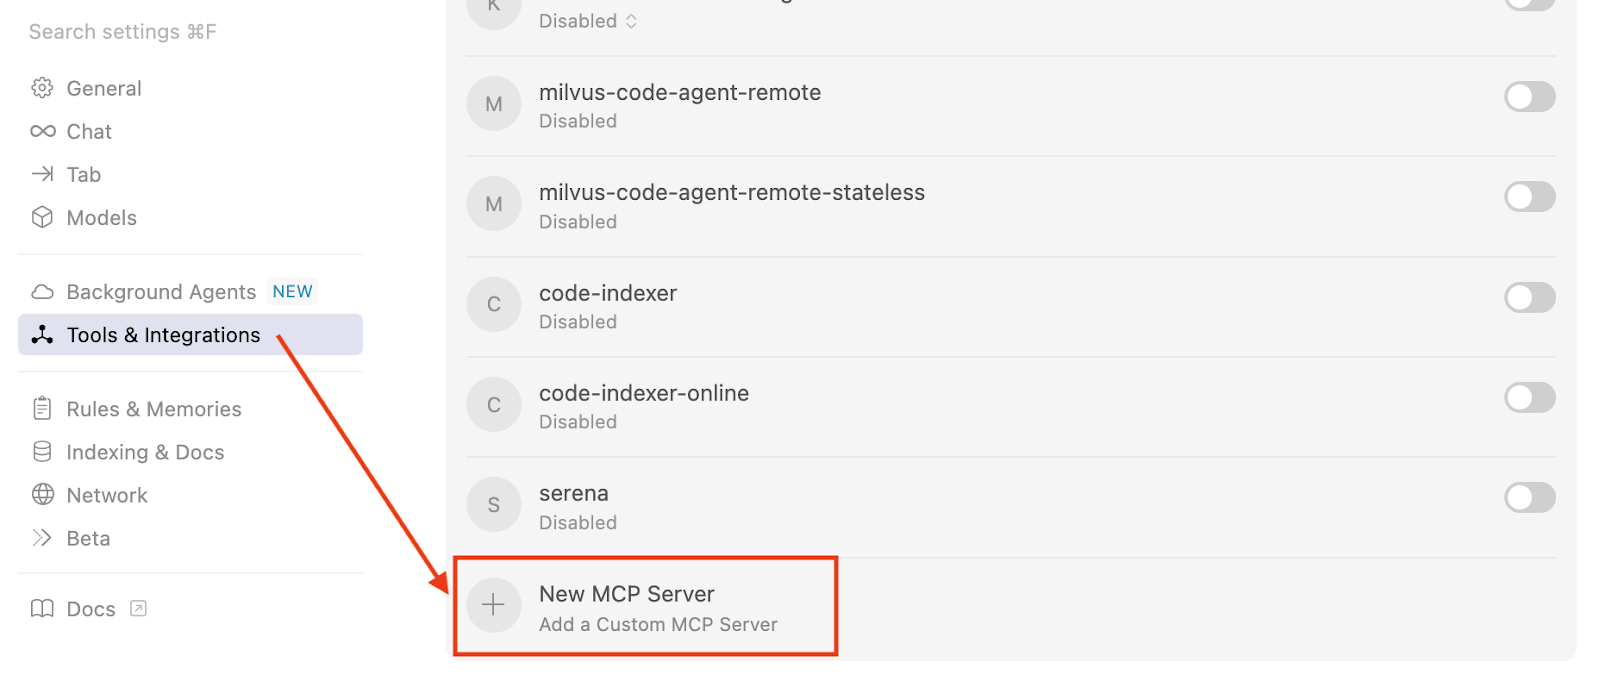 Cursor MCP configuration interface
Step 2: Configure the MCP Server
You have two options for configuration:
Option A: Global Configuration (Recommended)
Add the following configuration to your Cursor ~/.cursor/mcp.json file:
{
  "mcpServers": {
    "sdk-code-helper": {
      "url": "https://sdk.milvus.io/mcp/",
      "headers": {
        "Accept": "text/event-stream"
      }
    }
  }
}
Option B: Project-Specific Configuration
Create a .cursor/mcp.json file in your project folder with the same configuration above.
For additional configuration options and troubleshooting, refer to the Cursor MCP documentation.
Claude Desktop Setup
Claude Desktop provides straightforward MCP integration through its configuration system.
Step 1: Locate Configuration File
Add the following configuration to your Claude Desktop configuration file:
{
  "mcpServers": {
    "sdk-code-helper": {
      "url": "https://sdk.milvus.io/mcp/",
      "headers": {
        "Accept": "text/event-stream"
      }
    }
  }
}
Step 2: Restart Claude Desktop
After saving the configuration, restart Claude Desktop to activate the new MCP server.
Claude Code Setup
Claude Code offers command-line configuration for MCP servers, making it ideal for developers who prefer terminal-based setup.
Step 1: Add MCP Server via Command Line
Execute the following command in your terminal:
claude mcp add-json sdk-code-helper --json '{
  "url": "https://sdk.milvus.io/mcp/",
  "headers": {
    "Accept": "text/event-stream"
  }
}
Step 2: Verify Installation
The MCP server will be automatically configured and ready for use immediately after running the command.
Windsurf IDE Setup
Windsurf supports MCP configuration through its JSON-based settings system.
Step 1: Access MCP Settings
Add the following configuration to your Windsurf MCP settings file:
{
  "mcpServers": {
    "sdk-code-helper": {
      "url": "https://sdk.milvus.io/mcp/",
      "headers": {
        "Accept": "text/event-stream"
      }
    }
  }
}
Step 2: Apply Configuration
Save the settings file and restart Windsurf to activate the MCP server.
VS Code Setup
VS Code integration requires an MCP-compatible extension to function properly.
Step 1: Install MCP Extension
Ensure you have an MCP-compatible extension installed in VS Code.
Step 2: Configure MCP Server
Add the following configuration to your VS Code MCP settings:
{
  "mcpServers": {
    "sdk-code-helper": {
      "url": "https://sdk.milvus.io/mcp/",
      "headers": {
        "Accept": "text/event-stream"
      }
    }
  }
}
Cherry Studio Setup
Cherry Studio provides a user-friendly graphical interface for MCP server configuration, making it accessible for developers who prefer visual setup processes.
Step 1: Access MCP Server Settings
Navigate to Settings → MCP Servers → Add Server through the Cherry Studio interface.
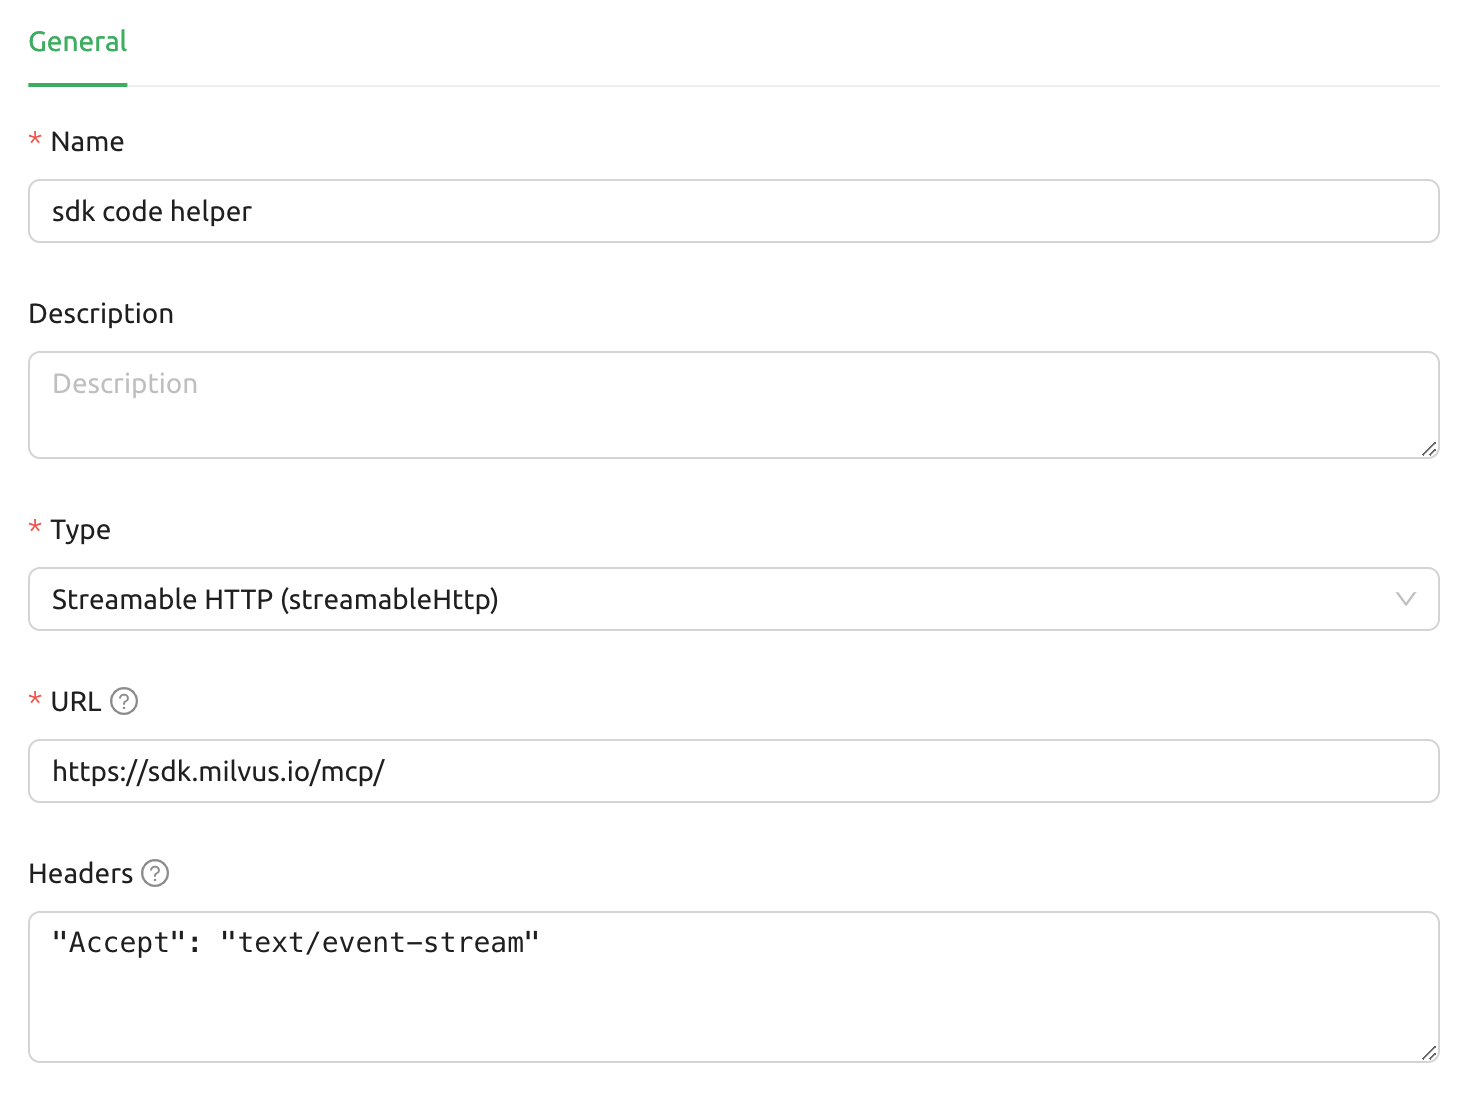
Step 2: Configure Server Details
Fill in the server configuration form with the following information:
Name:
sdk code helperType:
Streamable HTTPURL:
https://sdk.milvus.io/mcp/Headers:
"Accept": "text/event-stream"
Step 3: Save and Activate
Click Save to activate the server configuration.
Cherry Studio MCP configuration interface
Cline Setup
Cline uses a JSON-based configuration system accessible through its interface.
Step 1: Access MCP Settings
Open Cline and click on the MCP Servers icon in the top navigation bar
Select the Installed tab
Click Advanced MCP Settings
Step 2: Edit Configuration File In the cline_mcp_settings.json file, add the following configuration:
{
  "mcpServers": {
    "sdk-code-helper": {
      "url": "https://sdk.milvus.io/mcp/",
      "headers": {
        "Accept": "text/event-stream"
      }
    }
  }
}
Step 3: Save and Restart
Save the configuration file and restart Cline to apply the changes.
Augment Setup
Augment provides access to MCP configuration through its advanced settings panel.
Step 1: Access Settings
Press Cmd/Ctrl + Shift + P or navigate to the hamburger menu in the Augment panel
Select Edit Settings
Under Advanced, click Edit in settings.json
Step 2: Add Server Configuration
Add the server configuration to the mcpServers array in the augment.advanced object:
{
  "mcpServers": {
    "sdk-code-helper": {
      "url": "https://sdk.milvus.io/mcp/",
      "headers": {
        "Accept": "text/event-stream"
      }
    }
  }
}
Gemini CLI Setup
Gemini CLI requires manual configuration through a JSON settings file.
Step 1: Create or Edit Settings File
Create or edit the ~/.gemini/settings.json file on your system.
Step 2: Add Configuration
Insert the following configuration into the settings file:
{
  "mcpServers": {
    "sdk-code-helper": {
      "url": "https://sdk.milvus.io/mcp/",
      "headers": {
        "Accept": "text/event-stream"
      }
    }
  }
}
Step 3: Apply Changes
Save the file and restart Gemini CLI to apply the configuration changes.
Roo Code Setup
Roo Code utilizes a centralized JSON configuration file for managing MCP servers.
Step 1: Access Global Configuration
Open Roo Code
Navigate to Settings → MCP Servers → Edit Global Config
Step 2: Edit Configuration File
In the mcp_settings.json file, add the following configuration:
{
  "mcpServers": {
    "sdk-code-helper": {
      "url": "https://sdk.milvus.io/mcp/",
      "headers": {
        "Accept": "text/event-stream"
      }
    }
  }
}
Step 3: Activate Server
Save the file to automatically activate the MCP server.
Verification and Testing
After completing the setup for your chosen IDE, you can verify that the Milvus SDK Code Helper is working correctly by:
Testing Code Generation: Ask your AI assistant to generate Milvus-related code and observe whether it uses current best practices
Checking Documentation Access: Request information about specific Milvus features to ensure the helper is providing up-to-date responses
Comparing Results: Generate the same code request with and without the helper to see the difference in quality and currentness
Conclusion
By setting up the Milvus SDK Code Helper, you’ve taken a crucial step toward the future of development—where AI assistants generate not just fast code, but accurate, current code. Instead of relying on static training data that becomes obsolete, we’re moving toward dynamic, real-time knowledge systems that evolve with the technologies they support.
As AI coding assistants become more sophisticated, the gap between tools with current knowledge and those without will only widen. The Milvus SDK Code Helper is just the beginning—expect to see similar specialized knowledge servers for other major technologies and frameworks. The future belongs to developers who can harness AI’s speed while ensuring accuracy and currentness. You’re now equipped with both.
- Introduction
- What is the Milvus SDK Code Helper?
- Before You Begin
- Setting Up the Milvus SDK Code Helper
- Cursor IDE Setup
- Claude Desktop Setup
- Claude Code Setup
- Windsurf IDE Setup
- VS Code Setup
- Cherry Studio Setup
- Cline Setup
- Augment Setup
- Gemini CLI Setup
- Roo Code Setup
- Verification and Testing
- Conclusion
On This Page
Try Managed Milvus for Free
Zilliz Cloud is hassle-free, powered by Milvus and 10x faster.
Get StartedLike the article? Spread the word