Deploying Milvus on Kubernetes: A Step-by-Step Guide for Kubernetes Users
Milvus is an open-source vector database designed to store, index, and search massive amounts of unstructured data through vector representations, making it perfect for AI-driven applications, such as similarity search, semantic search, retrieval augmented generation (RAG), recommendation engines, and other machine learning tasks.
But what makes Milvus even more powerful is its seamless integration with Kubernetes. If you’re a Kubernetes aficionado, you know the platform is perfect for orchestrating scalable, distributed systems. Milvus takes full advantage of Kubernetes’ capabilities, allowing you to easily deploy, scale, and manage distributed Milvus clusters. This guide will provide a clear, step-by-step walkthrough for setting up Milvus on Kubernetes using the Milvus Operator.
Prerequisites
Before we begin, ensure you have the following prerequisites in place:
A Kubernetes cluster up and running. If you’re testing locally,
minikubeis a great choice.kubectlinstalled and configured to interact with your Kubernetes cluster.Familiarity with basic Kubernetes concepts like pods, services, and deployments.
Step 1: Installing Minikube (For Local Testing)
If you need to set up a local Kubernetes environment, minikube is the tool for you. Official installation instructions are on the minikube getting started page.
1. Install Minikube
Visit the minikube releases page and download the appropriate version for your operating system. For macOS/Linux, you can use the following command:
$ curl -Lo minikube https://storage.googleapis.com/minikube/releases/latest/minikube-linux-amd64
$ sudo install minikube-linux-amd64 /usr/local/bin/minikube && rm minikube-linux-amd64
2. Start Minikube
$ minikube start
3. Interact with Cluster
Now, you can interact with your clusters with the kubectl inside minikube. If you haven’t installed kubectl, minikube will download the appropriate version by default.
$ minikube kubectl cluster-info
Alternatively, you can create a symbolic link to minikube’s binary named kubectl for easier usage.
$ sudo ln -s $(which minikube) /usr/local/bin/kubectl
$ kubectl cluster-info
Step 2: Configuring the StorageClass
In Kubernetes, a StorageClass defines the types of storage available for your workloads, providing flexibility in managing different storage configurations. Before proceeding, you must ensure a default StorageClass is available in your cluster. Here’s how to check and configure one if necessary.
1. Check Installed StorageClasses
To see the available StorageClasses in your Kubernetes cluster, run the following command:
$ kubectl get sc
This will display the list of storage classes installed in your cluster. If a default StorageClass is already configured, it will be marked with (default).

2. Configure a Default StorageClass (if necessary)
If no default StorageClass is set, you can create one by defining it in a YAML file. Use the following example to create a default StorageClass:
apiVersion: storage.k8s.io/v1
kind: StorageClass
metadata:
 name: default-storageclass
provisioner: k8s.io/minikube-hostpath
This YAML configuration defines a StorageClass called default-storageclass that uses the minikube-hostpath provisioner, commonly used in local development environments.
3. Apply the StorageClass
Once the default-storageclass.yaml file is created, apply it to your cluster using the following command:
$ kubectl apply -f default-storageclass.yaml
This will set up the default StorageClass for your cluster, ensuring that your storage needs are properly managed in the future.
Step 3: Installing Milvus Using the Milvus Operator
The Milvus Operator simplifies deploying Milvus on Kubernetes, managing the deployment, scaling, and updates. Before installing the Milvus Operator, you’ll need to install the cert-manager, which provides certificates for the webhook server used by the Milvus Operator.
1. Install cert-manager
Milvus Operator requires a cert-manager to manage certificates for secure communication. Make sure you install cert-manager version 1.1.3 or later. To install it, run the following command:
$ kubectl apply -f https://github.com/jetstack/cert-manager/releases/download/v1.5.3/cert-manager.yaml
After the installation, verify that the cert-manager pods are running by executing:
$ kubectl get pods -n cert-manager

2. Install the Milvus Operator
Once the cert-manager is up and running, you can install the Milvus Operator. Run the following command to deploy it using kubectl:
$ kubectl apply -f https://raw.githubusercontent.com/zilliztech/milvus-operator/main/deploy/manifests/deployment.yaml
You can check if the Milvus Operator pod is running using the following command:
$ kubectl get pods -n milvus-operator

3. Deploy Milvus Cluster
Once the Milvus Operator pod is running, you can deploy a Milvus cluster with the operator. The following command deploys a Milvus cluster with its components and dependencies in separate pods using default configurations:
$ kubectl apply -f https://raw.githubusercontent.com/zilliztech/milvus-operator/main/config/samples/milvus_cluster_default.yaml

To customize the Milvus settings, you will need to replace the YAML file with your own configuration YAML file. In addition to manually editing or creating the file, you can use the Milvus Sizing Tool to adjust the configurations and then download the corresponding YAML file.
Alternatively, you can use the Milvus Sizing Tool for a more streamlined approach. This tool allows you to adjust various settings, such as resource allocation and storage options, and then download the corresponding YAML file with your desired configurations. This ensures that your Milvus deployment is optimized for your specific use case.
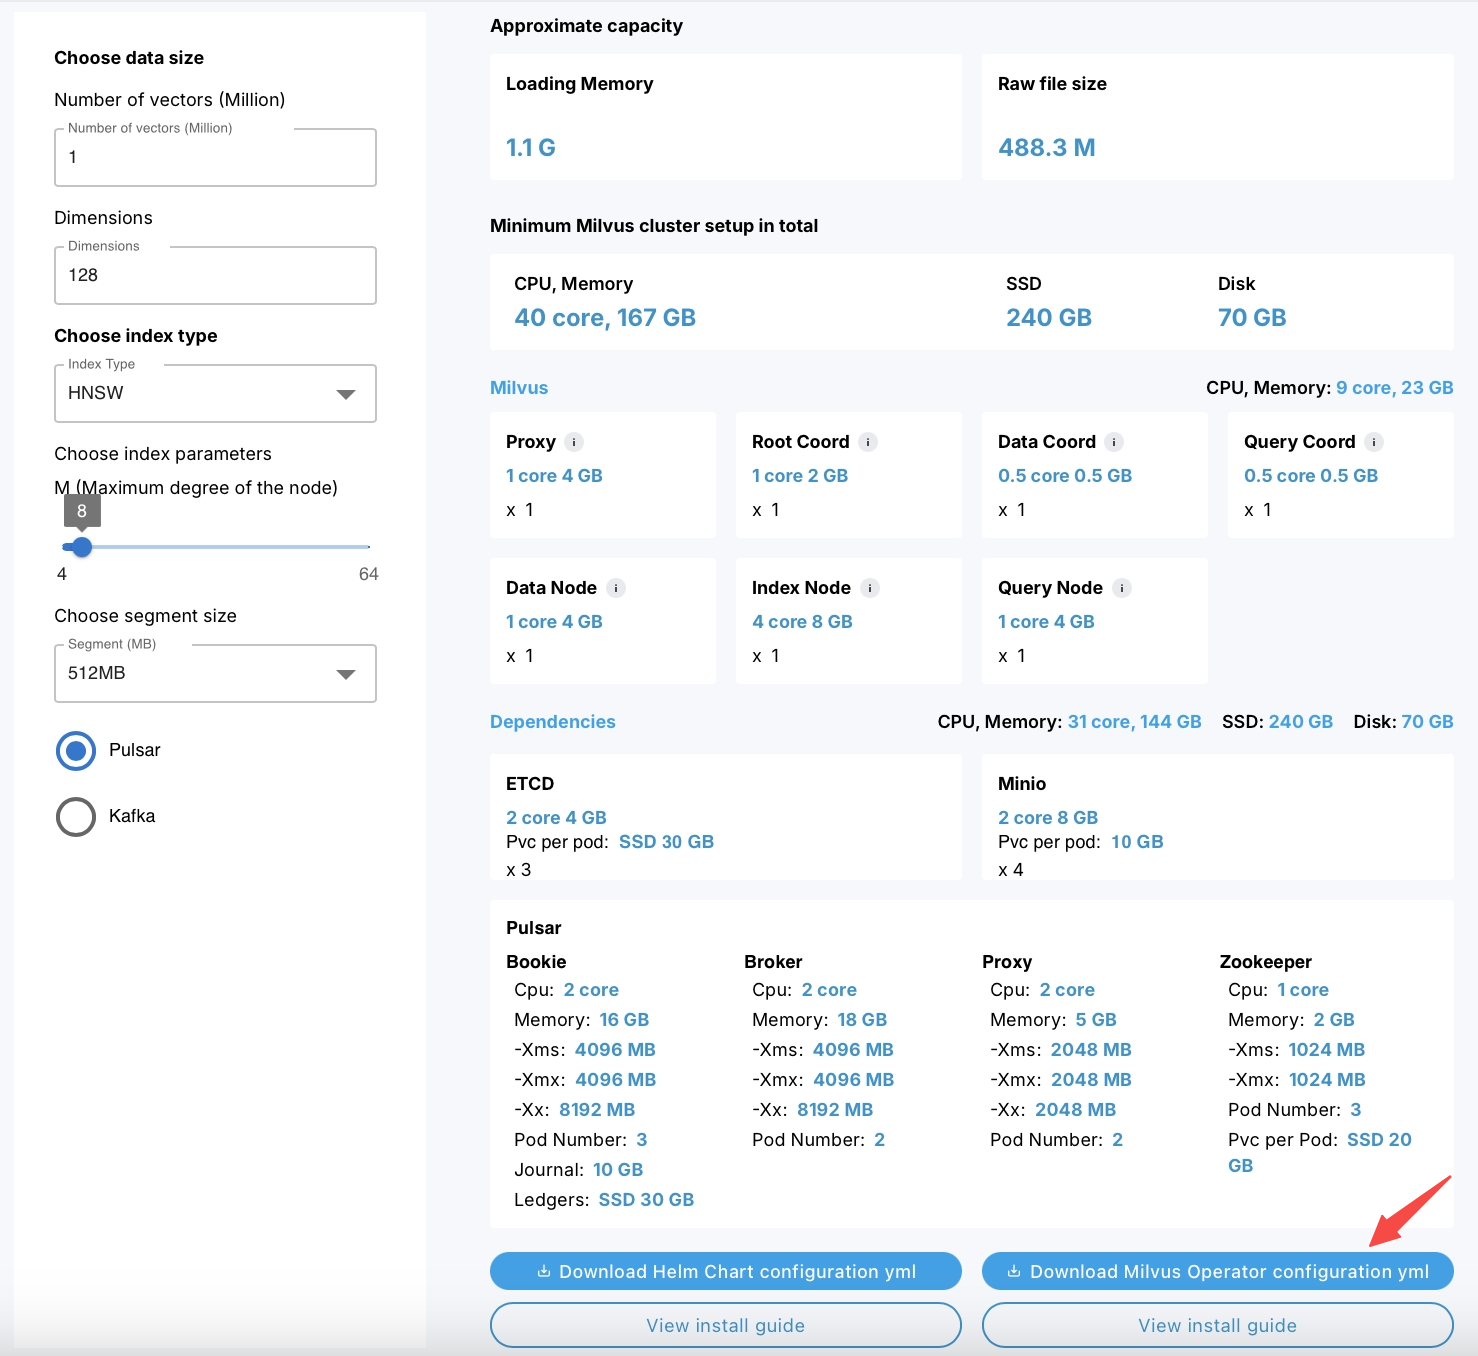
Figure: Milvus sizing tool
It may take some time to finish the deployment. You can check the status of your Milvus cluster via the command:
$ kubectl get milvus my-release

Once your Milvus cluster is ready, all pods in the Milvus cluster should be running or completed:
$ kubectl get pods
Step 4: Accessing Your Milvus Cluster
Once your Milvus cluster is deployed, you need to access it by forwarding a local port to the Milvus service port. Follow these steps to retrieve the service port and set up port forwarding.
1. Get the Service Port
First, identify the service port by using the following command. Replace <YOUR_MILVUS_PROXY_POD> with the name of your Milvus proxy pod, which typically starts with my-release-milvus-proxy-:
$ kubectl get pod <YOUR_MILVUS_PROXY_POD> --template ='{{(index (index .spec.containers 0).ports 0).containerPort}}{{"\n"}}'
This command will return the port number that your Milvus service is using.
2. Forward the Port
To access your Milvus cluster locally, forward a local port to the service port using the following command. Replace <YOUR_LOCAL_PORT> with the local port you want to use and <YOUR_SERVICE_PORT> with the service port retrieved in the previous step:
$ kubectl port-forward --address 0.0.0.0 service/my-release-milvus <YOUR_LOCAL_PORT>:<YOUR_SERVICE_PORT>
This command allows port-forwarding to listen on all IP addresses of the host machine. If you only need the service to listen on localhost, you can omit the --address 0.0.0.0 option.
Once the port-forwarding is set up, you can access your Milvus cluster via the specified local port for further operations or integrations.
Step 5: Connecting to Milvus Using Python SDK
With your Milvus cluster up and running, you can now interact with it using any Milvus SDK. In this example, we’ll use PyMilvus, Milvus’s Python SDK, to connect to the cluster and perform basic operations.
1. Install PyMilvus
To interact with Milvus via Python, you need to install the pymilvus package:
$ pip install pymilvus
2. Connect to Milvus
The following is a sample Python script that connects to your Milvus cluster and demonstrates how to perform basic operations such as creating a collection.
from pymilvus import MilvusClient
# Connect to the Milvus server
client = MilvusClient(uri="http://localhost:<YOUR_LOCAL_PORT>")
# Create a collection
collection_name = "example_collection"
if client.has_collection(collection_name):
   client.drop_collection(collection_name)
client.create_collection(
   collection_name=collection_name,
   dimension=768,  # The vectors we will use in this demo has 768 dimensions
)
Explanation:
Connect to Milvus: The script connects to the Milvus server running on
localhostusing the local port you set up in Step 4.Create a Collection: It checks if a collection named
example_collectionalready exists, drops it if so, and then creates a new collection with vectors of 768 dimensions.
This script establishes a connection to the Milvus cluster and creates a collection, serving as a starting point for more complex operations like inserting vectors and performing similarity searches.
Conclusion
Deploying Milvus in a distributed setup on Kubernetes unlocks powerful capabilities for managing large-scale vector data, enabling seamless scalability and high-performance AI-driven applications. Following this guide, you’ve learned how to set up Milvus using the Milvus Operator, making the process streamlined and efficient.
As you continue to explore Milvus, consider scaling your cluster to meet growing demands or deploying it on cloud platforms such as Amazon EKS, Google Cloud, or Microsoft Azure. For enhanced management and monitoring, tools like Milvus Backup, Birdwatcher, and Attu offer valuable support for maintaining the health and performance of your deployments.
You’re now ready to harness the full potential of Milvus on Kubernetes—happy deploying! 🚀
Further Resources
- Prerequisites
- Step 1: Installing Minikube (For Local Testing)
- 1. Install Minikube
- 2. Start Minikube
- 3. Interact with Cluster
- Step 2: Configuring the StorageClass
- 1. Check Installed StorageClasses
- 2. Configure a Default StorageClass (if necessary)
- 3. Apply the StorageClass
- Step 3: Installing Milvus Using the Milvus Operator
- 1. Install cert-manager
- 2. Install the Milvus Operator
- 3. Deploy Milvus Cluster
- Step 4: Accessing Your Milvus Cluster
- Step 5: Connecting to Milvus Using Python SDK
- 1. Install PyMilvus
- 2. Connect to Milvus
- Conclusion
- Further Resources
On This Page
Try Managed Milvus for Free
Zilliz Cloud is hassle-free, powered by Milvus and 10x faster.
Get StartedLike the article? Spread the word