Data Model Design with an Array of StructsCompatible with Milvus 2.6.4+
Modern AI applications, especially in the Internet of Things (IoT) and autonomous driving, typically reason over rich, structured events: a sensor reading with its timestamp and vector embedding, a diagnostic log with an error code and audio snippet, or a trip segment with location, speed, and scene context. These require the database to natively support the ingestion and search of nested data.
Instead of asking the user to convert their atomic structural events into flat data models, Milvus introduces the Array of Structs, where each Struct in the array can hold scalars and vectors, preserving semantic integrity.
Why Array of Structs
Modern AI applications, from autonomous driving to multimodal retrieval, increasingly rely on nested, heterogeneous data. Traditional flat data models struggle to represent complex relationships like "one document with many annotated chunks" or "one driving scene with multiple observed maneuvers". This is where the Array of Structs data type in Milvus shines.
An Array of Structs allows you to store an ordered set of structured elements, where each Struct contains its own combination of scalar fields and vector embeddings. This makes it ideal for:
Hierarchical data: Parent entities with multiple child records, such as a book with many text chunks, or a video with many annotated frames.
Multimodal embeddings: Each Struct can hold multiple vectors, such as text embedding plus image embedding, alongside metadata.
Temporal or sequential data: Structs in an Array field naturally represent time-series or step-by-step events.
Unlike traditional workarounds that store JSON blobs or split data across multiple collections, the Array of Structs provides native schema enforcement, vector indexing, and efficient storage within Milvus.
Schema design guidelines
In addition to all the guidelines discussed in Data Model Design for Search, you should also consider the following things before starting to use an Array of Structs in your data model design.
Define the Struct schema
Before adding the Array field to your collection, define the inner Struct schema. Each field in the struct must be explicitly typed, scalar (VARCHAR, INT, BOOLEAN, etc.) or vector (FLOAT_VECTOR).
You are advised to keep the Struct schema lean by only including fields you’ll use for retrieval or display. Avoid bloating with unused metadata.
Set the max capacity thoughtfully
Each Array field has an attribute that specifies the maximum number of elements the Array field can hold for each entity. Set this based on your use case’s upper bound. For example, there are 1,000 text chunks per document, or 100 maneuvers per driving scene.
An excessively high value wastes memory, and you’ll need to do some calculations to determine the maximum number of Structs in the Array field.
Index vector fields in Structs
Indexing is mandatory for vector fields, including both the vector fields in a collection and those defined in a Struct. For vector fields in a Struct, you should use AUTOINDEX or HNSW as the index type and MAX_SIM series as the metric type.
For details on all applicable limits, refer to the limits.
A real-world example: Modeling the CoVLA dataset for autonomous driving
The Comprehensive Vision-Language-Action (CoVLA) dataset, introduced by Turing Motors and accepted at the Winter Conference on Applications of Computer Vision (WACV) 2025, provides a rich foundation for training and evaluating Vision-Language-Action (VLA) models in autonomous driving. Each data point, which is usually a video clip, contains not just raw visual input but also structured captions describing:
The ego vehicle’s behaviors (e.g., “Merge left while yielding to oncoming traffic”),
The detected objects present (e.g., leading vehicles, pedestrians, traffic lights), and
A frame-level caption of the scene.
This hierarchical, multi-modal nature makes it an ideal candidate for the Array of Structs feature. For details on the CoVLA dataset, refer to the CoVLA Dataset Website.
Step 1: Map the dataset into a collection schema
The CoVLA dataset is a large-scale, multimodal driving dataset comprising 10,000 video clips, totaling over 80 hours of footage. It samples frames at a rate of 20Hz and annotates each frame with detailed natural language captions along with information on vehicle states and the coordinates of detected objects.
The dataset structure is as follows:
├── video_1                                       (VIDEO) # video.mp4
│   ├── video_id                                  (INT)
│   ├── video_url                                 (STRING)
│   ├── frames                                    (ARRAY)
│   │   ├── frame_1                               (STRUCT)
│   │   │   ├── caption                           (STRUCT) # captions.jsonl
│   │   │   │   ├── plain_caption                 (STRING)
│   │   │   │   ├── rich_caption                  (STRING)
│   │   │   │   ├── risk                          (STRING)
│   │   │   │   ├── risk_correct                  (BOOL)
│   │   │   │   ├── risk_yes_rate                 (FLOAT)
│   │   │   │   ├── weather                       (STRING)
│   │   │   │   ├── weather_rate                  (FLOAT)
│   │   │   │   ├── road                          (STRING)
│   │   │   │   ├── road_rate                     (FLOAT)
│   │   │   │   ├── is_tunnel                     (BOOL)
│   │   │   │   ├── is_tunnel_yes_rate            (FLOAT)
│   │   │   │   ├── is_highway                    (BOOL)
│   │   │   │   ├── is_highway_yes_rate           (FLOAT)
│   │   │   │   ├── has_pedestrain                (BOOL)
│   │   │   │   ├── has_pedestrain_yes_rate       (FLOAT)
│   │   │   │   ├── has_carrier_car               (BOOL)
│   │   │   ├── traffic_light                     (STRUCT) # traffic_lights.jsonl
│   │   │   │   ├── index                         (INT)
│   │   │   │   ├── class                         (STRING)
│   │   │   │   ├── bbox                          (LIST<FLOAT>)
│   │   │   ├── front_car                         (STRUCT) # front_cars.jsonl
│   │   │   │   ├── has_lead                      (BOOL)
│   │   │   │   ├── lead_prob                     (FLOAT)
│   │   │   │   ├── lead_x                        (FLOAT)
│   │   │   │   ├── lead_y                        (FLOAT)
│   │   │   │   ├── lead_speed_kmh                (FLOAT)
│   │   │   │   ├── lead_a                        (FLOAT)
│   │   ├── frame_2                               (STRUCT)
│   │   ├── ...                                   (STRUCT)
│   │   ├── frame_n                               (STRUCT)
├── video_2
├── ...
├── video_n
You can find that the structure of the CoVLA dataset is highly hierarchical, dividing the collected data into multiple .jsonl files, along with the video clips in the .mp4 format.
In Milvus, you can use either a JSON field or an Array-of-Structs field to create nested structures within a collection schema. When vector embeddings are part of the nested format, only an Array-of-Structs field is supported. However, a Struct inside an Array cannot itself contain further nested structures. To store the CoVLA dataset while retaining essential relationships, you need to remove unnecessary hierarchy and flatten the data so it fits the Milvus collection schema.
The diagram below illustrates how we can model this dataset using the schema illustrated in the following schema:
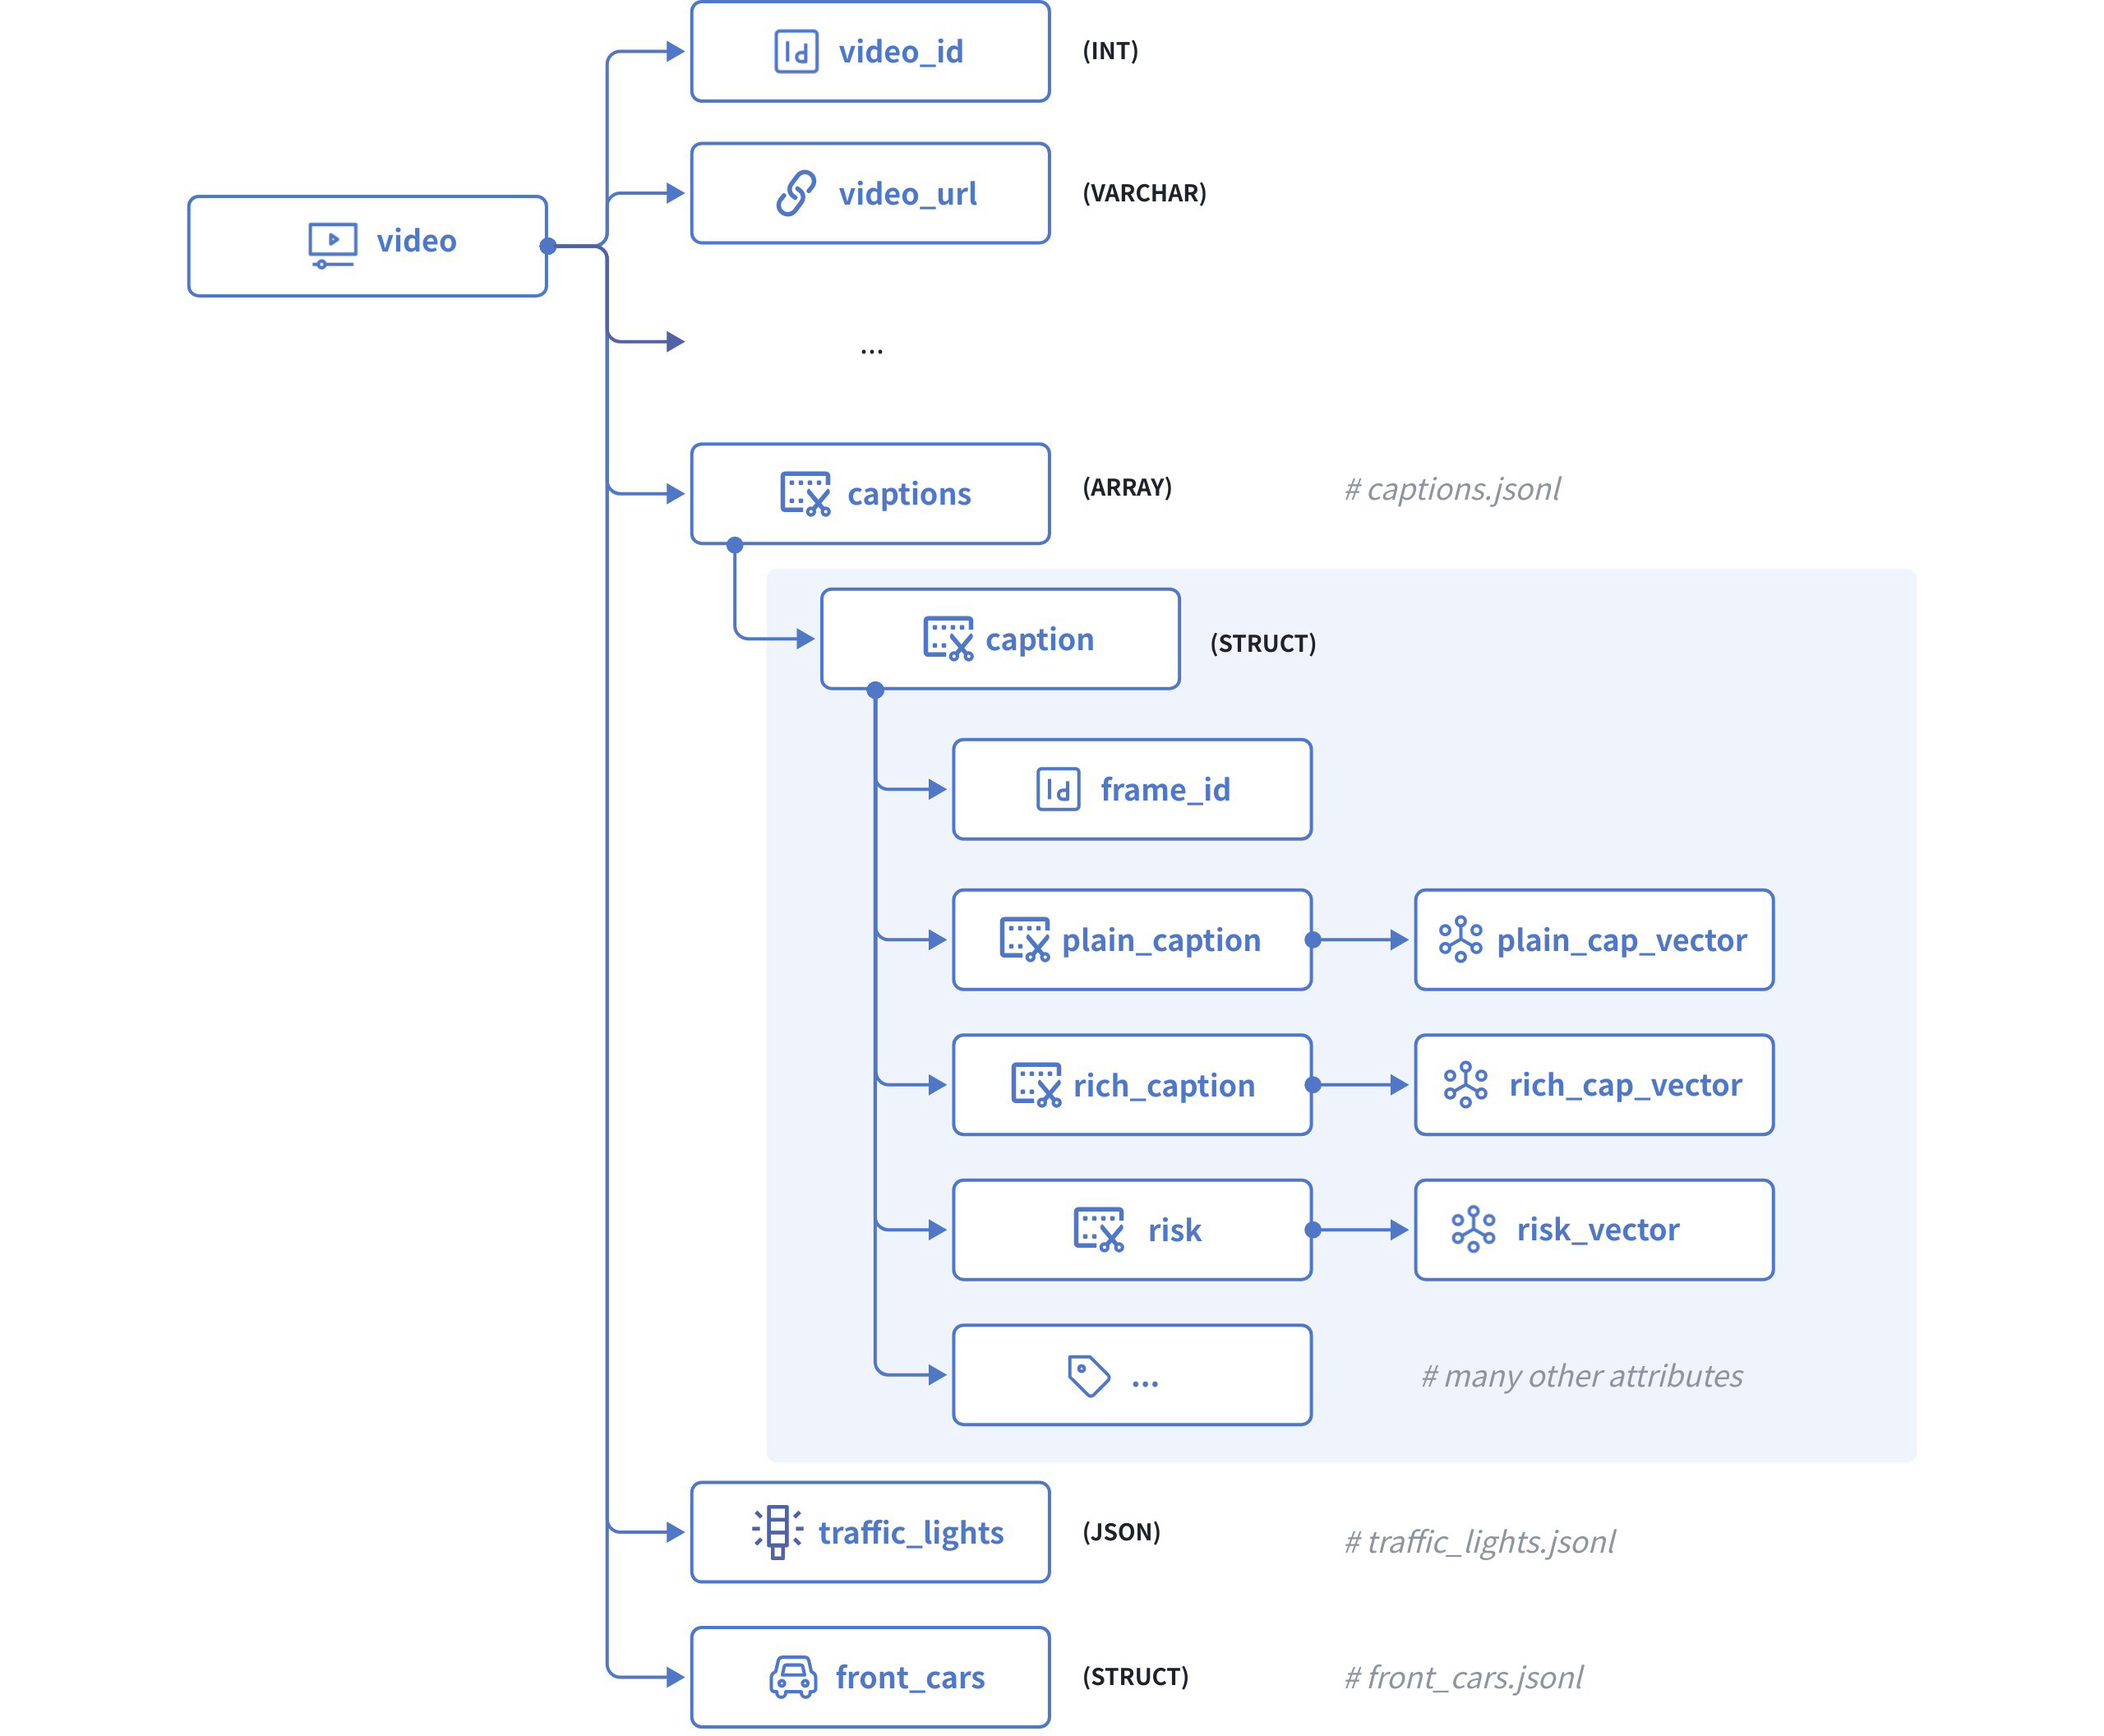 Dataset Model
The above diagram illustrates the structure of a video clip, which comprises the following fields:
video_idserves as the primary key, which accepts integers of the INT64 type.statesis a raw JSON body that contains the state of the ego vehicle in each frame of the current video.captionsis an Array of Structs with each Struct having the following fields:frame_ididentifies a specific frame within the current video.plain_captionis a description of the current frame without the ambient environment, such as weather, road condition, etc., andplain_cap_vectoris its corresponding vector embeddings.rich_captionis a description of the current frame with the ambient environment, andrich_cap_vectoris its corresponding vector embeddings.riskis a description of the risk that the ego vehicle faces in the current frame, andrisk_vectoris its corresponding vector embeddings, andAll the other attributes of the frame, such as
road,weather,is_tunnel,has_pedestrain, etc…
traffic_lightsis a JSON body that contains all the traffic light signals identified in the current frame.front_carsis also an Array of Structs that contains all the leading cars identified in the current frame.
Step 2: Initialize the schemas
To start, we need to initialize the schema for a caption Struct, a front_cars Struct, and the collection.
Initialize the schema for the Caption Struct.
client = MilvusClient("http://localhost:19530")

# create the schema for the caption struct
schema_for_caption = client.create_struct_field_schema()

schema_for_caption.add_field(
    field_name="frame_id",
    datatype=DataType.INT64,
    description="ID of the frame to which the ego vehicle's behavior belongs"
)

schema_for_caption.add_field(
    field_name="plain_caption",
    datatype=DataType.VARCHAR,
    max_length=1024,
    description="plain description of the ego vehicle's behaviors"
)

schema_for_caption.add_field(
    field_name="plain_cap_vector",
    datatype=DataType.FLOAT_VECTOR,
    dim=768,
    description="vectors for the plain description of the ego vehicle's behaviors"
)

schema_for_caption.add_field(
    field_name="rich_caption",
    datatype=DataType.VARCHAR,
    max_length=1024,
    description="rich description of the ego vehicle's behaviors"
)

schema_for_caption.add_field(
    field_name="rich_cap_vector",
    datatype=DataType.FLOAT_VECTOR,
    dim=768,
    description="vectors for the rich description of the ego vehicle's behaviors"
)

schema_for_caption.add_field(
    field_name="risk",
    datatype=DataType.VARCHAR,
    max_length=1024,
    description="description of the ego vehicle's risks"
)

schema_for_caption.add_field(
    field_name="risk_vector",
    datatype=DataType.FLOAT_VECTOR,
    dim=768,
    description="vectors for the description of the ego vehicle's risks"
)

schema_for_caption.add_field(
    field_name="risk_correct",
    datatype=DataType.BOOL,
    description="whether the risk assessment is correct"
)

schema_for_caption.add_field(
    field_name="risk_yes_rate",
    datatype=DataType.FLOAT,
    description="probability/confidence of risk being present"
)

schema_for_caption.add_field(
    field_name="weather",
    datatype=DataType.VARCHAR,
    max_length=50,
    description="weather condition"
)

schema_for_caption.add_field(
    field_name="weather_rate",
    datatype=DataType.FLOAT,
    description="probability/confidence of the weather condition"
)

schema_for_caption.add_field(
    field_name="road",
    datatype=DataType.VARCHAR,
    max_length=50,
    description="road type"
)

schema_for_caption.add_field(
    field_name="road_rate",
    datatype=DataType.FLOAT,
    description="probability/confidence of the road type"
)

schema_for_caption.add_field(
    field_name="is_tunnel",
    datatype=DataType.BOOL,
    description="whether the road is a tunnel"
)

schema_for_caption.add_field(
    field_name="is_tunnel_yes_rate",
    datatype=DataType.FLOAT,
    description="probability/confidence of the road being a tunnel"
)

schema_for_caption.add_field(
    field_name="is_highway",
    datatype=DataType.BOOL,
    description="whether the road is a highway"
)

schema_for_caption.add_field(
    field_name="is_highway_yes_rate",
    datatype=DataType.FLOAT,
    description="probability/confidence of the road being a highway"
)

schema_for_caption.add_field(
    field_name="has_pedestrian",
    datatype=DataType.BOOL,
    description="whether there is a pedestrian present"
)

schema_for_caption.add_field(
    field_name="has_pedestrian_yes_rate",
    datatype=DataType.FLOAT,
    description="probability/confidence of pedestrian presence"
)

schema_for_caption.add_field(
    field_name="has_carrier_car",
    datatype=DataType.BOOL,
    description="whether there is a carrier car present"
)
Initialize the schema for the Front Car Struct
Although a front car does not involve vector embeddings, you still need to include it as an array of Struct because the data size exceeds the maximum for a JSON field.
schema_for_front_car = client.create_struct_field_schema()

schema_for_front_car.add_field(
    field_name="frame_id",
    datatype=DataType.INT64,
    description="ID of the frame to which the ego vehicle's behavior belongs"
)

schema_for_front_car.add_field(
    field_name="has_lead",
    datatype=DataType.BOOL,
    description="whether there is a leading vehicle"
)

schema_for_front_car.add_field(
    field_name="lead_prob",
    datatype=DataType.FLOAT,
    description="probability/confidence of the leading vehicle's presence"
)

schema_for_front_car.add_field(
    field_name="lead_x",
    datatype=DataType.FLOAT,
    description="x position of the leading vehicle relative to the ego vehicle"
)

schema_for_front_car.add_field(
    field_name="lead_y",
    datatype=DataType.FLOAT,
    description="y position of the leading vehicle relative to the ego vehicle"
)

schema_for_front_car.add_field(
    field_name="lead_speed_kmh",
    datatype=DataType.FLOAT,
    description="speed of the leading vehicle in km/h"
)

schema_for_front_car.add_field(
    field_name="lead_a",
    datatype=DataType.FLOAT,
    description="acceleration of the leading vehicle"
)
Initialize the schema for the collection
schema = client.create_schema()

schema.add_field(
    field_name="video_id",
    datatype=DataType.VARCHAR,
    description="primary key",
    max_length=16,
    is_primary=True,
    auto_id=False
)

schema.add_field(
    field_name="video_url",
    datatype=DataType.VARCHAR,
    max_length=512,
    description="URL of the video"
)

schema.add_field(
    field_name="captions",
    datatype=DataType.ARRAY,
    element_type=DataType.STRUCT,
    struct_schema=schema_for_caption,
    max_capacity=600,
    description="captions for the current video"
)

schema.add_field(
    field_name="traffic_lights",
    datatype=DataType.JSON,
    description="frame-specific traffic lights identified in the current video"
)

schema.add_field(
    field_name="front_cars",
    datatype=DataType.ARRAY,
    element_type=DataType.STRUCT,
    struct_schema=schema_for_front_car,
    max_capacity=600,
    description="frame-specific leading cars identified in the current video"
)
Step 3: Set index parameters
All vector fields must be indexed. To index the vector fields in an element Struct, you need to use AUTOINDEX or HNSW as the index type and the MAX_SIM series metric type to measure the similarities between embedding lists.
index_params = client.prepare_index_params()

index_params.add_index(
    field_name="captions[plain_cap_vector]",
    index_type="AUTOINDEX",
    metric_type="MAX_SIM_COSINE",
    index_name="captions_plain_cap_vector_idx", # mandatory for now
    index_params={"M": 16, "efConstruction": 200}
)

index_params.add_index(
    field_name="captions[rich_cap_vector]",
    index_type="AUTOINDEX",
    metric_type="MAX_SIM_COSINE",
    index_name="captions_rich_cap_vector_idx", # mandatory for now
    index_params={"M": 16, "efConstruction": 200}
)

index_params.add_index(
    field_name="captions[risk_vector]",
    index_type="AUTOINDEX",
    metric_type="MAX_SIM_COSINE",
    index_name="captions_risk_vector_idx", # mandatory for now
    index_params={"M": 16, "efConstruction": 200}
)
You are advised to enable JSON shredding for JSON fields to accelerate filtering within these fields.
Step 4: Create a collection
Once the schemas and indexes are ready, you can create the target collection as follows:
client.create_collection(
    collection_name="covla_dataset",
    schema=schema,
    index_params=index_params
)
Step 5: Insert the data
Turing Motos organizes the CoVLA dataset in multiple files, including raw video clips (.mp4), states (states.jsonl), captions (captions.jsonl), traffic lights (traffic_lights.jsonl), and front cars (front_cars.jsonl).
You need to merge the data pieces for each video clip from these files and insert the data. The following is the script to merge the data pieces for a specific video clip.
import json
from openai import OpenAI

openai_client = OpenAI(
    api_key='YOUR_OPENAI_API_KEY',
)

video_id = "0a0fc7a5db365174" # represent a single video with 600 frames

# get all front car records in the specified video clip
entries = []
front_cars = []
with open('data/front_car/{}.jsonl'.format(video_id), 'r') as f:
    for line in f:
        entries.append(json.loads(line))

for entry in entries:
    for key, value in entry.items():
        value['frame_id'] = int(key)
        front_cars.append(value)

# get all traffic lights identified in the specified video clip
entries = []
traffic_lights = []
frame_id = 0
with open('data/traffic_lights/{}.jsonl'.format(video_id), 'r') as f:
    for line in f:
        entries.append(json.loads(line))

for entry in entries:
    for key, value in entry.items():
        if not value or (value['index'] == 1 and key != '0'):
            frame_id+=1

        if value:
            value['frame_id'] = frame_id
            traffic_lights.append(value)
        else:
            value_dict = {}
            value_dict['frame_id'] = frame_id
            traffic_lights.append(value_dict)

# get all captions generated in the video clip and convert them into vector embeddings
entries = []
captions = []
with open('data/captions/{}.jsonl'.format(video_id), 'r') as f:
    for line in f:
        entries.append(json.loads(line))

def get_embedding(text, model="embeddinggemma:latest"):
    response = openai_client.embeddings.create(input=text, model=model)
    return response.data[0].embedding

# Add embeddings to each entry
for entry in entries:
    # Each entry is a dict with a single key (e.g., '0', '1', ...)
    for key, value in entry.items():
        value['frame_id'] = int(key)  # Convert key to integer and assign to frame_id

        if "plain_caption" in value and value["plain_caption"]:
            value["plain_cap_vector"] = get_embedding(value["plain_caption"])
        if "rich_caption" in value and value["rich_caption"]:
            value["rich_cap_vector"] = get_embedding(value["rich_caption"])
        if "risk" in value and value["risk"]:
            value["risk_vector"] = get_embedding(value["risk"])

        captions.append(value)

data = {
    "video_id": video_id,
    "video_url": "https://your-storage.com/{}".format(video_id),
    "captions": captions,
    "traffic_lights": traffic_lights,
    "front_cars": front_cars
}
Once you have processed the data accordingly, you can insert it as follows:
client.insert(
    collection_name="covla_dataset",
    data=[data]
)

# {'insert_count': 1, 'ids': ['0a0fc7a5db365174'], 'cost': 0}