Prepare Source Data
This page discusses something you should consider before you start bulk-inserting data into your collection.
Before you start
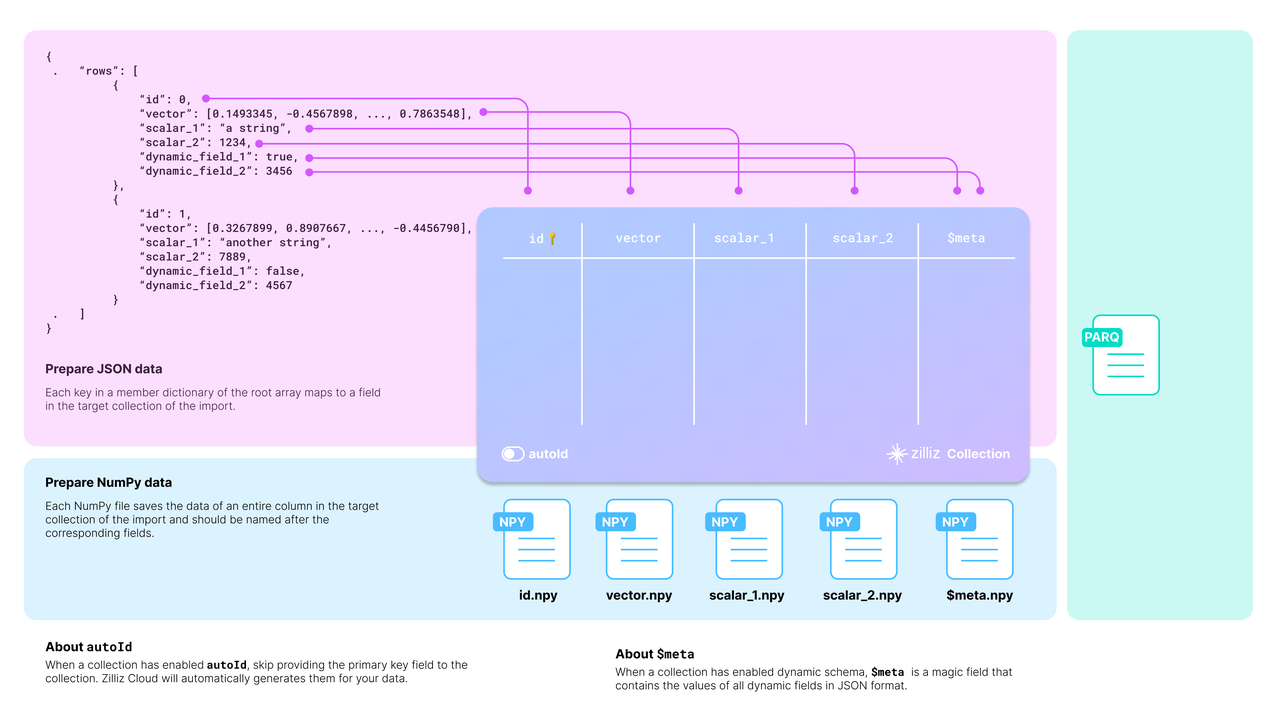
The target collection requires mapping the source data to its schema. The diagram below shows how acceptable source data is mapped to the schema of a target collection.
 Map data to schema
You should carefully examine your data and design the schema of the target collection accordingly.
Taking the JSON data in the above diagram as an example, there are two entities in the rows list, each row having six fields. The collection schema selectively includes four: id, vector, scalar_1, and scalar_2.
There are two more things to consider when designing the schema:
Whether to enable AutoID
The id field serves as the primary field of the collection. To make the primary field automatically increment, you can enable AutoID in the schema. In this case, you should exclude the id field from each row in the source data.
Whether to enable dynamic fields
The target collection can also store fields not included in its pre-defined schema if the schema enables dynamic fields. The $meta field is a reserved JSON field to hold dynamic fields and their values in key-value pairs. In the above diagram, the fields dynamic_field_1 and dynamic_field_2 and the values will be saved as key-value pairs in the $meta field.
The following code shows how to set up the schema for the collection illustrated in the above diagram.
To obtain more information, refer to create_schema() and add_field() in the SDK reference.
To obtain more information, refer to CollectionSchema in the SDK reference.
from pymilvus import MilvusClient, DataType

# You need to work out a collection schema out of your dataset.
schema = MilvusClient.create_schema(
    auto_id=False,
    enable_dynamic_field=True
)

DIM = 512

schema.add_field(field_name="id", datatype=DataType.INT64, is_primary=True),
schema.add_field(field_name="bool", datatype=DataType.BOOL),
schema.add_field(field_name="int8", datatype=DataType.INT8),
schema.add_field(field_name="int16", datatype=DataType.INT16),
schema.add_field(field_name="int32", datatype=DataType.INT32),
schema.add_field(field_name="int64", datatype=DataType.INT64),
schema.add_field(field_name="float", datatype=DataType.FLOAT),
schema.add_field(field_name="double", datatype=DataType.DOUBLE),
schema.add_field(field_name="varchar", datatype=DataType.VARCHAR, max_length=512),
schema.add_field(field_name="json", datatype=DataType.JSON),
schema.add_field(field_name="array_str", datatype=DataType.ARRAY, max_capacity=100, element_type=DataType.VARCHAR, max_length=128)
schema.add_field(field_name="array_int", datatype=DataType.ARRAY, max_capacity=100, element_type=DataType.INT64)
schema.add_field(field_name="float_vector", datatype=DataType.FLOAT_VECTOR, dim=DIM),
schema.add_field(field_name="binary_vector", datatype=DataType.BINARY_VECTOR, dim=DIM),
schema.add_field(field_name="float16_vector", datatype=DataType.FLOAT16_VECTOR, dim=DIM),
# schema.add_field(field_name="bfloat16_vector", datatype=DataType.BFLOAT16_VECTOR, dim=DIM),
schema.add_field(field_name="sparse_vector", datatype=DataType.SPARSE_FLOAT_VECTOR)

schema.verify()

print(schema)
import com.google.gson.Gson;
import com.google.gson.JsonObject;
import io.milvus.bulkwriter.BulkImport;
import io.milvus.bulkwriter.RemoteBulkWriter;
import io.milvus.bulkwriter.RemoteBulkWriterParam;
import io.milvus.bulkwriter.common.clientenum.BulkFileType;
import io.milvus.bulkwriter.common.clientenum.CloudStorage;
import io.milvus.bulkwriter.connect.S3ConnectParam;
import io.milvus.bulkwriter.connect.StorageConnectParam;
import io.milvus.bulkwriter.request.describe.MilvusDescribeImportRequest;
import io.milvus.bulkwriter.request.import_.MilvusImportRequest;
import io.milvus.bulkwriter.request.list.MilvusListImportJobsRequest;
import io.milvus.common.utils.Float16Utils;
import io.milvus.v2.client.ConnectConfig;
import io.milvus.v2.client.MilvusClientV2;
import io.milvus.v2.common.DataType;
import io.milvus.v2.service.collection.request.*;

import java.io.IOException;
import java.nio.ByteBuffer;
import java.util.*;
import java.util.concurrent.TimeUnit;

private static final String MINIO_ENDPOINT = CloudStorage.MINIO.getEndpoint("http://127.0.0.1:9000");
private static final String BUCKET_NAME = "a-bucket";
private static final String ACCESS_KEY = "minioadmin";
private static final String SECRET_KEY = "minioadmin";

private static final Integer DIM = 512;
private static final Gson GSON_INSTANCE = new Gson();

private static CreateCollectionReq.CollectionSchema createSchema() {
    CreateCollectionReq.CollectionSchema schema = CreateCollectionReq.CollectionSchema.builder()
        .enableDynamicField(true)
        .build();
    schema.addField(AddFieldReq.builder()
            .fieldName("id")
            .dataType(io.milvus.v2.common.DataType.Int64)
            .isPrimaryKey(Boolean.TRUE)
            .autoID(false)
            .build());
    schema.addField(AddFieldReq.builder()
            .fieldName("bool")
            .dataType(DataType.Bool)
            .build());
    schema.addField(AddFieldReq.builder()
            .fieldName("int8")
            .dataType(DataType.Int8)
            .build());
    schema.addField(AddFieldReq.builder()
            .fieldName("int16")
            .dataType(DataType.Int16)
            .build());
    schema.addField(AddFieldReq.builder()
            .fieldName("int32")
            .dataType(DataType.Int32)
            .build());
    schema.addField(AddFieldReq.builder()
            .fieldName("int64")
            .dataType(DataType.Int64)
            .build());
    schema.addField(AddFieldReq.builder()
            .fieldName("float")
            .dataType(DataType.Float)
            .build());
    schema.addField(AddFieldReq.builder()
            .fieldName("double")
            .dataType(DataType.Double)
            .build());
    schema.addField(AddFieldReq.builder()
            .fieldName("varchar")
            .dataType(DataType.VarChar)
            .maxLength(512)
            .build());
    schema.addField(AddFieldReq.builder()
            .fieldName("json")
            .dataType(io.milvus.v2.common.DataType.JSON)
            .build());
    schema.addField(AddFieldReq.builder()
            .fieldName("array_int")
            .dataType(io.milvus.v2.common.DataType.Array)
            .maxCapacity(100)
            .elementType(io.milvus.v2.common.DataType.Int64)
            .build());
    schema.addField(AddFieldReq.builder()
            .fieldName("array_str")
            .dataType(io.milvus.v2.common.DataType.Array)
            .maxCapacity(100)
            .elementType(io.milvus.v2.common.DataType.VarChar)
            .maxLength(128)
            .build());
    schema.addField(AddFieldReq.builder()
            .fieldName("float_vector")
            .dataType(io.milvus.v2.common.DataType.FloatVector)
            .dimension(DIM)
            .build());
    schema.addField(AddFieldReq.builder()
            .fieldName("binary_vector")
            .dataType(io.milvus.v2.common.DataType.BinaryVector)
            .dimension(DIM)
            .build());
    schema.addField(AddFieldReq.builder()
            .fieldName("float16_vector")
            .dataType(io.milvus.v2.common.DataType.Float16Vector)
            .dimension(DIM)
            .build());
    schema.addField(AddFieldReq.builder()
            .fieldName("sparse_vector")
            .dataType(io.milvus.v2.common.DataType.SparseFloatVector)
            .build());

    return schema;
}
Set up BulkWriter
BulkWriter is a tool designed to convert raw datasets into a format suitable for importing via the RESTful Import API. It offers two types of writers:
- LocalBulkWriter: Reads the designated dataset and transforms it into an easy-to-use format.
- RemoteBulkWriter: Performs the same task as the LocalBulkWriter but additionally transfers the converted data files to a specified remote object storage bucket.
RemoteBulkWriter differs from LocalBulkWriter in that RemoteBulkWriter transfers the converted data files to a target object storage bucket.
Set up LocalBulkWriter
A LocalBulkWriter appends rows from the source dataset and commits them to a local file of the specified format.
from pymilvus.bulk_writer import LocalBulkWriter, BulkFileType
# Use `from pymilvus import LocalBulkWriter, BulkFileType`
# when you use pymilvus earlier than 2.4.2

writer = LocalBulkWriter(
    schema=schema,
    local_path='.',
    segment_size=512 * 1024 * 1024, # Default value
    file_type=BulkFileType.PARQUET
)
import io.milvus.bulkwriter.LocalBulkWriter;
import io.milvus.bulkwriter.LocalBulkWriterParam;
import io.milvus.bulkwriter.common.clientenum.BulkFileType;

LocalBulkWriterParam localBulkWriterParam = LocalBulkWriterParam.newBuilder()
    .withCollectionSchema(schema)
    .withLocalPath(".")
    .withChunkSize(512 * 1024 * 1024)
    .withFileType(BulkFileType.PARQUET)
    .build();

LocalBulkWriter localBulkWriter = new LocalBulkWriter(localBulkWriterParam);
When creating a LocalBulkWriter, you should:
- Reference the created schema in
schema. - Set
local_pathto the output directory. - Set
file_typeto the output file type. - If your dataset contains a large number of records, you are advised to segment your data by setting
segment_sizeto a proper value.
For details on parameter settings, refer to LocalBulkWriter in the SDK reference.
When creating a LocalBulkWriter, you should:
- Reference the created schema in
CollectionSchema(). - Set the output directory in
withLocalPath(). - Set the output file type in
withFileType(). - If your dataset contains a large number of records, you are advised to segment your data by setting
withChunkSize()to a proper value.
For details on parameter settings, refer to LocalBulkWriter in the SDK reference.
Set up RemoteBulkWriter
Instead of committing appended data to a local file, a RemoteBulkWriter commits them to a remote bucket. Therefore, you should set up a ConnectParam object before creating a RemoteBulkWriter.
from pymilvus.bulk_writer import RemoteBulkWriter
# Use `from pymilvus import RemoteBulkWriter`
# when you use pymilvus earlier than 2.4.2

# Third-party constants
ACCESS_KEY="minioadmin"
SECRET_KEY="minioadmin"
BUCKET_NAME="a-bucket"

# Connections parameters to access the remote bucket
conn = RemoteBulkWriter.S3ConnectParam(
    endpoint="localhost:9000", # the default MinIO service started along with Milvus
    access_key=ACCESS_KEY,
    secret_key=SECRET_KEY,
    bucket_name=BUCKET_NAME,
    secure=False
)

from pymilvus.bulk_writer import BulkFileType
# Use `from pymilvus import BulkFileType`
# when you use pymilvus earlier than 2.4.2

writer = RemoteBulkWriter(
    schema=schema,
    remote_path="/",
    connect_param=conn,
    file_type=BulkFileType.PARQUET
)

print('bulk writer created.')
private static RemoteBulkWriter createRemoteBulkWriter(CreateCollectionReq.CollectionSchema collectionSchema) throws IOException {
    StorageConnectParam connectParam = S3ConnectParam.newBuilder()
            .withEndpoint(MINIO_ENDPOINT)
            .withBucketName(BUCKET_NAME)
            .withAccessKey(ACCESS_KEY)
            .withSecretKey(SECRET_KEY)
            .build();
    RemoteBulkWriterParam bulkWriterParam = RemoteBulkWriterParam.newBuilder()
            .withCollectionSchema(collectionSchema)
            .withRemotePath("/")
            .withConnectParam(connectParam)
            .withFileType(BulkFileType.PARQUET)
            .build();
    return new RemoteBulkWriter(bulkWriterParam);
}
Once the connection parameters are ready, you can reference it in the RemoteBulkWriter as follows:
from pymilvus.bulk_writer import BulkFileType
# Use `from pymilvus import BulkFileType`
# when you use pymilvus earlier than 2.4.2

writer = RemoteBulkWriter(
    schema=schema,
    remote_path="/",
    connect_param=conn,
    file_type=BulkFileType.PARQUET
)
import io.milvus.bulkwriter.RemoteBulkWriter;
import io.milvus.bulkwriter.RemoteBulkWriterParam;

RemoteBulkWriterParam remoteBulkWriterParam = RemoteBulkWriterParam.newBuilder()
    .withCollectionSchema(schema)
    .withConnectParam(storageConnectParam)
    .withChunkSize(512 * 1024 * 1024)
    .withRemotePath("/")
    .withFileType(BulkFileType.PARQUET)
    .build();

RemoteBulkWriter remoteBulkWriter = new RemoteBulkWriter(remoteBulkWriterParam);
The parameters for creating a RemoteBulkWriter are barely the same as those for a LocalBulkWriter, except connect_param. For details on parameter settings, refer to RemoteBulkWriter and ConnectParam in the SDK reference.
The parameters for creating a RemoteBulkWriter are barely the same as those for a LocalBulkWriter, except StorageConnectParam. For details on parameter settings, refer to RemoteBulkWriter and StorageConnectParam in the SDK reference.
Start writing
A BulkWriter has two methods: append_row() adds a row from a source dataset, and commit() commits added rows to a local file or a remote bucket.
A BulkWriter has two methods: appendRow() adds a row from a source dataset, and commit() commits added rows to a local file or a remote bucket.
For demonstration purposes, the following code appends randomly generated data.
import random, string, json
import numpy as np
import tensorflow as tf

def generate_random_str(length=5):
    letters = string.ascii_uppercase
    digits = string.digits

    return ''.join(random.choices(letters + digits, k=length))

# optional input for binary vector:
# 1. list of int such as [1, 0, 1, 1, 0, 0, 1, 0]
# 2. numpy array of uint8
def gen_binary_vector(to_numpy_arr):
    raw_vector = [random.randint(0, 1) for i in range(DIM)]
    if to_numpy_arr:
        return np.packbits(raw_vector, axis=-1)
    return raw_vector

# optional input for float vector:
# 1. list of float such as [0.56, 1.859, 6.55, 9.45]
# 2. numpy array of float32
def gen_float_vector(to_numpy_arr):
    raw_vector = [random.random() for _ in range(DIM)]
    if to_numpy_arr:
        return np.array(raw_vector, dtype="float32")
    return raw_vector

# # optional input for bfloat16 vector:
# # 1. list of float such as [0.56, 1.859, 6.55, 9.45]
# # 2. numpy array of bfloat16
# def gen_bf16_vector(to_numpy_arr):
#     raw_vector = [random.random() for _ in range(DIM)]
#     if to_numpy_arr:
#         return tf.cast(raw_vector, dtype=tf.bfloat16).numpy()
#     return raw_vector

# optional input for float16 vector:
# 1. list of float such as [0.56, 1.859, 6.55, 9.45]
# 2. numpy array of float16
def gen_fp16_vector(to_numpy_arr):
    raw_vector = [random.random() for _ in range(DIM)]
    if to_numpy_arr:
        return np.array(raw_vector, dtype=np.float16)
    return raw_vector

# optional input for sparse vector:
# only accepts dict like {2: 13.23, 45: 0.54} or {"indices": [1, 2], "values": [0.1, 0.2]}
# note: no need to sort the keys
def gen_sparse_vector(pair_dict: bool):
    raw_vector = {}
    dim = random.randint(2, 20)
    if pair_dict:
        raw_vector["indices"] = [i for i in range(dim)]
        raw_vector["values"] = [random.random() for _ in range(dim)]
    else:
        for i in range(dim):
            raw_vector[i] = random.random()
    return raw_vector

for i in range(10000):
    writer.append_row({
        "id": np.int64(i),
        "bool": True if i % 3 == 0 else False,
        "int8": np.int8(i%128),
        "int16": np.int16(i%1000),
        "int32": np.int32(i%100000),
        "int64": np.int64(i),
        "float": np.float32(i/3),
        "double": np.float64(i/7),
        "varchar": f"varchar_{i}",
        "json": json.dumps({"dummy": i, "ok": f"name_{i}"}),
        "array_str": np.array([f"str_{k}" for k in range(5)], np.dtype("str")),
        "array_int": np.array([k for k in range(10)], np.dtype("int64")),
        "float_vector": gen_float_vector(True),
        "binary_vector": gen_binary_vector(True),
        "float16_vector": gen_fp16_vector(True),
        # "bfloat16_vector": gen_bf16_vector(True),
        "sparse_vector": gen_sparse_vector(True),
        f"dynamic_{i}": i,
    })
    if (i+1)%1000 == 0:
        writer.commit()
        print('committed')

print(writer.batch_files)
private static byte[] genBinaryVector() {
    Random ran = new Random();
    int byteCount = DIM / 8;
    ByteBuffer vector = ByteBuffer.allocate(byteCount);
    for (int i = 0; i < byteCount; ++i) {
        vector.put((byte) ran.nextInt(Byte.MAX_VALUE));
    }
    return vector.array();
}

private static List<Float> genFloatVector() {
    Random ran = new Random();
    List<Float> vector = new ArrayList<>();
    for (int i = 0; i < DIM; ++i) {
        vector.add(ran.nextFloat());
    }
    return vector;
}

private static byte[] genFloat16Vector() {
    List<Float> originalVector = genFloatVector();
    return Float16Utils.f32VectorToFp16Buffer(originalVector).array();
}

private static SortedMap<Long, Float> genSparseVector() {
    Random ran = new Random();
    SortedMap<Long, Float> sparse = new TreeMap<>();
    int dim = ran.nextInt(18) + 2; // [2, 20)
    for (int i = 0; i < dim; ++i) {
        sparse.put((long)ran.nextInt(1000000), ran.nextFloat());
    }
    return sparse;
}

private static List<String> genStringArray(int length) {
    List<String> arr = new ArrayList<>();
    for (int i = 0; i < length; i++) {
        arr.add("str_" + i);
    }
    return arr;
}

private static List<Long> genIntArray(int length) {
    List<Long> arr = new ArrayList<>();
    for (long i = 0; i < length; i++) {
        arr.add(i);
    }
    return arr;
}

private static RemoteBulkWriter createRemoteBulkWriter(CreateCollectionReq.CollectionSchema collectionSchema) throws IOException {
    StorageConnectParam connectParam = S3ConnectParam.newBuilder()
            .withEndpoint(MINIO_ENDPOINT)
            .withBucketName(BUCKET_NAME)
            .withAccessKey(ACCESS_KEY)
            .withSecretKey(SECRET_KEY)
            .build();
    RemoteBulkWriterParam bulkWriterParam = RemoteBulkWriterParam.newBuilder()
            .withCollectionSchema(collectionSchema)
            .withRemotePath("/")
            .withConnectParam(connectParam)
            .withFileType(BulkFileType.PARQUET)
            .build();
    return new RemoteBulkWriter(bulkWriterParam);
}

private static List<List<String>> uploadData() throws Exception {
    CreateCollectionReq.CollectionSchema collectionSchema = createSchema();
    try (RemoteBulkWriter remoteBulkWriter = createRemoteBulkWriter(collectionSchema)) {
        for (int i = 0; i < 10000; ++i) {
            JsonObject rowObject = new JsonObject();

            rowObject.addProperty("id", i);
            rowObject.addProperty("bool", i % 3 == 0);
            rowObject.addProperty("int8", i % 128);
            rowObject.addProperty("int16", i % 1000);
            rowObject.addProperty("int32", i % 100000);
            rowObject.addProperty("int64", i);
            rowObject.addProperty("float", i / 3);
            rowObject.addProperty("double", i / 7);
            rowObject.addProperty("varchar", "varchar_" + i);
            rowObject.addProperty("json", String.format("{\"dummy\": %s, \"ok\": \"name_%s\"}", i, i));
            rowObject.add("array_str", GSON_INSTANCE.toJsonTree(genStringArray(5)));
            rowObject.add("array_int", GSON_INSTANCE.toJsonTree(genIntArray(10)));
            rowObject.add("float_vector", GSON_INSTANCE.toJsonTree(genFloatVector()));
            rowObject.add("binary_vector", GSON_INSTANCE.toJsonTree(genBinaryVector()));
            rowObject.add("float16_vector", GSON_INSTANCE.toJsonTree(genFloat16Vector()));
            rowObject.add("sparse_vector", GSON_INSTANCE.toJsonTree(genSparseVector()));
            rowObject.addProperty("dynamic", "dynamic_" + i);

            remoteBulkWriter.appendRow(rowObject);

            if ((i+1)%1000 == 0) {
                remoteBulkWriter.commit(false);
            }
        }

        List<List<String>> batchFiles = remoteBulkWriter.getBatchFiles();
        System.out.println(batchFiles);
        return batchFiles;
    } catch (Exception e) {
        throw e;
    }
}

public static void main(String[] args) throws Exception {
    List<List<String>> batchFiles = uploadData();
}
Verify the results
To check the results, you can get the actual output path by printing the batch_files property of the writer.
To check the results, you can get the actual output path by printing the getBatchFiles() method of the writer.
print(writer.batch_files)

# [['d4220a9e-45be-4ccb-8cb5-bf09304b9f23/1.parquet'],
#  ['d4220a9e-45be-4ccb-8cb5-bf09304b9f23/2.parquet']]
// localBulkWriter.getBatchFiles();
remoteBulkWriter.getBatchFiles();

//

// Close the BulkWriter
try {
    localBulkWriter.close();
    remoteBulkWriter.close();
} catch (Exception e) {
    // TODO: handle exception
    e.printStackTrace();
}
BulkWriter generates a UUID, creates a sub-folder using the UUID in the provided output directory, and places all generated files in the sub-folder. Click here to download the prepared sample data.
Possible folder structures are as follows:
# JSON
├── folder
│   └── 45ae1139-1d87-4aff-85f5-0039111f9e6b
│       └── 1.json

# Parquet
├── folder
│   └── 45ae1139-1d87-4aff-85f5-0039111f9e6b
│       └── 1.parquet