Image Search with PyTorch and Milvus
This guide introduces an example of integrating PyTorch and Milvus to perform image search using embeddings. PyTorch is a powerful open-source deep learning framework widely used for building and deploying machine learning models. In this example, we’ll leverage its Torchvision library and a pre-trained ResNet50 model to generate feature vectors (embeddings) that represent image content. These embeddings will be stored in Milvus, a high-performance vector database, to enable efficient similarity search. The dataset used is the Impressionist-Classifier Dataset from Kaggle. By combining the deep learning capabilities of PyTorch with the scalable search functionality of Milvus, this example demonstrates how to build a robust and efficient image retrieval system.
Let’s get started!
Installing the requirements
For this example, we are going to be using pymilvus to connect to use Milvus, torch for running the embedding model, torchvision for the actual model and preprocessing, gdown to download the example dataset and tqdm for loading bars.
pip install pymilvus torch gdown torchvision tqdm
Grabbing the data
We are going to use gdown to grab the zip from Google Drive and then decompress it with the built-in zipfile library.
import gdown
import zipfile

url = 'https://drive.google.com/uc?id=1OYDHLEy992qu5C4C8HV5uDIkOWRTAR1_'
output = './paintings.zip'
gdown.download(url, output)

with zipfile.ZipFile("./paintings.zip","r") as zip_ref:
    zip_ref.extractall("./paintings")
The size of the dataset is 2.35 GB, and the time spent downloading it depends on your network condition.
Global Arguments
These are some of the main global arguments that we will be using for easier tracking and updating.
# Milvus Setup Arguments
COLLECTION_NAME = 'image_search'  # Collection name
DIMENSION = 2048  # Embedding vector size in this example
MILVUS_HOST = "localhost"
MILVUS_PORT = "19530"

# Inference Arguments
BATCH_SIZE = 128
TOP_K = 3
Setting up Milvus
At this point, we are going to begin setting up Milvus. The steps are as follows:
Connect to the Milvus instance using the provided URI.
from pymilvus import connections

# Connect to the instance
connections.connect(host=MILVUS_HOST, port=MILVUS_PORT)
If the collection already exists, drop it.
from pymilvus import utility

# Remove any previous collections with the same name
if utility.has_collection(COLLECTION_NAME):
    utility.drop_collection(COLLECTION_NAME)
Create the collection that holds the ID, the file path of the image, and its embedding.
from pymilvus import FieldSchema, CollectionSchema, DataType, Collection

# Create collection which includes the id, filepath of the image, and image embedding
fields = [
    FieldSchema(name='id', dtype=DataType.INT64, is_primary=True, auto_id=True),
    FieldSchema(name='filepath', dtype=DataType.VARCHAR, max_length=200),  # VARCHARS need a maximum length, so for this example they are set to 200 characters
    FieldSchema(name='image_embedding', dtype=DataType.FLOAT_VECTOR, dim=DIMENSION)
]
schema = CollectionSchema(fields=fields)
collection = Collection(name=COLLECTION_NAME, schema=schema)
Create an index on the newly created collection and load it into memory.
# Create an AutoIndex index for collection
index_params = {
'metric_type':'L2',
'index_type':"IVF_FLAT",
'params':{'nlist': 16384}
}
collection.create_index(field_name="image_embedding", index_params=index_params)
collection.load()
Once these steps are done, the collection is ready to be inserted into and searched. Any added data will be indexed automatically and be available to search immediately. If the data is very fresh, the search might be slower as brute force searching will be used on data that is still in process of being indexed.
Inserting the data
For this example, we are going to use the ResNet50 model provided by torch and its model hub. To get the embeddings, we are taking off the final classification layer, which results in the model giving us embeddings of 2048 dimensions. All the vision models found on torch use the same preprocessing that we have included here.
In these next few steps we will be:
Loading the data.
import glob

# Get the filepaths of the images
paths = glob.glob('./paintings/paintings/**/*.jpg', recursive=True)
len(paths)
Preprocessing the data into batches.
import torch

# Load the embedding model with the last layer removed
model = torch.hub.load('pytorch/vision:v0.10.0', 'resnet50', pretrained=True)
model = torch.nn.Sequential(*(list(model.children())[:-1]))
model.eval()
Embedding the data.
from torchvision import transforms

# Preprocessing for images
preprocess = transforms.Compose([
    transforms.Resize(256),
    transforms.CenterCrop(224),
    transforms.ToTensor(),
    transforms.Normalize(mean=[0.485, 0.456, 0.406], std=[0.229, 0.224, 0.225]),
])
Inserting the data.
from PIL import Image from tqdm import tqdm # Embed function that embeds the batch and inserts it def embed(data): with torch.no_grad(): output = model(torch.stack(data[0])).squeeze() collection.insert([data[1], output.tolist()]) data_batch = [[],[]] # Read the images into batches for embedding and insertion for path in tqdm(paths): im = Image.open(path).convert('RGB') data_batch[0].append(preprocess(im)) data_batch[1].append(path) if len(data_batch[0]) % BATCH_SIZE == 0: embed(data_batch) data_batch = [[],[]] # Embed and insert the remainder if len(data_batch[0]) != 0: embed(data_batch) # Call a flush to index any unsealed segments. collection.flush()- This step is relatively time-consuming because embedding takes time. Take a sip of coffee and relax.
- PyTorch may not work well with Python 3.9 and earlier versions. Consider using Python 3.10 and later versions instead.
Performing the search
With all the data inserted into Milvus, we can start performing our searches. In this example, we are going to search for two example images. Because we are doing a batch search, the search time is shared across the images of the batch.
import glob

# Get the filepaths of the search images
search_paths = glob.glob('./paintings/test_paintings/**/*.jpg', recursive=True)
len(search_paths)
import time
from matplotlib import pyplot as plt

# Embed the search images
def embed(data):
    with torch.no_grad():
        ret = model(torch.stack(data))
        # If more than one image, use squeeze
        if len(ret) > 1:
            return ret.squeeze().tolist()
        # Squeeze would remove batch for single image, so using flatten
        else:
            return torch.flatten(ret, start_dim=1).tolist()

data_batch = [[],[]]

for path in search_paths:
    im = Image.open(path).convert('RGB')
    data_batch[0].append(preprocess(im))
    data_batch[1].append(path)

embeds = embed(data_batch[0])
start = time.time()
res = collection.search(embeds, anns_field='image_embedding', param={'nprobe': 128}, limit=TOP_K, output_fields=['filepath'])
finish = time.time()
# Show the image results
f, axarr = plt.subplots(len(data_batch[1]), TOP_K + 1, figsize=(20, 10), squeeze=False)

for hits_i, hits in enumerate(res):
    axarr[hits_i][0].imshow(Image.open(data_batch[1][hits_i]))
    axarr[hits_i][0].set_axis_off()
    axarr[hits_i][0].set_title('Search Time: ' + str(finish - start))
    for hit_i, hit in enumerate(hits):
        axarr[hits_i][hit_i + 1].imshow(Image.open(hit.entity.get('filepath')))
        axarr[hits_i][hit_i + 1].set_axis_off()
        axarr[hits_i][hit_i + 1].set_title('Distance: ' + str(hit.distance))

# Save the search result in a separate image file alongside your script.
plt.savefig('search_result.png')
The search result image should be similar to the following:
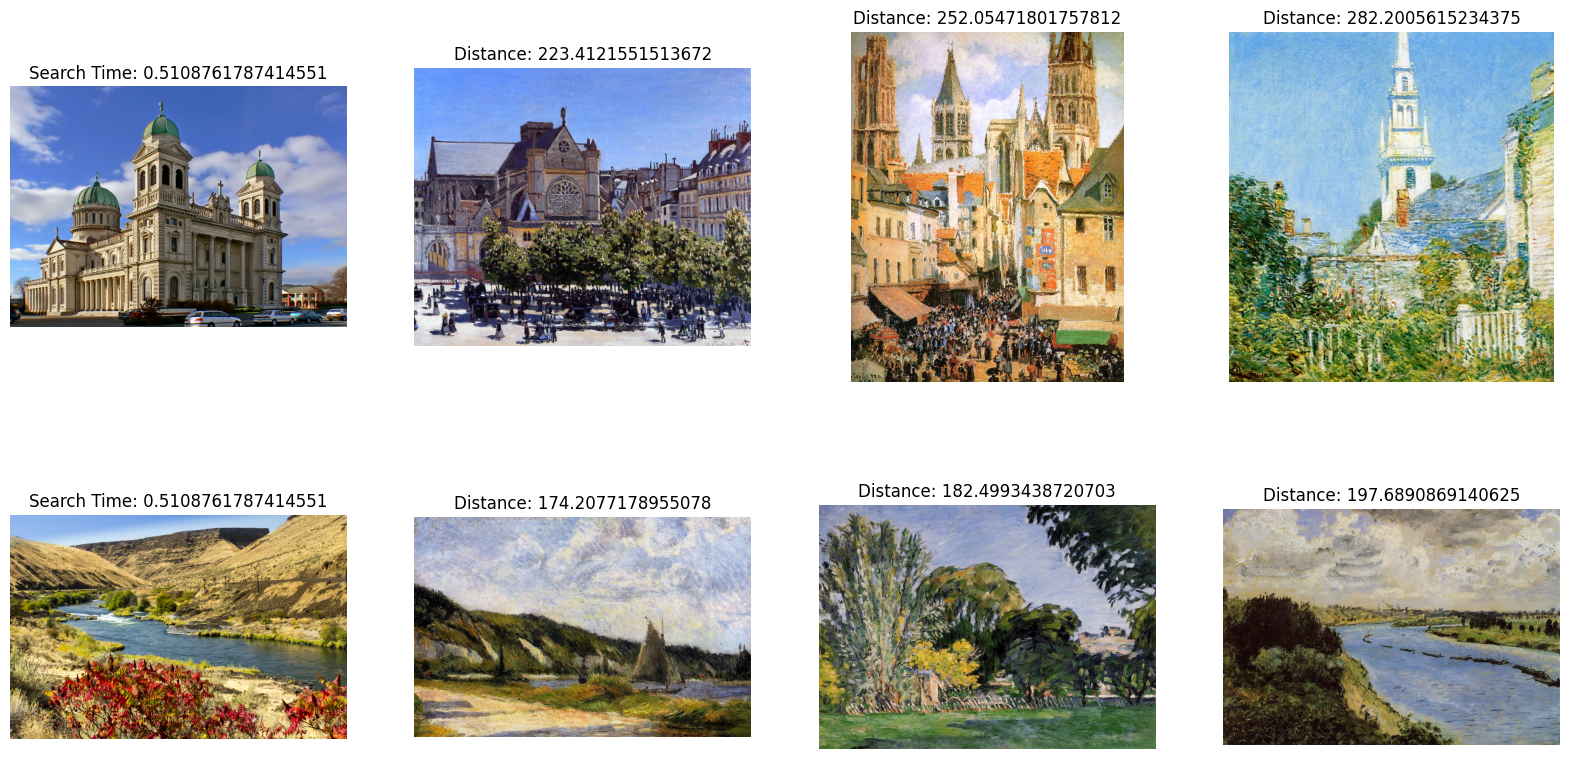 Image search output