Use Apache Spark™ with Milvus/Zilliz Cloud for AI Pipelines
The Spark-Milvus Connector provides integration of Apache Spark and Databricks with Milvus and Zilliz Cloud. It bridges Apache Spark’s powerful big data processing and machine learning (ML) features with Milvus’s state-of-the-art vector search capabilities. This integration enables streamlined workflow for AI-powered search, advanced analytics, ML training, and efficient management of large-scale vector data.
Apache Spark is a distributed data processing platform designed for handling massive datasets with high-speed computation. When paired with Milvus or Zilliz Cloud, it unlocks new possibilities for use cases such as semantic search, recommendation systems, and AI-driven data analytics.
For example, Spark can batch-process large datasets to generate embeddings via ML models, then use the Spark-Milvus connector to store these embeddings directly in Milvus or Zilliz Cloud. Once indexed, this data can be quickly searched or analyzed, creating a powerful pipeline for AI and big data workflows.
The Spark-Milvus connector supports tasks like iterative and bulk data ingestion into Milvus, synchronization of data between systems, and advanced analytics on vector data stored in Milvus. This guide will walk you through the steps to configure and use the connector effectively for use cases such as:
- Efficiently load vector data into Milvus in large batches,
- Move data between Milvus and other storage systems or databases,
- Analyzing the data in Milvus by leveraging Spark MLlib and other AI tools.
Quick start
Preparation
The Spark-Milvus Connector supports Scala and Python programming languages. Users can use it with Pyspark or Spark-shell. To run this demo, set up a Spark environment containing Spark-Milvus Connector dependency in the following steps:
Install Apache Spark (version >= 3.3.0)
You can install Apache Spark by referring to the official documentation.
Download the spark-milvus jar file.
wget https://github.com/zilliztech/spark-milvus/raw/1.0.0-SNAPSHOT/output/spark-milvus-1.0.0-SNAPSHOT.jarStart the Spark runtime with spark-milvus jar as one of the dependencies.
To start the Spark runtime with the Spark-Milvus Connector, add the downloaded spark-milvus as the dependency to the command.
pyspark
./bin/pyspark --jars spark-milvus-1.0.0-SNAPSHOT.jarspark-shell
./bin/spark-shell --jars spark-milvus-1.0.0-SNAPSHOT.jar
Demo
In this demo, we create a sample Spark DataFrame with vector data and write it to Milvus through the Spark-Milvus Connector. A collection will be created in Milvus automatically based on the schema and specified options.
from pyspark.sql import SparkSession

columns = ["id", "text", "vec"]
data = [(1, "a", [1.0,2.0,3.0,4.0,5.0,6.0,7.0,8.0]),
    (2, "b", [1.0,2.0,3.0,4.0,5.0,6.0,7.0,8.0]),
    (3, "c", [1.0,2.0,3.0,4.0,5.0,6.0,7.0,8.0]),
    (4, "d", [1.0,2.0,3.0,4.0,5.0,6.0,7.0,8.0])]
sample_df = spark.sparkContext.parallelize(data).toDF(columns)
sample_df.write \
    .mode("append") \
    .option("milvus.host", "localhost") \
    .option("milvus.port", "19530") \
    .option("milvus.collection.name", "hello_spark_milvus") \
    .option("milvus.collection.vectorField", "vec") \
    .option("milvus.collection.vectorDim", "8") \
    .option("milvus.collection.primaryKeyField", "id") \
    .format("milvus") \
    .save()
import org.apache.spark.sql.{SaveMode, SparkSession}

object Hello extends App {

  val spark = SparkSession.builder().master("local[*]")
    .appName("HelloSparkMilvus")
    .getOrCreate()

  import spark.implicits._

  // Create DataFrame
  val sampleDF = Seq(
    (1, "a", Seq(1.0,2.0,3.0,4.0,5.0)),
    (2, "b", Seq(1.0,2.0,3.0,4.0,5.0)),
    (3, "c", Seq(1.0,2.0,3.0,4.0,5.0)),
    (4, "d", Seq(1.0,2.0,3.0,4.0,5.0))
  ).toDF("id", "text", "vec")

  // set milvus options
  val milvusOptions = Map(
      "milvus.host" -> "localhost" -> uri,
      "milvus.port" -> "19530",
      "milvus.collection.name" -> "hello_spark_milvus",
      "milvus.collection.vectorField" -> "vec",
      "milvus.collection.vectorDim" -> "5",
      "milvus.collection.primaryKeyField", "id"
    )

  sampleDF.write.format("milvus")
    .options(milvusOptions)
    .mode(SaveMode.Append)
    .save()
}
After executing the above code, you can view the inserted data in Milvus using SDK or Attu (A Milvus Dashboard). You can find a collection named hello_spark_milvus created with 4 entities already inserted into it.
Features & concepts
Milvus options
In the Quick Start section, we have shown setting options during operations with Milvus. These options are abstracted as Milvus Options. They are used to create connections to Milvus and control other Milvus behaviors. Not all of the options are mandatory.
| Option Key | Default Value | Description |
|---|---|---|
milvus.host | localhost | Milvus server host. See Manage Milvus Connections for detail. |
milvus.port | 19530 | Milvus server port. See Manage Milvus Connections for detail. |
milvus.username | root | Username for Milvus server. See Manage Milvus Connections for detail. |
milvus.password | Milvus | Password for Milvus server. See Manage Milvus Connections for detail. |
milvus.uri | -- | Milvus server URI. See Manage Milvus Connections for detail. |
milvus.token | -- | Milvus server token. See Manage Milvus Connections for detail. |
milvus.database.name | default | Name of the Milvus database to read or write. |
milvus.collection.name | hello_milvus | Name of the Milvus collection to read or write. |
milvus.collection.primaryKeyField | None | Name of the primary key field in the collection. Required if the collection does not exist. |
milvus.collection.vectorField | None | Name of the vector field in the collection. Required if the collection does not exist. |
milvus.collection.vectorDim | None | Dimension of the vector field in the collection. Required if the collection does not exist. |
milvus.collection.autoID | false | If the collection does not exist, this option specifies whether to automatically generate IDs for the entities. For more information, see create_collection |
milvus.bucket | a-bucket | Bucket name in the Milvus storage. This should be the same as minio.bucketName in milvus.yaml. |
milvus.rootpath | files | Root path of the Milvus storage. This should be the same as minio.rootpath in milvus.yaml. |
milvus.fs | s3a:// | File system of the Milvus storage. The value s3a:// applies to open-source Spark. Use s3:// for Databricks. |
milvus.storage.endpoint | localhost:9000 | Endpoint of the Milvus storage. This should be the same as minio.address:minio.port in milvus.yaml. |
milvus.storage.user | minioadmin | User of the Milvus storage. This should be the same as minio.accessKeyID in milvus.yaml. |
milvus.storage.password | minioadmin | Password of the Milvus storage. This should be the same as minio.secretAccessKey in milvus.yaml. |
milvus.storage.useSSL | false | Whether to use SSL for the Milvus storage. This should be the same as minio.useSSL in milvus.yaml. |
Milvus data format
The Spark-Milvus Connector supports reading and writing data in the following Milvus data formats:
milvus: Milvus data format for seamless conversion from Spark DataFrame to Milvus entities.milvusbinlog: Milvus data format for reading Milvus build-in binlog data.mjson: Milvus JSON format for bulk-inserting data into Milvus.
milvus
In Quick start, we use the milvus format to write sample data into a Milvus cluster. The milvus format is a new data format that supports seamlessly writing Spark DataFrame data into Milvus Collections. This is achieved by batch calls to the Insert API of Milvus SDK. If a collection doesn’t exist in Milvus, a new collection will be created based on the schema of the Dataframe. However, the automatically created collection may not support all features of the collection schema. Therefore, it is recommended to create a collection via SDK first and then use spark-milvus for writing. For further information, please refer to the demo.
milvusbinlog
The new data format milvusbinlog is for reading Milvus built-in binlog data. Binlog is Milvus’s internal data storage format based on parquet. Unfortunately, it can’t be read by a regular parquet library, so we implemented this new data format to help Spark job read it. It is not recommended to use milvusbinlog directly unless you are familiar with the milvus internal storage details. We suggest using the MilvusUtils function that will be introduced in the next section.
val df = spark.read
  .format("milvusbinlog")
  .load(path)
  .withColumnRenamed("val", "embedding")
mjson
Milvus provides Bulkinsert functionality for better writing performance when operating with large datasets. However, the JSON format used by Milvus is slightly different than Spark’s default JSON output format. To resolve this, we introduce mjson data format to generate data that meets Milvus requirements. Here is an example that shows the difference between JSON-lines and mjson:
JSON-lines:
{"book_id": 101, "word_count": 13, "book_intro": [1.1, 1.2]}
{"book_id": 102, "word_count": 25, "book_intro": [2.1, 2.2]}
{"book_id": 103, "word_count": 7, "book_intro": [3.1, 3.2]}
{"book_id": 104, "word_count": 12, "book_intro": [4.1, 4.2]}
{"book_id": 105, "word_count": 34, "book_intro": [5.1, 5.2]}
mjson (Required for Milvus Bulkinsert):
{
    "rows":[
        {"book_id": 101, "word_count": 13, "book_intro": [1.1, 1.2]},
        {"book_id": 102, "word_count": 25, "book_intro": [2.1, 2.2]},
        {"book_id": 103, "word_count": 7, "book_intro": [3.1, 3.2]},
        {"book_id": 104, "word_count": 12, "book_intro": [4.1, 4.2]},
        {"book_id": 105, "word_count": 34, "book_intro": [5.1, 5.2]}
    ]
}
This will be improved in the future. We recommend using parquet format in spark-milvus intergration if your Milvus version is v2.3.7+ which supports bulkinsert with Parquet format. See Demo on Github.
MilvusUtils
MilvusUtils contains several useful util functions. Currently it is only supported in Scala. More usage examples are in Advanced Usage section.
MilvusUtils.readMilvusCollection
MilvusUtils.readMilvusCollection is a simple interface for loading a whole Milvus collection into a Spark Dataframe. It wraps various operations, including calling Milvus SDK, reading milvusbinlog and common union/join operations.
val collectionDF = MilvusUtils.readMilvusCollection(spark, milvusOptions)
MilvusUtils.bulkInsertFromSpark
MilvusUtils.bulkInsertFromSpark provides a convenient way to import Spark output files into Milvus in a large batch. It wraps the Bullkinsert API of the Milvus SDK.
df.write.format("parquet").save(outputPath)
MilvusUtils.bulkInsertFromSpark(spark, milvusOptions, outputPath, "parquet")
Advanced Usage
In this section, you will find advanced usage examples of the Spark-Milvus Connector for data analysis and migration. For more demos, see examples.
MySQL -> embedding -> Milvus
In this demo, we will
- Read data from MySQL through the Spark-MySQL Connector,
- Generate embedding (using Word2Vec as an example), and
- Write embedded data into Milvus.
To enable the Spark-MySQL Connector, you need to add the following dependency to your Spark environment:
spark-shell --jars spark-milvus-1.0.0-SNAPSHOT.jar,mysql-connector-j-x.x.x.jar
import org.apache.spark.ml.feature.{Tokenizer, Word2Vec}
import org.apache.spark.sql.functions.udf
import org.apache.spark.sql.{SaveMode, SparkSession}
import zilliztech.spark.milvus.MilvusOptions._

import org.apache.spark.ml.linalg.Vector

object Mysql2MilvusDemo  extends App {

  val spark = SparkSession.builder().master("local[*]")
    .appName("Mysql2MilvusDemo")
    .getOrCreate()

  import spark.implicits._

  // Create DataFrame
  val sampleDF = Seq(
    (1, "Milvus was created in 2019 with a singular goal: store, index, and manage massive embedding vectors generated by deep neural networks and other machine learning (ML) models."),
    (2, "As a database specifically designed to handle queries over input vectors, it is capable of indexing vectors on a trillion scale. "),
    (3, "Unlike existing relational databases which mainly deal with structured data following a pre-defined pattern, Milvus is designed from the bottom-up to handle embedding vectors converted from unstructured data."),
    (4, "As the Internet grew and evolved, unstructured data became more and more common, including emails, papers, IoT sensor data, Facebook photos, protein structures, and much more.")
  ).toDF("id", "text")

  // Write to MySQL Table
  sampleDF.write
    .mode(SaveMode.Append)
    .format("jdbc")
    .option("driver","com.mysql.cj.jdbc.Driver")
    .option("url", "jdbc:mysql://localhost:3306/test")
    .option("dbtable", "demo")
    .option("user", "root")
    .option("password", "123456")
    .save()

  // Read from MySQL Table
  val dfMysql = spark.read
    .format("jdbc")
    .option("driver","com.mysql.cj.jdbc.Driver")
    .option("url", "jdbc:mysql://localhost:3306/test")
    .option("dbtable", "demo")
    .option("user", "root")
    .option("password", "123456")
    .load()

  val tokenizer = new Tokenizer().setInputCol("text").setOutputCol("tokens")
  val tokenizedDf = tokenizer.transform(dfMysql)

  // Learn a mapping from words to Vectors.
  val word2Vec = new Word2Vec()
    .setInputCol("tokens")
    .setOutputCol("vectors")
    .setVectorSize(128)
    .setMinCount(0)
  val model = word2Vec.fit(tokenizedDf)

  val result = model.transform(tokenizedDf)

  val vectorToArrayUDF = udf((v: Vector) => v.toArray)
  // Apply the UDF to the DataFrame
  val resultDF = result.withColumn("embedding", vectorToArrayUDF($"vectors"))
  val milvusDf = resultDF.drop("tokens").drop("vectors")

  milvusDf.write.format("milvus")
    .option(MILVUS_HOST, "localhost")
    .option(MILVUS_PORT, "19530")
    .option(MILVUS_COLLECTION_NAME, "text_embedding")
    .option(MILVUS_COLLECTION_VECTOR_FIELD, "embedding")
    .option(MILVUS_COLLECTION_VECTOR_DIM, "128")
    .option(MILVUS_COLLECTION_PRIMARY_KEY, "id")
    .mode(SaveMode.Append)
    .save()
}
Milvus -> Transform -> Milvus
In this demo, we will
- Read data from a Milvus collection,
- Apply a transformation (using PCA as an example), and
- Write the transformed data into another Milvus via the Bulkinsert API.
The PCA model is a tranformation model that reduces the dimensionality of embedding vectors, which is a common operation in machine learning. You can add any other processing operations, such as filtering, joining, or normalizing, to the transformation step.
import org.apache.spark.ml.feature.PCA
import org.apache.spark.ml.linalg.{Vector, Vectors}
import org.apache.spark.SparkConf
import org.apache.spark.sql.SparkSession
import org.apache.spark.sql.functions.udf
import org.apache.spark.sql.util.CaseInsensitiveStringMap
import zilliztech.spark.milvus.{MilvusOptions, MilvusUtils}

import scala.collection.JavaConverters._

object TransformDemo extends App {
  val sparkConf = new SparkConf().setMaster("local")
  val spark = SparkSession.builder().config(sparkConf).getOrCreate()

  import spark.implicits._

  val host = "localhost"
  val port = 19530
  val user = "root"
  val password = "Milvus"
  val fs = "s3a://"
  val bucketName = "a-bucket"
  val rootPath = "files"
  val minioAK = "minioadmin"
  val minioSK = "minioadmin"
  val minioEndpoint = "localhost:9000"
  val collectionName = "hello_spark_milvus1"
  val targetCollectionName = "hello_spark_milvus2"

  val properties = Map(
    MilvusOptions.MILVUS_HOST -> host,
    MilvusOptions.MILVUS_PORT -> port.toString,
    MilvusOptions.MILVUS_COLLECTION_NAME -> collectionName,
    MilvusOptions.MILVUS_BUCKET -> bucketName,
    MilvusOptions.MILVUS_ROOTPATH -> rootPath,
    MilvusOptions.MILVUS_FS -> fs,
    MilvusOptions.MILVUS_STORAGE_ENDPOINT -> minioEndpoint,
    MilvusOptions.MILVUS_STORAGE_USER -> minioAK,
    MilvusOptions.MILVUS_STORAGE_PASSWORD -> minioSK,
  )

  // 1, configurations
  val milvusOptions = new MilvusOptions(new CaseInsensitiveStringMap(properties.asJava))

  // 2, batch read milvus collection data to dataframe
  //  Schema: dim of `embeddings` is 8
  // +-+------------+------------+------------------+
  // | | field name | field type | other attributes |
  // +-+------------+------------+------------------+
  // |1|    "pk"    |    Int64   |  is_primary=True |
  // | |            |            |   auto_id=False  |
  // +-+------------+------------+------------------+
  // |2|  "random"  |    Double  |                  |
  // +-+------------+------------+------------------+
  // |3|"embeddings"| FloatVector|     dim=8        |
  // +-+------------+------------+------------------+
  val arrayToVectorUDF = udf((arr: Seq[Double]) => Vectors.dense(arr.toArray[Double]))
  val collectionDF = MilvusUtils.readMilvusCollection(spark, milvusOptions)
    .withColumn("embeddings_vec", arrayToVectorUDF($"embeddings"))
    .drop("embeddings")

  // 3. Use PCA to reduce dim of vector
  val dim = 4
  val pca = new PCA()
    .setInputCol("embeddings_vec")
    .setOutputCol("pca_vec")
    .setK(dim)
    .fit(collectionDF)
  val vectorToArrayUDF = udf((v: Vector) => v.toArray)
  // embeddings dim number reduce to 4
  // +-+------------+------------+------------------+
  // | | field name | field type | other attributes |
  // +-+------------+------------+------------------+
  // |1|    "pk"    |    Int64   |  is_primary=True |
  // | |            |            |   auto_id=False  |
  // +-+------------+------------+------------------+
  // |2|  "random"  |    Double  |                  |
  // +-+------------+------------+------------------+
  // |3|"embeddings"| FloatVector|     dim=4        |
  // +-+------------+------------+------------------+
  val pcaDf = pca.transform(collectionDF)
    .withColumn("embeddings", vectorToArrayUDF($"pca_vec"))
    .select("pk", "random", "embeddings")

  // 4. Write PCAed data to S3
  val outputPath = "s3a://a-bucket/result"
  pcaDf.write
    .mode("overwrite")
    .format("parquet")
    .save(outputPath)

  // 5. Config MilvusOptions of target table
  val targetProperties = Map(
    MilvusOptions.MILVUS_HOST -> host,
    MilvusOptions.MILVUS_PORT -> port.toString,
    MilvusOptions.MILVUS_COLLECTION_NAME -> targetCollectionName,
    MilvusOptions.MILVUS_BUCKET -> bucketName,
    MilvusOptions.MILVUS_ROOTPATH -> rootPath,
    MilvusOptions.MILVUS_FS -> fs,
    MilvusOptions.MILVUS_STORAGE_ENDPOINT -> minioEndpoint,
    MilvusOptions.MILVUS_STORAGE_USER -> minioAK,
    MilvusOptions.MILVUS_STORAGE_PASSWORD -> minioSK,
  )
  val targetMilvusOptions = new MilvusOptions(new CaseInsensitiveStringMap(targetProperties.asJava))

  // 6. Bulkinsert Spark output files into milvus
  MilvusUtils.bulkInsertFromSpark(spark, targetMilvusOptions, outputPath, "parquet")
}
Databricks -> Zilliz Cloud
If you are using Zilliz Cloud (the managed Milvus service), you can leverage its convenient Data Import API. Zilliz Cloud provides comprehensive tools and documentation to help you efficiently move your data from various data sources, including Spark and Databricks. Simply set up an S3 bucket as an intermediary and open its access to your Zilliz Cloud account. The Zilliz Cloud’s Data Import API will automatically load the full batch of data from the S3 bucket to your Zilliz Cloud cluster.
Preparations
Load the Spark runtime by adding a jar file to your Databricks Cluster.
You can install a library in different ways. This screenshot shows uploading a jar from local to the cluster. For more information, see Cluster Libraries in the Databricks documentation.
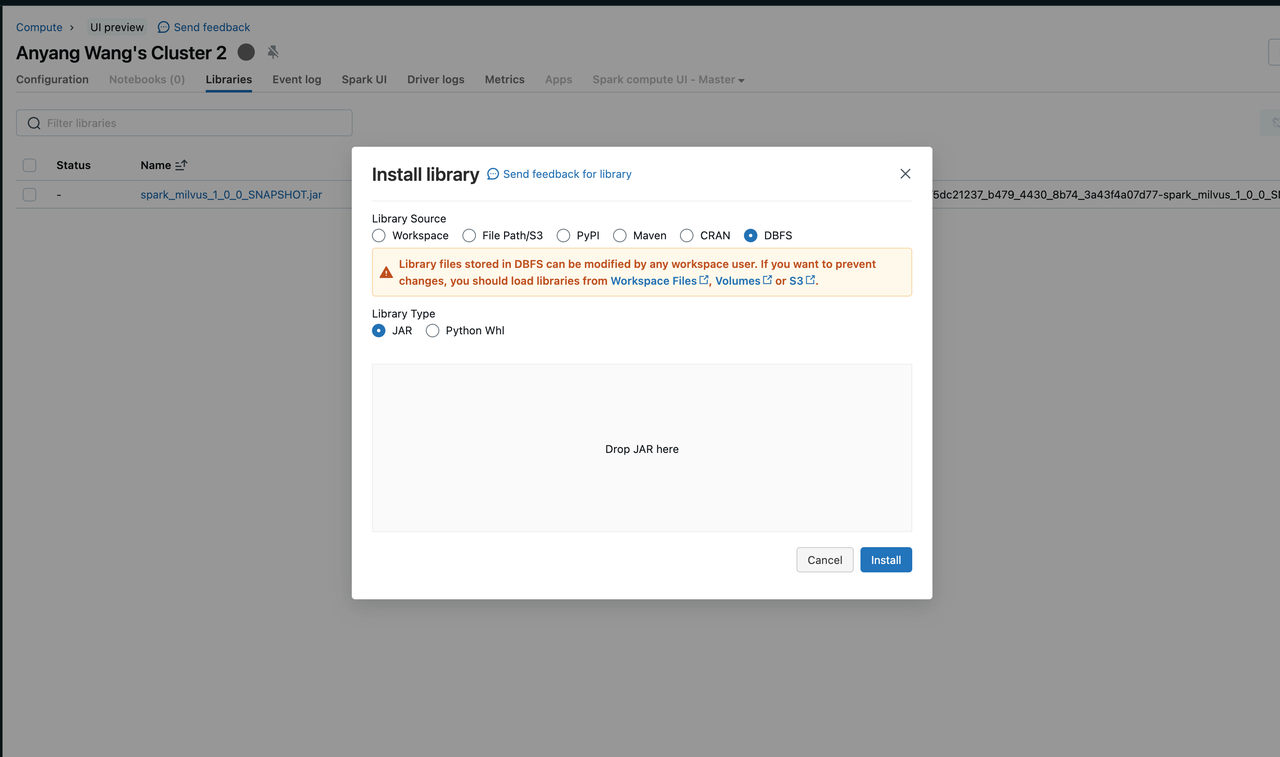 Install Databricks Library
Create an S3 bucket and configure it as an external storage location for you Databricks cluster.
Bulkinsert required data to be stored in a temporary bucket so that Zilliz Cloud can import the data in a batch. You can create an S3 bucket and configure it as an external location of databricks. Please refer to External locations for details.
Secure you Databricks credentials.
For more details, refer to the instructions on the blog Securely Managing Credentials in Databricks.
Demo
Here’s a code snippet showcasing the batch data migration process. Similar to the above Milvus example, you just need to replace the credential and S3 bucket address.
// Write the data in batch into the Milvus bucket storage.
val outputPath = "s3://my-temp-bucket/result"
df.write
  .mode("overwrite")
  .format("mjson")
  .save(outputPath)
// Specify Milvus options.
val targetProperties = Map(
  MilvusOptions.MILVUS_URI -> zilliz_uri,
  MilvusOptions.MILVUS_TOKEN -> zilliz_token,
  MilvusOptions.MILVUS_COLLECTION_NAME -> targetCollectionName,
  MilvusOptions.MILVUS_BUCKET -> bucketName,
  MilvusOptions.MILVUS_ROOTPATH -> rootPath,
  MilvusOptions.MILVUS_FS -> fs,
  MilvusOptions.MILVUS_STORAGE_ENDPOINT -> minioEndpoint,
  MilvusOptions.MILVUS_STORAGE_USER -> minioAK,
  MilvusOptions.MILVUS_STORAGE_PASSWORD -> minioSK,
)
val targetMilvusOptions = new MilvusOptions(new CaseInsensitiveStringMap(targetProperties.asJava))

// Bulk insert Spark output files into Milvus
MilvusUtils.bulkInsertFromSpark(spark, targetMilvusOptions, outputPath, "mjson")
Hands-on Notebook
To help you quickly get started with the Spark-Milvus Connector, you can checkout the notebook that walks you through both the streaming and batch data ingestion examples for Spark to Milvus and Zilliz Cloud.