Quickly Test and Deploy Vector Search Solutions with the Milvus 2.0 Bootcamp
With the release of Milvus 2.0, the team has revamped the Milvus bootcamp. The new and improved bootcamp offers updated guides and easier to follow code examples for a variety of use cases and deployments. Additionally, this new version is updated for Milvus 2.0, a reimagined version of the world's most advanced vector databse.
Stress test your system against 1M and 100M dataset benchmarks
The benchmark directory contains 1 million and 100 million vector benchmark tests that indicate how your system will react to differently sized datasets.
Explore and build popular vector similarity search solutions
The solution directory includes the most popular vector similarity search use cases. Each use case contains a notebook solution and a docker deployable solution. Use cases include:
- Image similarity search
- Video similarity search
- Audio similarity search
- Recommendation system
- Molecular search
- Question answering system
Quickly deploy a fully built application on any system
The quick deploy solutions are dockerized solutions that allow users to deploy fully built applications on any system. These solutions are ideal for brief demos, but require additional work to customize and understand compared to notebooks.
Use scenario specific notebooks to easily deploy pre-configured applications
The notebooks contain a simple example of deploying Milvus to solve the problem in a given use case. Each of the examples are able to be run from start to finish without the need to manage files or configurations. Each notebook is also easy to follow and modifiable, making them ideal base files for other projects.
Image similarity search notebook example
Image similarity search is one of the core ideas behind many different technologies, including autonomous cars recognizing objects. This example explains how to easily build computer vision programs with Milvus.
This notebookrevolves around three things:
- Milvus server
- Redis server (for metadata storage)
- Pretrained Resnet-18 model.
Step 1: Download required packages
Begin by downloading all the required packages for this project. This notebook includes a table listing the packages to use.
pip install -r requirements.txt
Step 2: Server startup
After the packages are installed, start the servers and ensure both are running properly. Be sure to follow the correct instructions for starting the Milvus and Redis servers.
Step 3: Download project data
By default, this notebook pulls a snippet of the VOCImage data for use as an example, but any directory with images should work as long as it follows the file structure that can be seen at the top of the notebook.
! gdown "https://drive.google.com/u/1/uc?id=1jdudBiUu41kL-U5lhH3ari_WBRXyedWo&export=download"
! tar -xf 'VOCdevkit.zip'
! rm 'VOCdevkit.zip'
Step 4: Connect to the servers
In this example, the servers are running on the default ports on the localhost.
connections.connect(host="127.0.0.1", port=19537)
red = redis.Redis(host = '127.0.0.1', port=6379, db=0)
Step 5: Create a collection
After starting the servers, create a collection in Milvus for storing all the vectors. In this example, the dimension size is set to 512, the size of the resnet-18 output, and the similarity metric is set to the Euclidean distance (L2). Milvus supports a variety of different similarity metrics.
collection_name = "image_similarity_search"
dim = 512
default_fields = [
    schema.FieldSchema(name="id", dtype=DataType.INT64, is_primary=True, auto_id=True),
    schema.FieldSchema(name="vector", dtype=DataType.FLOAT_VECTOR, dim=dim)
]
default_schema = schema.CollectionSchema(fields=default_fields, description="Image test collection")
collection = Collection(name=collection_name, schema=default_schema)
Step 6: Build an index for the collection
Once the collection is made, build an index for it. In this case, the IVF_SQ8 index is used. This index requires the 'nlist' parameter, which tells Milvus how many clusters to make within each datafile (segment). Different indices require different parameters.
default_index = {"index_type": "IVF_SQ8", "params": {"nlist": 2048}, "metric_type": "L2"}
collection.create_index(field_name="vector", index_params=default_index)
collection.load()
Step 7: Set up model and data loader
After the IVF_SQ8 index is built, set up the neural network and data loader. The pretrained pytorch resnet-18 used in this example is sans its last layer, which compresses vectors for classification and may lose valuable information.
model = torch.hub.load('pytorch/vision:v0.9.0', 'resnet18', pretrained=True)
encoder = torch.nn.Sequential(*(list(model.children())[:-1]))
The dataset and data loader needs to be modified so that they are able to preprocess and batch the images while also providing the file paths of the images. This can be done with a slightly modified torchvision dataloader. For preprocessing, the images need to be cropped and normalized due to the resnet-18 model being trained on a specific size and value range.
dataset = ImageFolderWithPaths(data_dir, transform=transforms.Compose([
                                                transforms.Resize(256),
                                                transforms.CenterCrop(224),
                                                transforms.ToTensor(),
                                                transforms.Normalize(mean=[0.485, 0.456, 0.406], std=[0.229, 0.224, 0.225])]))

dataloader = torch.utils.data.DataLoader(dataset, num_workers=0, batch_si
Step 8: Insert vectors into the collection
With the collection setup, the images can be processed and loaded into the created collection. First the images are pulled by the dataloader and run through the resnet-18 model. The resulting vector embeddings are then inserted into Milvus, which returns a unique ID for each vector. The vector IDs and image file paths are then inserted as key-value pairs into the Redis server.
steps = len(dataloader)
step = 0
for inputs, labels, paths in dataloader:
    with torch.no_grad():
        output = encoder(inputs).squeeze()
        output = output.numpy()

    mr = collection.insert([output.tolist()])
    ids = mr.primary_keys
    for x in range(len(ids)):
        red.set(str(ids[x]), paths[x])
    if step%5 == 0:
        print("Insert Step: " + str(step) + "/" + str(steps))
    step += 1
Step 9: Conduct a vector similarity search
Once all of the data is inserted into Milvus and Redis, the actual vector similarity search can be performed. For this example, three randomly selected images are pulled out of the Redis server for a vector similarity search.
random_ids = [int(red.randomkey()) for x in range(3)]
search_images = [x.decode("utf-8") for x in red.mget(random_ids)]
These images first go through the same preprocessing that is found in Step 7 and are then pushed through the resnet-18 model.
transform_ops = transforms.Compose([
                transforms.Resize(256),
                transforms.CenterCrop(224),
                transforms.ToTensor(),
                transforms.Normalize(mean=[0.485, 0.456, 0.406], std=[0.229, 0.224, 0.225])])

embeddings = [transform_ops(Image.open(x)) for x in search_images]
embeddings = torch.stack(embeddings, dim=0)

with torch.no_grad():
    embeddings = encoder(embeddings).squeeze().numpy()
Then the resulting vector embeddings are used to perform a search. First, set the search parameters, including the name of the collection to search, nprobe (the number of the clusters to search), and top_k (the number of returned vectors). In this example, the search should be very quick.
search_params = {"metric_type": "L2", "params": {"nprobe": 32}}
start = time.time()
results = collection.search(embeddings, "vector", param=search_params, limit=3, expr=None)
end = time.time() - start
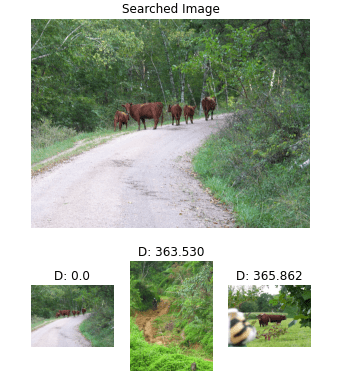
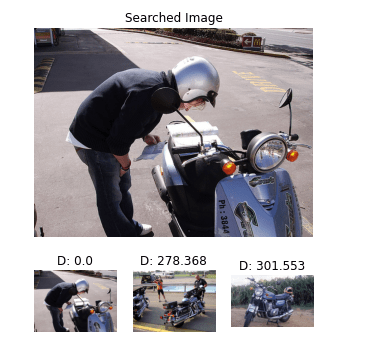
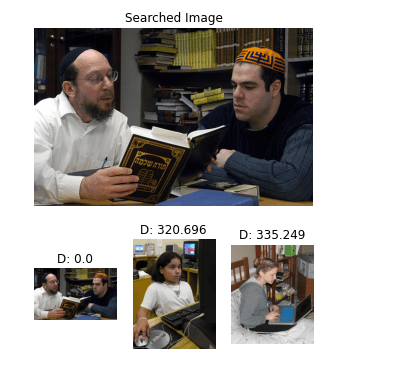
Step 10: Image search results
The vector IDs returned from the queries are used to find the corresponding images. Matplotlib is then used to display the image search results.
 pic1.png
 pic2.png
 pic3.png
Learn how to deploy Milvus in different enviroments
The deployments section of the new bootcamp contains all the information for using Milvus in different environments and setups. It includes deploying Mishards, using Kubernetes with Milvus, load balancing, and more. Each environment has a detailed step by step guide explaining how to get Milvus working in it.
Don't be a stranger
Like the article? Spread the word